Dodge Dakota (ND). Manual — part 860
CRANKCASE OIL LEVEL INSPECTION
CAUTION: Do not overfill crankcase with engine oil, pressure loss or oil foaming can result.
Inspect engine oil level approximately every 800 kilometers (500 miles). Unless the engine has exhibited loss of oil
pressure, run the engine for about five minutes before checking oil level. Checking engine oil level on a cold engine
is not accurate.
To ensure proper lubrication of an engine, the engine oil must be maintained at an acceptable level. The acceptable
levels are indicated between the ADD and SAFE marks on the engine oil dipstick.
1. Position vehicle on level surface.
2. With engine OFF, allow approximately ten minutes for oil to settle to bottom of crankcase, remove engine oil
dipstick.
3. Wipe dipstick clean.
4. Install dipstick and verify it is seated in the tube.
5. Remove dipstick, with handle held above the tip, take oil level reading.
6. Add oil only if level is below the ADD mark on dipstick.
ENGINE OIL CHANGE
Change engine oil at mileage and time intervals described in Maintenance Schedules.
Run engine until achieving normal operating temperature.
1. Position the vehicle on a level surface and turn engine off.
2. Hoist and support vehicle on safety stands.
3. Remove oil fill cap.
4. Place a suitable drain pan under crankcase drain.
5. Remove drain plug from crankcase and allow oil to drain into pan. Inspect drain plug threads for stretching or
other damage. Replace drain plug if damaged.
6. Install drain plug in crankcase.
7. Lower vehicle and fill crankcase with specified type and amount of engine oil described in this section.
8. Install oil fill cap.
9. Start engine and inspect for leaks.
10. Stop engine and inspect oil level.
NOTE: Care should be exercised when disposing used engine oil after it has been drained from a vehicle
engine. Refer to the WARNING at beginning of this section.
9 - 978
ENGINE - 4.7L SERVICE INFORMATION
ND

FILTER - ENGINE OIL
REMOVAL
All engines are equipped with a high quality full-flow,
disposable type oil filter. DaimlerChrysler Corporation
recommends a Mopar
T
or equivalent oil filter be used.
1. Position a drain pan under the oil filter.
2. Using a suitable oil filter wrench loosen filter.
3. Rotate the oil filter counterclockwise to remove it
from the cylinder block oil filter boss.
4. When filter separates from cylinder block oil filter
boss, tip gasket end upward to minimize oil spill.
Remove filter from vehicle.
NOTE: Make sure filter gasket was removed with
filter.
5. With a wiping cloth, clean the gasket sealing sur-
face of oil and grime.
INSTALLATION
1. Lightly lubricate oil filter gasket (2) with engine oil.
2. Thread filter (3) onto adapter nipple. When gasket
makes contact with sealing surface, hand tighten
filter one full turn, do not over tighten.
3. Add oil, verify crankcase oil level and start engine.
Inspect for oil leaks.
ND
ENGINE - 4.7L SERVICE INFORMATION
9 - 979
PAN-ENGINE OIL
REMOVAL
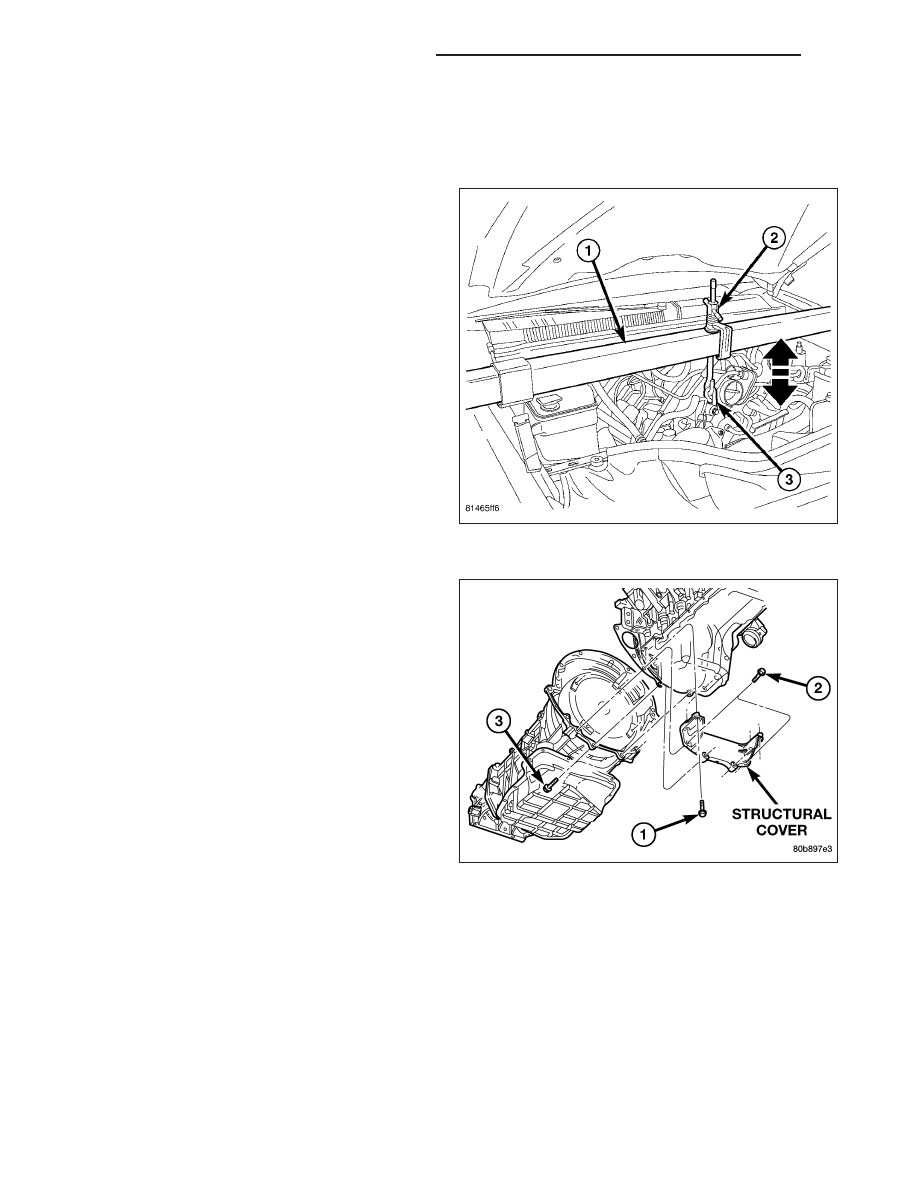
1. Disconnect the negative battery cable.
2. Install engine support fixture (1) special tool #
8534. Do not raise engine at this time.
3. Remove both left and right side engine mount
through bolts.
4. Remove the structural dust cover.
5. Drain engine oil.
9 - 980
ENGINE - 4.7L SERVICE INFORMATION
ND
CAUTION: Only raise the engine enough to pro-
vide clearance for oil pan removal. Check for
proper clearance at fan shroud to fan and cowl to
intake manifold.
6. Raise engine using special tool (1) # 8534 to pro-
vide clearance to remove oil pan.
NOTE: On 4WD vehicles, the front axle must be
lowered, to provide clearance for oil pan removal.
It is not necessary to remove the front axle from
the vehicle, or remove the axle shafts.
7. For 4WD Vehicles Remove the pinion bracket.
8. For 4WD Vehicles Disconnect the front driveshaft
at the front axle.
9. For 4WD Vehicles Remove the front axle mount-
ing bolts.
10. For 4WD Vehicles Lower axle using suitable jack
enough to provide clearance to remove oil pan.
NOTE: Do not pry on oil pan or oil pan gasket. Gasket is integral to engine windage tray and does not come
out with oil pan.
11. Remove the oil pan mounting bolts and oil pan.
12. Unbolt oil pump pickup tube and remove tube.
13. Inspect the integral windage tray and gasket and replace as needed.
INSTALLATION
1. Clean the oil pan gasket mating surface of the bed-
plate and oil pan.
2. Position the oil pan gasket and pickup tube with
new o-ring. Install the mounting bolt and nuts.
Tighten bolt and nuts to 28 N·m (20 ft. lbs.).
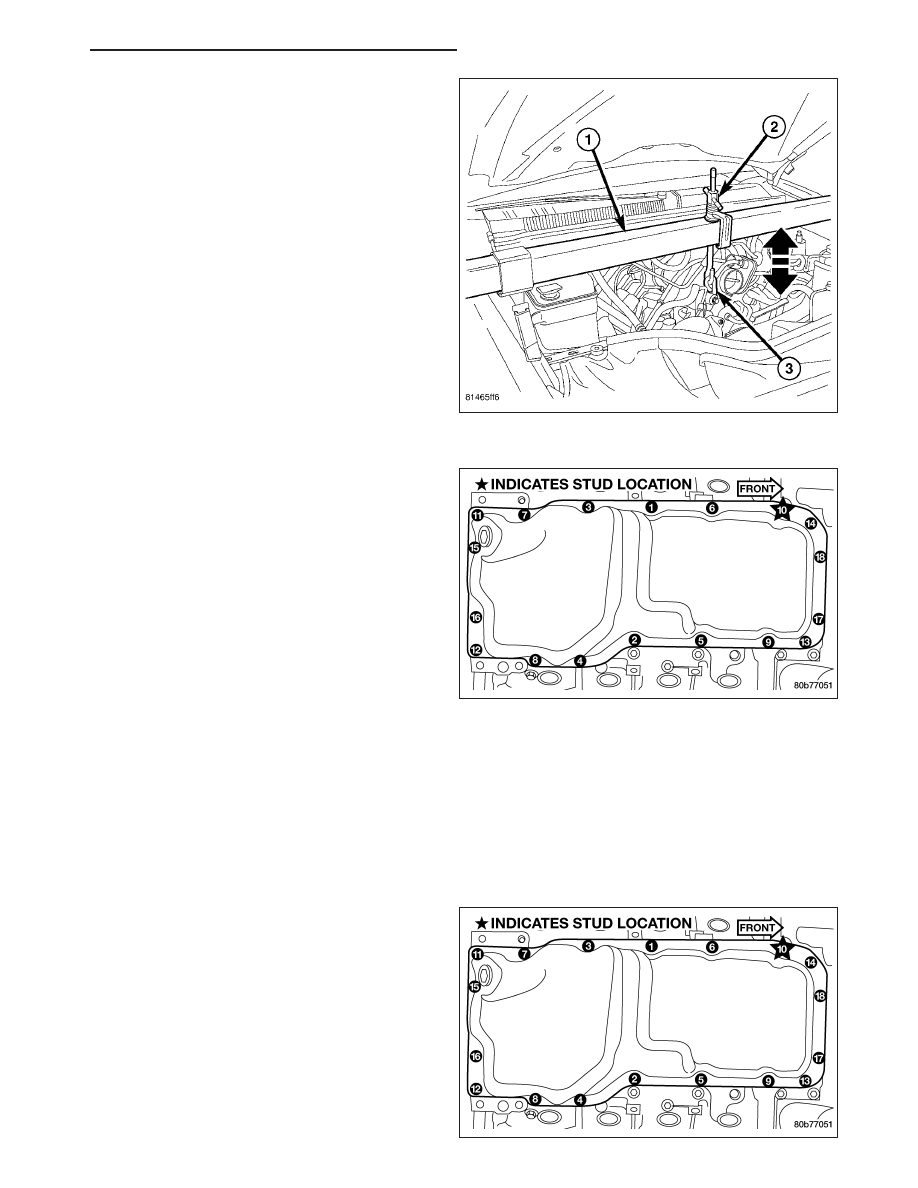
3. Position the oil pan and install the mounting bolts.
Tighten the mounting bolts to 15 N·m (11 ft. lbs.) in
the sequence shown.
ND
ENGINE - 4.7L SERVICE INFORMATION
9 - 981
Нет комментариевНе стесняйтесь поделиться с нами вашим ценным мнением.
Текст