Dodge Dakota (ND). Manual — part 975
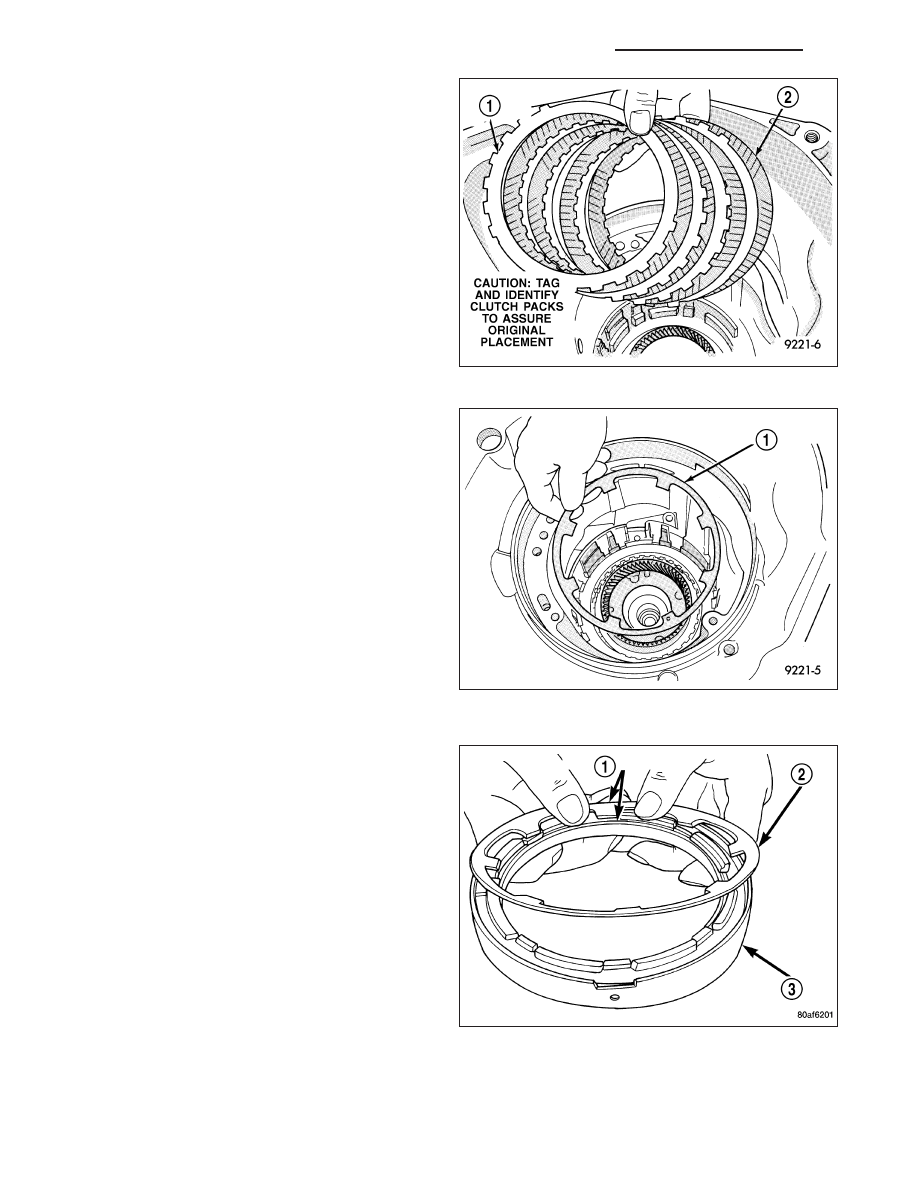
29. Install 2/4 clutch pack (1, 2).
NOTE: The 2/4 Clutch Piston has bonded seals
which
are
not
individually
serviceable.
Seal
replacement requires replacement of the piston
assembly.
30. Install 2/4 clutch belleville spring (1).
31. Verify the proper orientation of the return spring
(2) to the 2/4 retainer (3).
21 - 292
AUTOMATIC TRANSMISSION 42RLE - SERVICE INFORMATION
ND
32. Install 2/4 clutch retainer (1).
NOTE: Verify that Tool 5058A (1) is centered prop-
erly over the 2/4 clutch retainer (4) before com-
pressing. If necessary, fasten the 5058A bar to the
bellhousing flange with any combination of lock-
ing pliers and bolts to center the tool properly.
33. Set up Tool 5058 (1) as shown. Compress 2/4
clutch
just
enough
to
facilitate
snap
ring
installation.
34. Measure 2/4 clutch clearance: Set up dial indi-
cator (1) as shown. Press down clutch pack with
finger and zero dial indicator. Record measure-
ment in four (4) places and take average reading.
The 2/4 clutch pack clearance is 0.76 to 2.64
mm (0.030 to 0.104 inch). If not within specifica-
tions, the clutch is not assembled properly or is
excessively worn. There is no adjustment for
the 2/4 clutch clearance.
ND
AUTOMATIC TRANSMISSION 42RLE - SERVICE INFORMATION
21 - 293

35. Install the #7 needle bearing (1) to the rear sun
gear (2). The number 7 needle bearing has
three antireversal tabs and is common with
the number 5 and number 2 position. The ori-
entation should allow the bearing to seat flat
against the rear sun gear. A small amount of
petrolatum can be used to hold the bearing to
the rear sun gear.
36. Install rear sun gear (2) and #7 needle bearing
(1).
37. Install front carrier/rear annulus assembly (2) and
#6 needle bearing (1).
21 - 294
AUTOMATIC TRANSMISSION 42RLE - SERVICE INFORMATION
ND

38. Install front sun gear assembly (1) and #4 thrust
washer (2).
39. Determine proper #4 thrust plate thickness. Select
the thinnest available #4 thrust plate.
40. Install #4 thrust plate (2) using petrolatum to hold
into position.
41. Install input clutch assembly. Ensure the input
clutch assembly is completely seated by viewing
position through input speed sensor hole. If the
speed sensor tone wheel is not centered in
the opening, the input clutches assembly is
not seated properly.
42. Remove the oil pump o-ring (2) and install oil
pump and gasket to transmission. Use screw-in
dowels or phillips-head screwdrivers to align
pump to case. Be sure to reinstall O-ring on
oil pump after selecting the proper No. 4
thrust plate.
ND
AUTOMATIC TRANSMISSION 42RLE - SERVICE INFORMATION
21 - 295
Нет комментариевНе стесняйтесь поделиться с нами вашим ценным мнением.
Текст