Chrysler Le Baron, Dodge Dynasty, Plymouth Acclaim. Manual — part 586

PISTON AND CONNECTING ROD ASSEMBLY SERVICE
(1) Mark Identify Pistons.The pistons are not in-
terchangeable from bank to bank(Fig. 2). Pistons
with the letter R and arrow toward the front of en-
gine are to be installed in cylinders 1-3-5. Pistons
with the letter L and arrow toward the front of en-
gine are to be installed in cylinders 2-4-6.
(2) Mark connecting rod and cap with cylinder
number (Fig. 3).
(3) Remove piston rings (Fig. 4).
CYLINDER BORE INSPECTION
(1) Measure the cylinder bore at three levels in di-
rections A and B (Fig. 5). Top measurement should
be 12mm (.50 inch) down and bottom measurement
should be 10mm (.38 inch) up.
(2) Standard bore dimension: 91.1mm (3.587 inch)
(3) Maximum out-of-round or taper: 0.02mm (.0008
inch)
FITTING PISTONS
Measure approximately 2mm (.080 inch) above the
bottom of the piston skirt and across the thrust face.
(Fig. 6), See Boring Cylinder in Cylinder Block.
FITTING PISTON RINGS
(1) Wipe cylinder bore clean. Insert ring and push
down with piston to ensure it is square in bore. The
ring gap measurement must be made with the ring
positioning at least 16mm (0.63 inch) from bottom of
Fig. 1 Pistons, Connecting Rods
Fig. 2 Mark Pistons
Fig. 3 Mark Matching Parts
9 - 82
3.0L ENGINE
Ä
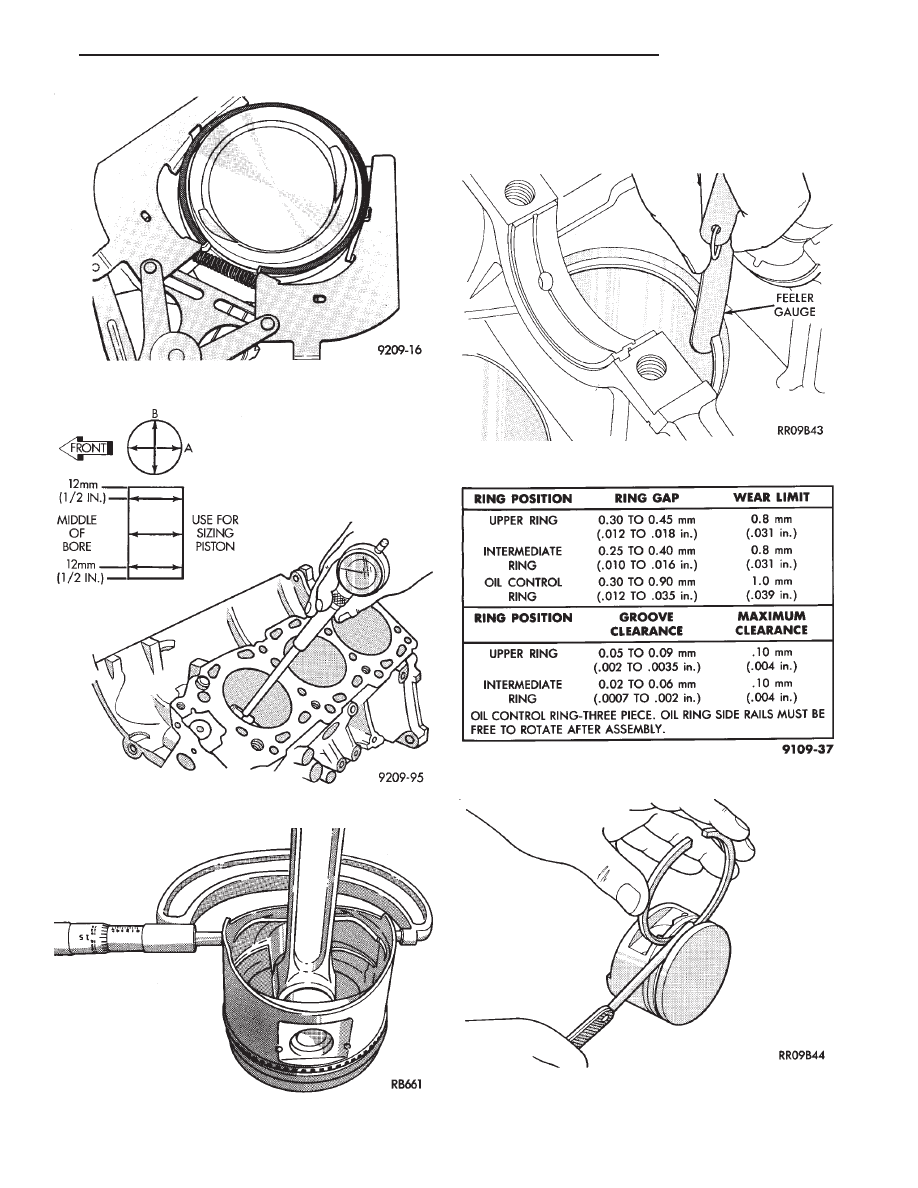
cylinder bore. Check gap with feeler gauge (Fig. 7).
Refer to (Fig. 8) for specification.
(2) Check piston ring to groove clearance; Refer to
Piston Ring Specification Chart (Fig. 8).
Fig. 4 Remove Piston Rings
Fig. 5 Checking Cylinder Bore Size
Fig. 6 Piston Clearance and Wear
Fig. 7 Check Gap on Piston Rings
Fig. 8 Piston Ring Specification Chart
Fig. 9 Piston Ring Clearance
Ä
3.0L ENGINE
9 - 83

PISTON RINGS—INSTALLATION
(1) The No. 1 and No. 2 piston rings have a differ-
ent cross section. Install rings with manufacturers
mark and size mark facing up, to the top of the pis-
ton (Fig. 10).
CAUTION: Install piston rings in the following or-
der:
(a) Oil ring expander.
(b) Upper oil ring side rail.
(c) Lower oil ring side rail.
(d) No. 2 Intermediate piston ring.
(e) No. 1 Upper piston ring.
(2) Install the side rail by placing one end between
the piston ring groove and the expander. Hold end
firmly and press down the portion to be installed un-
til side rail is in position. Do Not use a piston ring
expander (Fig. 11).
(3) Install upper side rail first and then the lower
side rail.
(4) Install No. 2 piston ring and then No. 1 piston
ring (Fig. 12).
(5) Position piston ring end gaps as shown in (Fig.
13).
(6) Position oil ring expander gap at least 45° from
the side rail gaps but not on the piston pin center or
on the thrust direction.
(7) Connecting rod front mark 72 must always face
forward, toward timing belt end. (Fig. 14)
(8) Install the piston and connecting rod assembly
into there respective bore from the cylinder block
top.
CAUTION: Piston assemblies are not to be inter-
changed from bank to bank.
(9) Check alignment marks made during disassem-
bly and that bearing position notches new or used
are on the same side as shown in (Fig. 15).
CONNECTING ROD CLEARANCE
(1) Following procedures specified in the Standard
Service Procedures Section for Measuring Main Bear-
ing Clearance and Connecting Rod Bearing Clear-
ance. (Fig. 16). Refer to (Fig. 18) for specifications.
Fig. 10 Piston Ring Installation
Fig. 11 Installing Side Rail
Fig. 12 Installing Upper and Intermediate Rings
Fig. 13 Piston Ring End Gap Position
9 - 84
3.0L ENGINE
Ä

(2) Tighten nuts to 52 N
Im (38 ft. lbs.).
(3) Remove connecting rod cap and measure Plas-
tigage (Fig. 16).
CAUTION: Do not rotate crankshaft or the Plasti-
gage may be smeared.
CONNECTING ROD SIDE CLEARANCE
Using a feeler gauge, check connecting rod side
clearance (Fig. 17). Refer to (Fig. 18) for specifica-
tion.
Fig. 14 Identify Piston/Rod Assembly for Cylinder
Installation
Fig. 15 Connecting Rod and Cap
Fig. 16 Connecting Rod Checking Bearing
Clearance
Fig. 17 Checking Connecting Rod Side Clearance
Fig. 18 Connecting Rod Clearance Specifications
Ä
3.0L ENGINE
9 - 85
Нет комментариевНе стесняйтесь поделиться с нами вашим ценным мнением.
Текст