Chrysler Le Baron, Dodge Dynasty, Plymouth Acclaim. Manual — part 133

Fig. 9 Remove or Install Extension
Fig. 10 Differential and Extension
Fig. 11 Remove Differential Bearing Cone
Fig. 12 Install Differential Bearing Cone
Fig. 13 Remove Differential Bearing Cone
Fig. 14 Install Differential Bearing Cone
21 - 138
TRANSAXLE
Ä
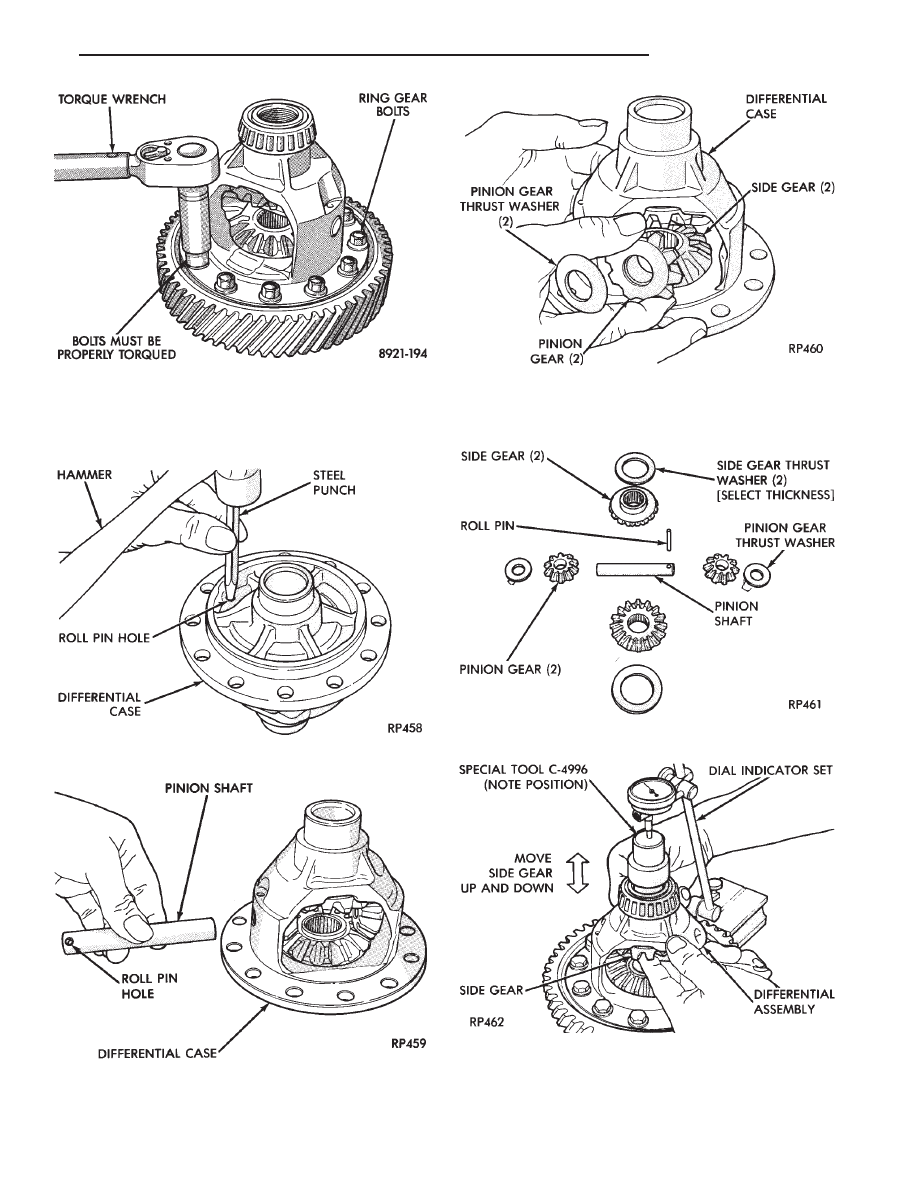
CAUTION: Always install NEW ring gear bolts. Bolts
must be properly torqued.
CAUTION: Side gear end play must be within .001
to .013 inch.
Fig. 15 Torque New Ring Gear Bolts to 95 N
I
m (70
ft. lbs.)
Fig. 16 Remove Pinion Shaft Roll Pin
Fig. 17 Remove or Install Pinion Shaft
Fig. 18 Remove or Install Pinion Gears, Side Gears,
and Tabbed Thrust Washers, by Rotating Pinion
Gears to Opening in Differential Case
Fig. 19 Differential Gears
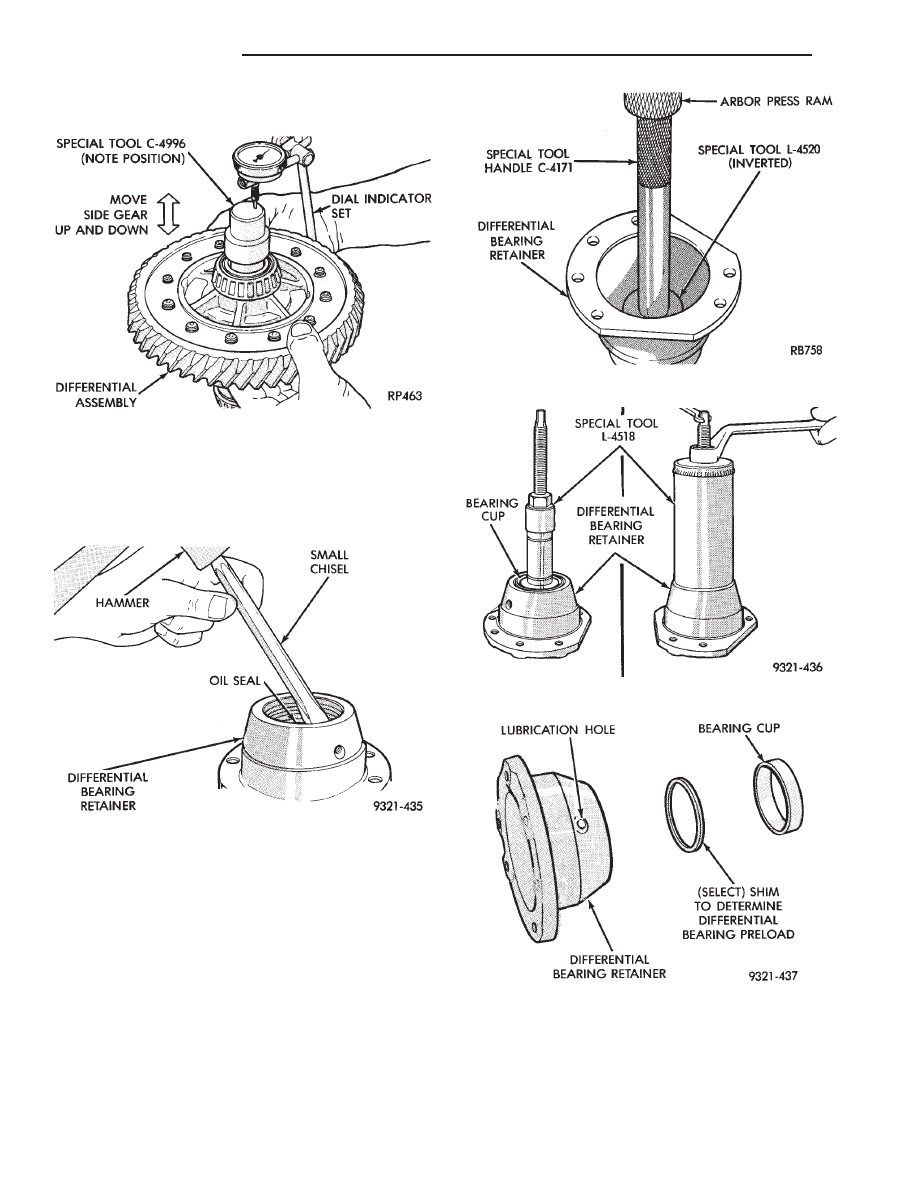
Fig. 20 Checking Side Gear End Play
Ä
TRANSAXLE
21 - 139
Four select thrust washers are available: .032,
.037, .042, and .047 inch.
CAUTION: Side gear end play must be within .001
to .013 inch.
Four select thrust washers are available: .032,
.037, .042, and .047 inch.
DETERMINING SHIM THICKNESS
Shim thickness need only be determined if any of
the following parts are replaced:
• Transaxle case
• Differential carrier
• Differential bearing retainer
• Extension housing
• Differential bearing cups and cones
Refer to Bearing Adjustment Procedure in rear
of this section to determine proper shim thickness for
correct bearing preload and proper bearing turning
torque.
Fig. 21 Checking Side Gear End Play
Fig. 22 Remove Oil Seal
Fig. 23 Install New Oil Seal
Fig. 24 Remove Bearing Cup
Fig. 25 Differential Bearing Retainer
21 - 140
TRANSAXLE
Ä

When rebuilding, reverse the above procedure.
Remove old sealant before applying new seal-
ant. Use MOPAR
t Adhesive Sealant on retainer
to seal retainer to case.
BEARING ADJUSTMENT PROCEDURE
GENERAL RULES ON SERVICING BEARINGS
(1) Take extreme care when removing and in stalling
bearing cups and cones. Use only an arbor press for
installation, as a hammer may not properly align the
bearing cup or cone. Burrs or nicks on the bearing seat
will give a false end play reading, while gauging for
proper shims. Improperly seated bearing cup and cones
are subject to low-mileage failure.
(2) Bearing cups and cones should be replaced if they
show signs of pitting or heat distress.
If distress is seen on either the cup or bearing rollers,
both cup and cone must be replaced.
Bearing end play and drag torque specifica-
tions must be maintained to avoid premature
bearing failures.
Used (original) bearing may lose up to 50
of the original drag torque after break-in.
All bearing adjustments must be made with no
other component interference or gear inter-
mesh, except the transfer gear bearing.
Oil all bearings before checking turning torque.
OUTPUT GEAR BEARING
With output gear removed:
(1) Install a 4.50 mm (0.177 inch) gauging shim on
the rear carrier assembly hub, using grease to hold the
shim in place.
(2) Install output gear and bearing assembly. Torque
to 271 N
Im (200 ft. lbs.).
(3) To measure bearing end play:
Fig. 26 Install Bearing Cup
Fig. 27 Checking Differential End Play
Fig. 28 Tool L-4436 and Torque Wrench
Fig. 29 Checking Differential Bearings Turning
Torque
Ä
TRANSAXLE
21 - 141
Нет комментариевНе стесняйтесь поделиться с нами вашим ценным мнением.
Текст