Infiniti FX35 / FX45. Manual — part 833
MA-12
< SERVICE INFORMATION >
ENGINE MAINTENANCE (VQ35DE ENGINE)
• When belt is replaced with a new one, adjust it to value for “New belt” to accommodate for insuffi-
cient adaptability with pulley grooves.
• When deflection or tension of belt being used exceeds “Limit”, adjust it to value for “After adjust-
ment”.
• When checking belt deflection or tension immediately after installation, first adjust it to the specified
value. Then, after turning crankshaft two turns or more, re-adjust to the specified value to avoid vari-
ation in deflection between pulleys.
• When installing belt, make sure that it is correctly engaged with pulley grooves.
• Keep engine oil, working fluid and engine coolant away from belt and pulley grooves.
• Do not twist or bend belt excessively.
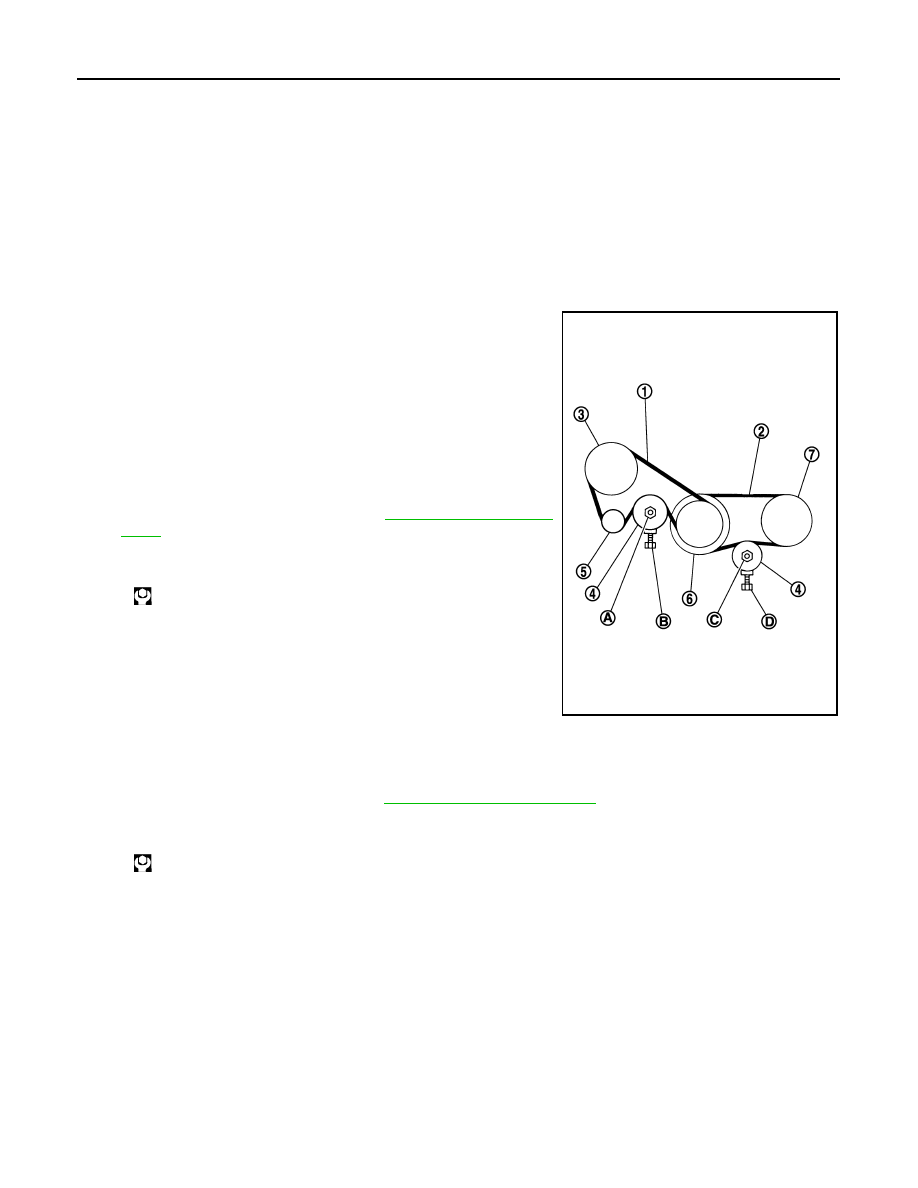
ALTERNATOR AND POWER STEERING OIL PUMP BELT
1.
Remove front engine undercover with power tool.
2.
Loosen idler pulley lock nut (A) and adjust tension by turning
adjusting bolt (B).
• For the specified belt tension, refer to
.
3.
Tighten nut (A).
A/C COMPRESSOR BELT
1.
Remove front engine undercover with power tool.
2.
Loosen idler pulley lock nut (C) and adjust tension by turning adjusting bolt (D).
• For the specified belt tension, refer to
3.
Tighten nut (C).
Changing Engine Coolant
INFOID:0000000001328902
WARNING:
• To avoid being scalded, do not change engine coolant when the engine is hot.
• Wrap a thick cloth around radiator cap and carefully remove radiator cap. First, turn radiator cap a
quarter of a turn to release built-up pressure. Then turn radiator cap all the way.
• Be careful not to allow engine coolant to contact drive belts.
DRAINING ENGINE COOLANT
1.
Remove front engine undercover with power tool.
1
: Alternator and power steering oil pump belt
2
: A/C compressor belt
3
: Power steering oil pump
4
: Idler pulley
5
: Alternator
6
: Crankshaft pulley
7
: A/C compressor
: 34.8 N·m (3.5 kg-m, 26 ft-lb)
JPBIA0423ZZ
: 34.8 N·m (3.5 kg-m, 26 ft-lb)
ENGINE MAINTENANCE (VQ35DE ENGINE)
MA-13
< SERVICE INFORMATION >
C
D
E
F
G
H
I
J
K
M
A
B
MA
N
O
P
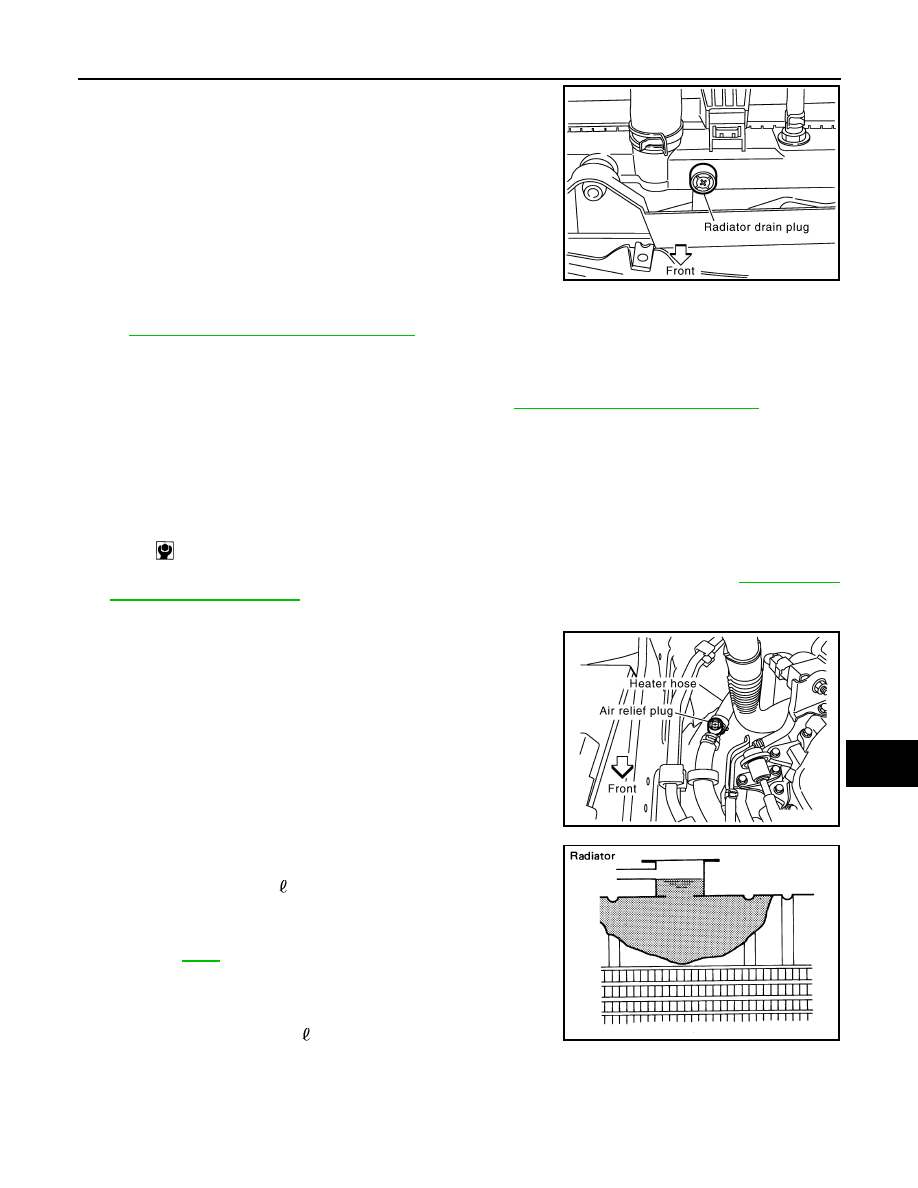
2.
Open radiator drain plug at the bottom of radiator, and then
remove radiator cap.
When draining all of engine coolant in the system, open water drain plugs on cylinder block. Refer
to
EM-123, "Disassembly and Assembly"
3.
Remove reservoir tank as necessary, drain engine coolant and clean reservoir tank before installing.
4.
Check drained engine coolant for contaminants such as rust, corrosion or discoloration.
If contaminated, flush the engine cooling system. Refer to
CO-10, "Changing Engine Coolant"
REFILLING ENGINE COOLANT
1.
Install reservoir tank if removed, and radiator drain plug.
CAUTION:
Be sure to clean drain plug and install with new O-ring.
If water drain plugs on cylinder block are removed, close and tighten them. Refer to
2.
Make sure that each hose clamp has been firmly tightened.
3.
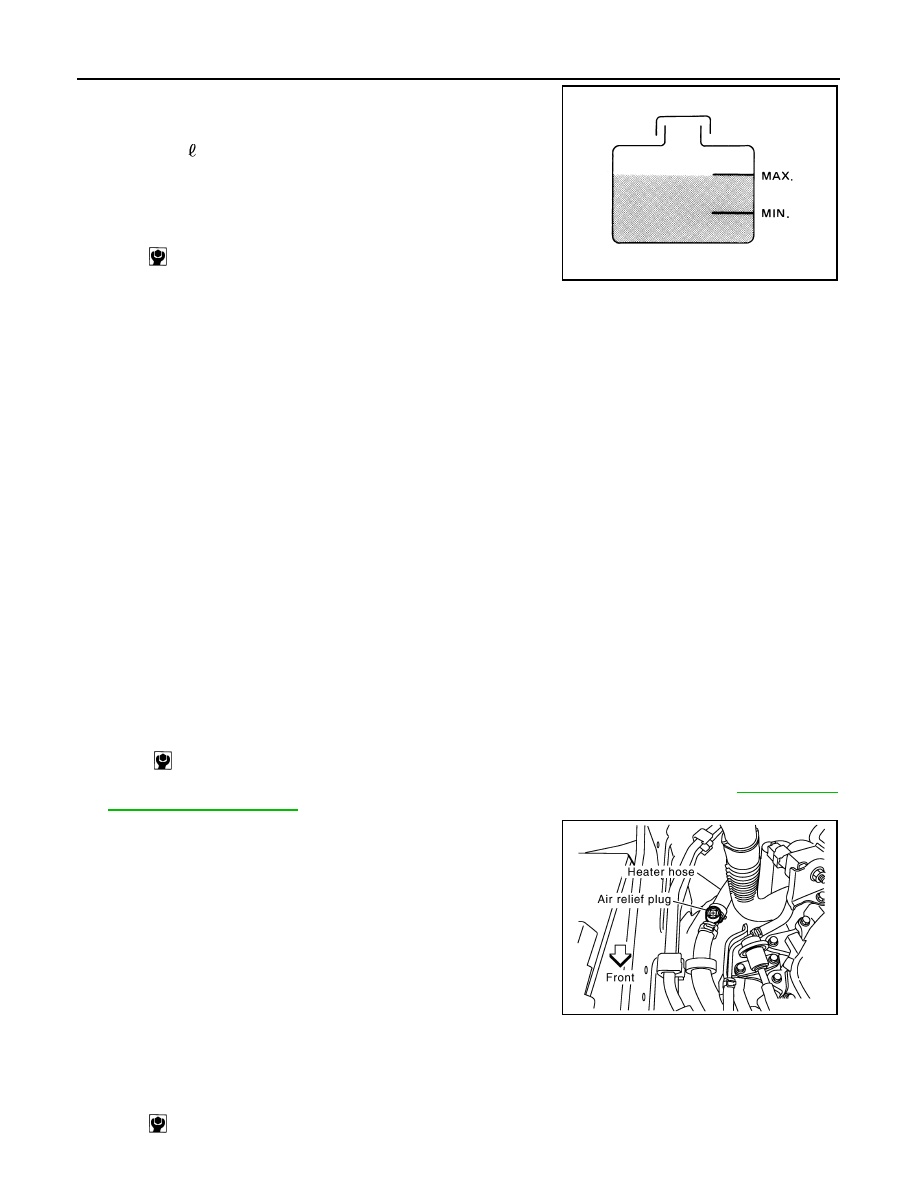
Remove air relief plug on heater hose.
4.
Fill radiator, and reservoir tank if removed, to specified level.
• Pour engine coolant through engine coolant filler neck
slowly of less than 2 (2-1/8 US qt, 1-3/4 lmp qt) a minute
to allow air in system to escape.
• Use Genuine NISSAN Long Life Antifreeze/Coolant or
equivalent mixed with water (distilled or demineralized).
Refer to
.
SBIA0444E
Radiator drain plug:
: 1.18 N·m (0.12 kg-m, 10 in-lb)
SBIA0445E
Engine coolant capacity
(With reservoir tank at “MAX” level)
: Approximately 8.6 (9-1/8 US qt, 7-5/8 lmp qt)
SMA182B
MA-14
< SERVICE INFORMATION >
ENGINE MAINTENANCE (VQ35DE ENGINE)
• When engine coolant overflows air relief hole on heater hose,
install air relief plug with new O-ring.
5.
Install radiator cap.
6.
Warm up until opening thermostat. Standard for warming-up time is approximately 10 minutes at 3,000
rpm.
• Make sure thermostat opening condition by touching radiator hose (lower) to see a flow of warm water.
CAUTION:
Watch water temperature gauge so as not to overheat engine.
7.
Stop the engine and cool down to less than approximately 50
°
C (122
°
F).
• Cool down using fan to reduce the time.
• If necessary, refill radiator up to filler neck with engine coolant.
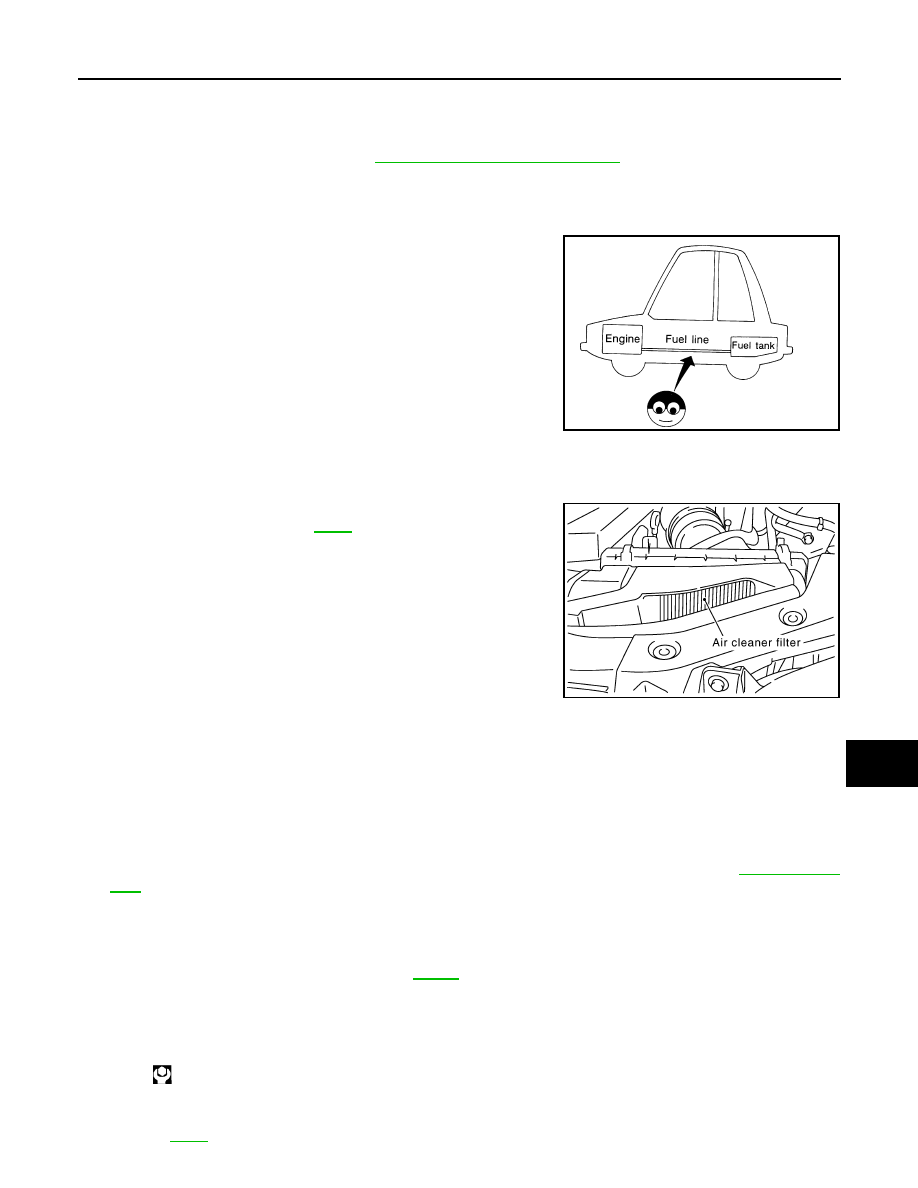
8.
Refill reservoir tank to “MAX” level line with engine coolant.
9.
Repeat steps 4 through 7 two or more times with radiator cap installed until engine coolant level no longer
drops.
10. Check cooling system for leaks with engine running.
11. Warm up the engine, and check for sound of engine coolant flow while running engine from idle up to
3,000 rpm with heater temperature controller set at several position between “COOL” and “WARM”.
• Sound may be noticeable at heater unit.
12. Repeat step 11 three times.
13. If sound is heard, bleed air from cooling system by repeating step 4 through 7 until engine coolant level no
longer drops.
FLUSHING COOLING SYSTEM
1.
Install reservoir tank, and radiator drain plug.
If water drain plugs on cylinder block are removed, close and tighten them. Refer to
2.
Remove air relief plug on heater hose.
3.
Fill radiator with water until water spills from the air relief hole, then close air relief plug. Fill radiator and
reservoir tank with water and reinstall radiator cap.
Reservoir tank engine coolant capacity
(At “MAX” level)
: 0.8 (7/8 US qt, 3/4 lmp qt)
Air relief plug:
: 1.19 N·m (0.12 kg-m, 11 in-lb)
SMA412B
Radiator drain plug:
: 1.18 N·m (0.12 kg-m, 10 in-lb)
SBIA0445E
Air relief plug:
: 1.19 N·m (0.12 kg-m, 11 in-lb)
ENGINE MAINTENANCE (VQ35DE ENGINE)
MA-15
< SERVICE INFORMATION >
C
D
E
F
G
H
I
J
K
M
A
B
MA
N
O
P
4.
Run the engine and warm it up to normal operating temperature.
5.
Rev engine two or three times under no-load.
6.
Stop the engine and wait until it cools down.
7.
Drain water from the system. Refer to
CO-10, "Changing Engine Coolant"
.
8.
Repeat steps 1 through 7 until clear water begins to drain from radiator.
Checking Fuel Line
INFOID:0000000001328903
Inspect fuel lines, filler cap and tank for improper attachment, leaks,
cracks, damage, loose connections, chafing or deterioration.
If necessary, repair or replace damaged parts.
Changing Air Cleaner Filter
INFOID:0000000001328904
VISCOUS PAPER TYPE
The viscous paper type filter does not need cleaning between
replacement intervals. Refer to
.
Changing Engine Oil
INFOID:0000000001328905
WARNING:
• Be careful not to burn yourself, as engine oil may be hot.
• Prolonged and repeated contact with used engine oil may cause skin cancer. Try to avoid direct skin
contact with used engine oil. If skin contact is made, wash thoroughly with soap or hand cleaner as
soon as possible.
1.
Remove front engine undercover with power tool.
2.
Warm up the engine, and check for engine oil leakage from engine components. Refer to
3.
Stop the engine and wait for 10 minutes.
4.
Loosen oil filler cap and then remove drain plug.
5.
Drain engine oil.
6.
Install drain plug with new washer. Refer to
CAUTION:
Be sure to clean drain plug and install with new washer.
7.
Refill with new engine oil.
Engine oil specification and viscosity:
Refer to
SMA803A
SBIA0463E
Oil pan drain plug:
: 34.3 N·m (3.5 kg-m, 25 ft-lb)
Нет комментариевНе стесняйтесь поделиться с нами вашим ценным мнением.
Текст