Infiniti FX35 / FX45. Manual — part 840
PB-2
< SERVICE INFORMATION >
PREPARATION
SERVICE INFORMATION
PREPARATION
Commercial Service Tool
INFOID:0000000001327645
Tool name
Description
Power tool
Loosening bolts and nuts
PBIC0190E
PARKING BRAKE SYSTEM
PB-3
< SERVICE INFORMATION >
C
D
E
G
H
I
J
K
L
M
A
B
PB
N
O
P
PARKING BRAKE SYSTEM
On-Vehicle Inspection
INFOID:0000000001327646
PEDAL STROKE
• When parking brake pedal is operated with a force of 200 N (20.4 kg, 44.9 lb), make sure the parking brake
pedal stroke is within the specified number of notches. (Check it by listening and counting the ratchet clicks.)
• Make sure that brake warning lamp comes on when parking brake pedal is depressed with in one notch.
INSPECT COMPONENTS
• Make sure the components are installed properly (check for looseness, backlash, etc.).
• Check parking brake pedal assembly for bend, damage and cracks, and replace if necessary.
• Check cable for wear and damage, and replace if necessary.
• Check parking brake switch for malfunction, and replace if necessary.
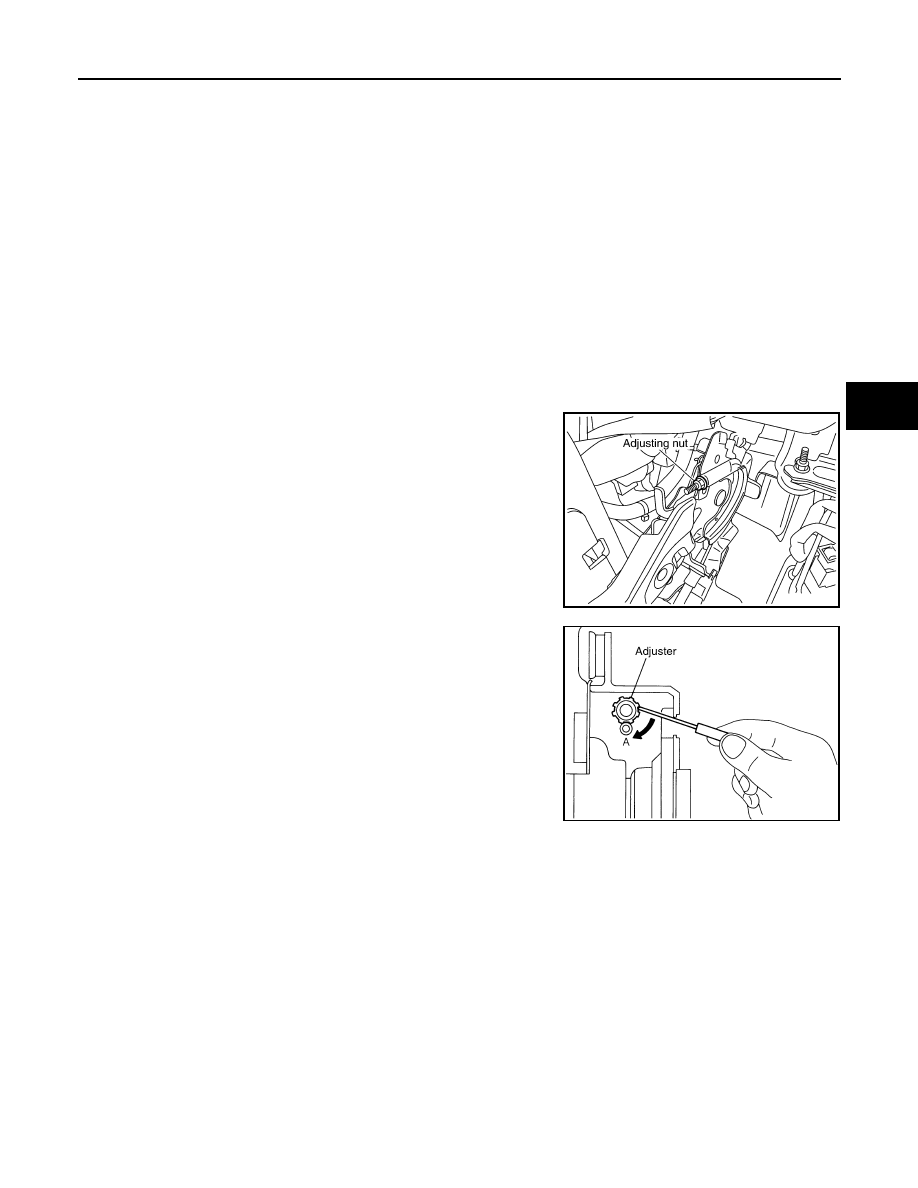
ADJUSTMENT
1.
Insert a deep socket wrench to rotate adjusting nut and loosen
cable sufficiently. Then, return pedal.
2.
Remove tires from vehicle with power tool.
3.
Using wheel nuts, fix disc rotor to hub and prevent it from tilting.
4.
Remove adjusting hole plug installed on disc rotor. Using a flat-
bladed screwdriver, turn adjuster to clockwise in the figure until
disc rotor is locked. After locking, turn adjuster to opposite direc-
tion by 5 or 6 notches.
5.
Rotate disc rotor to make sure that there is no drag. Then install
adjusting hole plug.
6.
After adjusting the clearance of rear shoes, with no drag on rear
brake, adjuster cable as follows:
a.
Operate pedal 10 or more times with a force of 490 N (50 kg,
110 lb).
b.
Depress pedal until a deep socket wrench can be inserted.
Insert deep socket, and rotate adjusting nut to adjust pedal stroke.
CAUTION:
Do not reuse adjusting nut after removing it.
c.
When parking brake pedal is operated with a force of 200 N (20.4 kg, 44.9 lb), make sure the stroke is
within the specified number of notches. (Check it by listening and counting the ratchet clicks.)
d.
With parking brake pedal completely returned, make sure there is no drag on rear brake.
Pedal stroke
: 4
−
5 notches
SFIA1139E
Pedal stroke
: 4
−
5 notches
PFIA0295E
PB-4
< SERVICE INFORMATION >
PARKING BRAKE CONTROL
PARKING BRAKE CONTROL
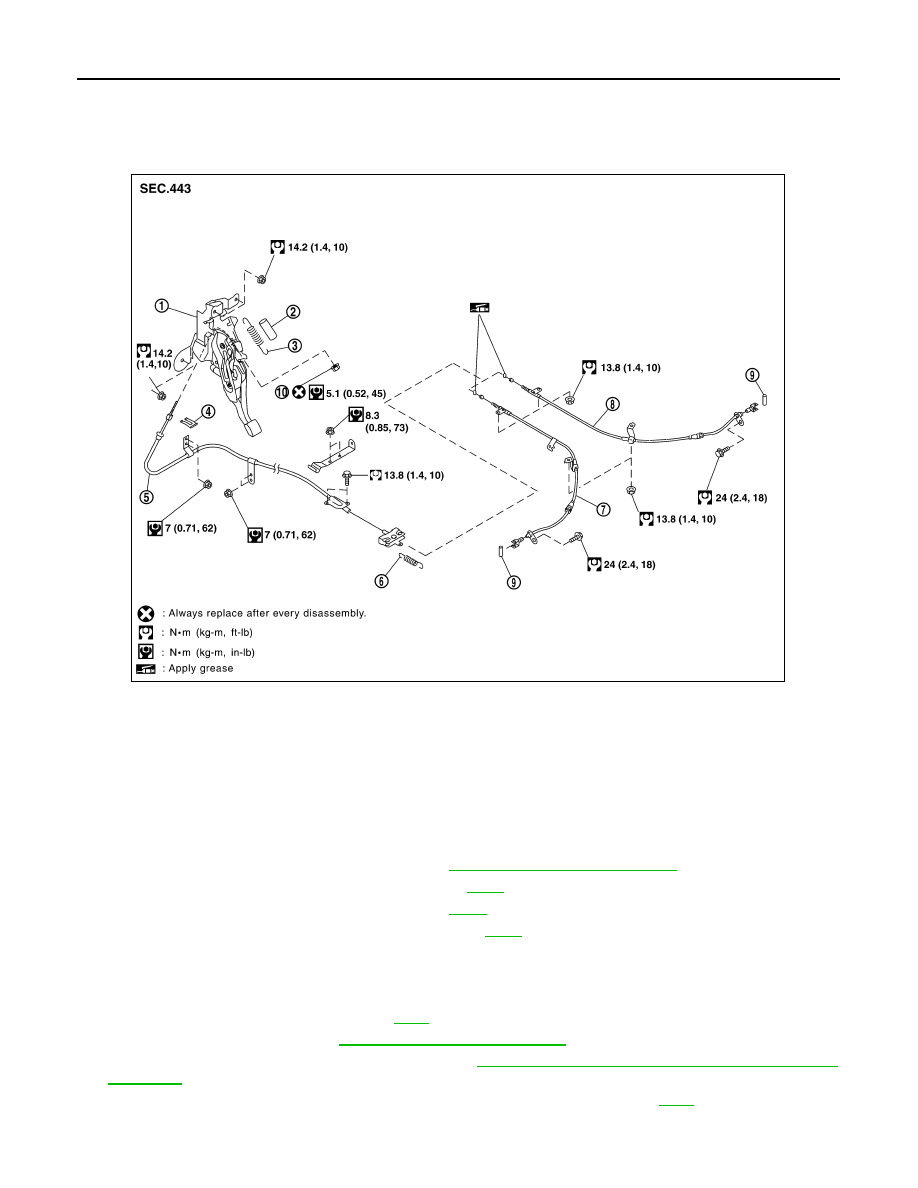
Component
INFOID:0000000001327647
Removal and Installation
INFOID:0000000001327648
REMOVAL
1.
Remove front kicking plate (driver side). Refer to
IP-11, "Removal and Installation"
.
2.
Remove front body side welt (driver side). Refer to
.
3.
Remove dash side finisher (driver side). Refer to
4.
Remove instrument lower panel (driver side). Refer to
.
5.
Remove adjusting nut.
6.
Remove front cable installation bolts, nuts, and lock plate, then remove front cable from the vehicle.
7.
Remove heat insulator between center muffler and rear propeller shaft.
8.
Remove exhaust center muffler. Refer to
9.
Remove propeller shaft. Refer to
PR-9, "Removal and Installation"
.
10. Remove rear disc caliper and disc rotors. Refer to
BR-25, "Removal and Installation of Brake Caliper
11. Remove parking brake shoe, and remove rear cable from toggle lever. Refer to
.
1.
Device assembly
2.
Spring insulator
3.
Return spring
4.
Lock plate
5.
Front cable
6.
Return spring
7.
Rear left cable
8.
Rear right cable
9.
Pin
10. Adjusting nut
SFIA1943E
PARKING BRAKE CONTROL
PB-5
< SERVICE INFORMATION >
C
D
E
G
H
I
J
K
L
M
A
B
PB
N
O
P
12. Remove right and left rear cables installation nuts, bolts, and remove right and left rear cable assembly
from the vehicle.
INSTALLATION
1.
Install in the reverse order of removal. Tighten the mounting bolts and nuts to the specified torque. Refer
to
.
CAUTION:
Do not reuse adjusting nut after removing it.
2.
Adjust parking brake. Refer to
.
Нет комментариевНе стесняйтесь поделиться с нами вашим ценным мнением.
Текст