Infiniti FX35 / FX45. Manual — part 624

NOISE, VIBRATION AND HARSHNESS (NVH) TROUBLESHOOTING
EM-13
< SERVICE INFORMATION >
[VQ35DE]
C
D
E
F
G
H
I
J
K
L
M
A
EM
N
P
O
3.
Specify the operating condition of the engine.
4.
Check specified noise source.
If necessary, repair or replace these parts.
A: Closely related
B: Related
C: Sometimes related
—: Not related
Location
of noise
Type of
noise
Operating condition of engine
Source of
noise
Check item
Refer-
ence page
Before
warm-
up
After
warm-
up
When
start-
ing
When
idling
When
racing
While
driving
Top of en-
gine
Rocker
cover
Cylinder
head
Ticking or
clicking
C
A
—
A
B
—
Tappet
noise
Valve clearance
Rattle
C
A
—
A
B
C
Camshaft
bearing
noise
Camshaft runout
Camshaft journal oil
clearance
Crank-
shaft pul-
ley
Cylinder
block
(Side of
engine)
Oil pan
Slap or
knock
—
A
—
B
B
—
Piston pin
noise
Piston to piston pin oil
clearance
Connecting rod bushing
oil clearance
Slap or
rap
A
—
—
B
B
A
Piston
slap noise
Piston to cylinder bore
clearance
Piston ring side clear-
ance
Piston ring end gap
Connecting rod bend
and torsion
Knock
A
B
C
B
B
B
Connect-
ing rod
bearing
noise
Connecting rod bushing
oil clearance
Connecting rod bearing
oil clearance
Knock
A
B
—
A
B
C
Main bear-
ing noise
Main bearing oil clear-
ance
Crankshaft runout
Front of
engine
Timing
chain case
Tapping or
ticking
A
A
—
B
B
B
Timing
chain and
timing
chain ten-
sioner
noise
Timing chain cracks
and wear
Timing chain tensioner
operation
Front of
engine
Squeak-
ing or fizz-
ing
A
B
—
B
—
C
Drive belts
(Sticking
or slip-
ping)
Drive belts deflection
Creaking
A
B
A
B
A
B
Drive belts
(Slipping)
Idler pulley bearing op-
eration
Squall
Creak
A
B
—
B
A
B
Water
pump
noise
Water pump operation
EM-14
< SERVICE INFORMATION >
[VQ35DE]
DRIVE BELTS
DRIVE BELTS
Checking Drive Belts
INFOID:0000000001429496
WARNING:
Be sure to perform when engine is stopped.
1.
Inspect belts for cracks, fraying, wear and oil. If necessary, replace.
2.
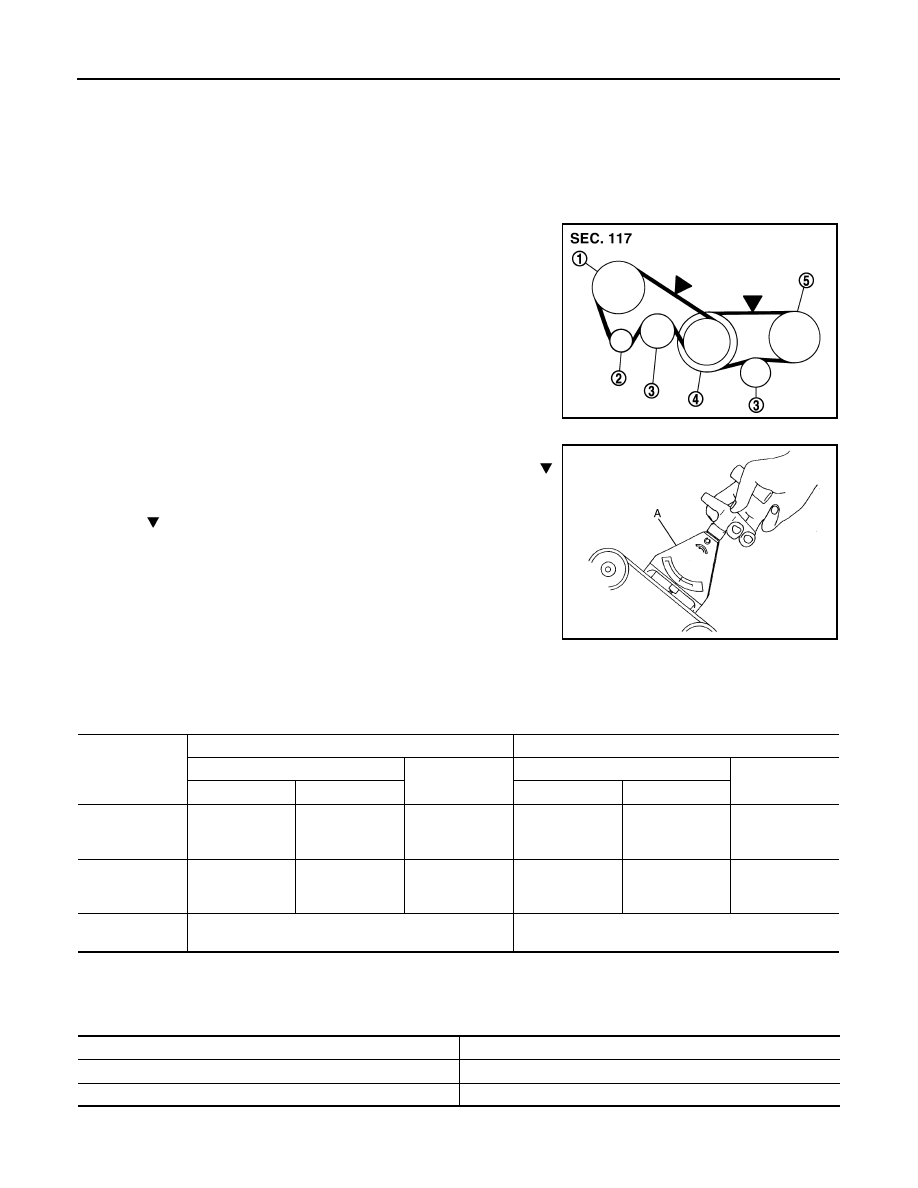
Inspect drive belt deflection or tension at a point on belt midway
between pulleys.
• Inspection should be done only when engine is cold, or over
30 minutes after engine is stopped.
• Measure the belt tension with belt tension gauge (Commercial
service tool: BT3373-F or equivalent) (A) at points marked
shown in the figure.
• When measuring the deflection, apply 98 N (10 kg, 22 lb) at
the marked point.
• Adjust if the belt deflection exceeds the limit or if the belt ten-
sion is not within specifications.
CAUTION:
• When checking the belt deflection or the tension immedi-
ately after installation, first adjust it to the specified value.
Then, after turning crankshaft two turns or more, re-adjust
to the specified value to avoid variation in deflection
between pulleys.
• Tighten idler pulley lock nut by hand and measure the deflection or the tension without loose-
ness.
Belt Deflection and Tension
*: If belt tension gauge cannot be installed at check points shown, check drive belt tension at different location on belt.
Tension Adjustment
INFOID:0000000001429497
CAUTION:
1 : Power steering oil pump
2 : Alternator
3 : Idler pulley
4 : Crankshaft pulley
5 : A/C compressor
JPBIA0421ZZ
JPBIA0422ZZ
Items
Deflection adjustment
Unit: mm (in)
Tension adjustment*
Unit: N (kg, lb)
Used belt
New belt
Used belt
New belt
Limit
After adjustment
Limit
After adjustment
Alternator and
power steering
oil pump belt
12 (0.47)
7 - 8
(0.28 - 0.31)
6 - 7
(0.24 - 0.28)
294 (30, 66)
730 - 818
(74.5 - 83.4,
164 - 184)
838 - 926
(85.5 - 94.5,
188 - 208)
A/C compressor
belt
12 (0.47)
9 - 10
(0.35 - 0.39)
8 - 9
(0.31 - 0.35)
196 (20, 44)
348 - 436
(35.5 - 44.5,
78 - 98)
470 - 559
(47.9 - 57.0,
106 - 126)
Applied pushing
force
98 N (10 kg, 22 lb)
—
Portion
Belt tightening method for adjustment
Alternator and power steering oil pump belt
Adjusting bolt on idler pulley
A/C compressor belt
Adjusting bolt on idler pulley
DRIVE BELTS
EM-15
< SERVICE INFORMATION >
[VQ35DE]
C
D
E
F
G
H
I
J
K
L
M
A
EM
N
P
O
• When belt is replaced with a new one, adjust it to value for “New belt” to accommodate for insuffi-
cient adaptability with pulley grooves.
• When deflection or tension of belt being used exceeds “Limit”, adjust it to value for “After adjust-
ment”.
• When checking belt deflection or tension immediately after installation, first adjust it to the specified
value. Then, after turning crankshaft two turns or more, re-adjust to the specified value to avoid vari-
ation in deflection between pulleys.
• When installing belt, make sure that it is correctly engaged with pulley grooves.
• Keep engine oil, working fluid and engine coolant away from belt and pulley grooves.
• Do not twist or bend belt excessively.
ALTERNATOR AND POWER STEERING OIL PUMP BELT
1.
Remove front engine undercover with power tool.
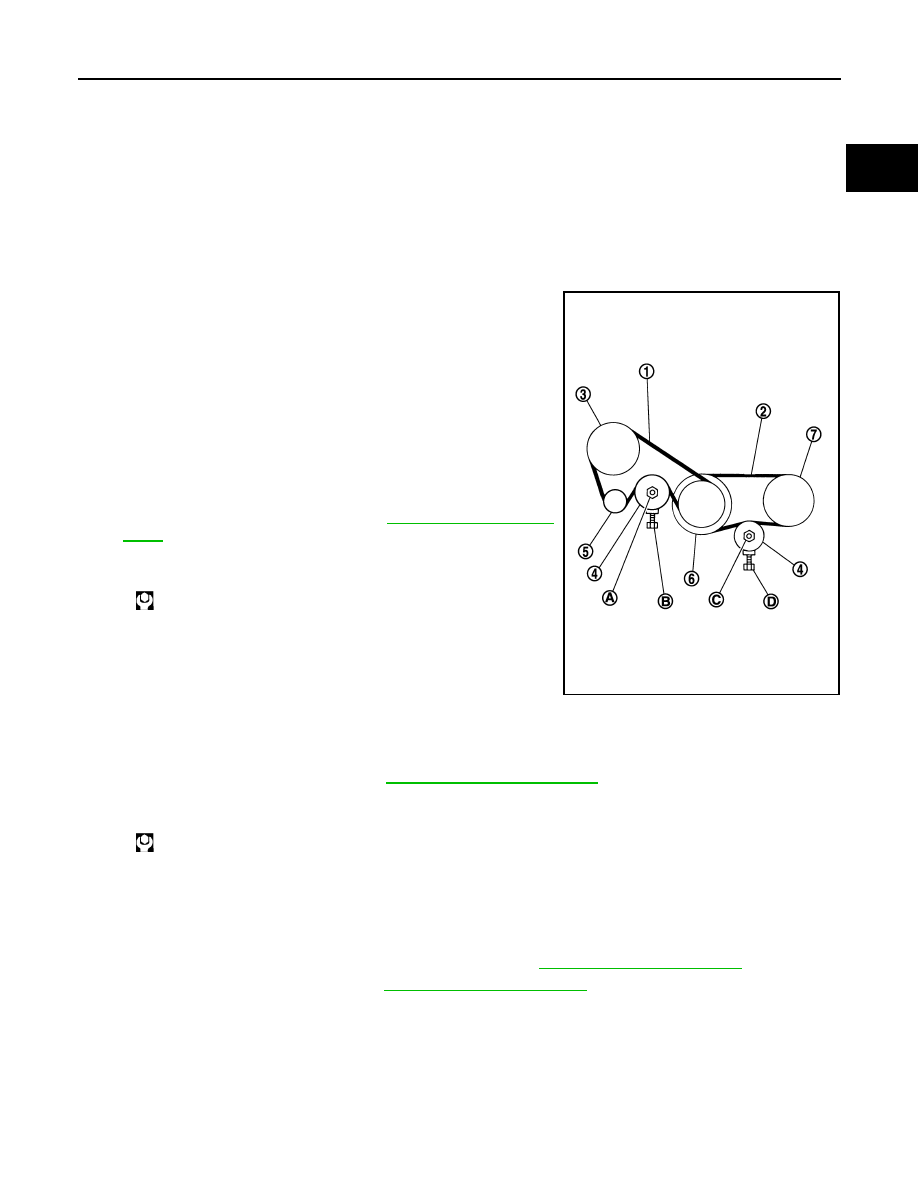
2.
Loosen idler pulley lock nut (A) and adjust tension by turning
adjusting bolt (B).
• For the specified belt tension, refer to
3.
Tighten nut (A).
A/C COMPRESSOR BELT
1.
Remove front engine undercover with power tool.
2.
Loosen idler pulley lock nut (C) and adjust tension by turning adjusting bolt (D).
• For the specified belt tension, refer to
3.
Tighten nut (C).
Removal and Installation
INFOID:0000000001429498
REMOVAL
1.
Remove front engine undercover with power tool.
2.
Remove alternator and power steering oil pump belt. Refer to
.
3.
Remove A/C compressor belt. Refer to
.
CAUTION:
Grease is applied to idler pulley adjusting bolt. Be careful to keep grease away from belt.
INSTALLATION
1.
Install belts to pulley in reverse order of removal.
CAUTION:
• Make sure drive belt is correctly engaged with pulley groove.
• Make sure that for engine oil and engine coolant do not adhere to belt and each pulley grooves.
1 : Alternator and power steering oil pump belt
2 : A/C compressor belt
3 : Power steering oil pump
4 : Idler pulley
5 : Alternator
6 : Crankshaft pulley
7 : A/C compressor
: 34.8 N·m (3.5 kg-m, 26 ft-lb)
JPBIA0423ZZ
: 34.8 N·m (3.5 kg-m, 26 ft-lb)
EM-16
< SERVICE INFORMATION >
[VQ35DE]
DRIVE BELTS
2.
Adjust belt tension. Refer to
.
3.
Tighten each adjusting bolt and nut to the specified torque.
4.
Make sure that tension of each belt is within the standard. Refer to
Нет комментариевНе стесняйтесь поделиться с нами вашим ценным мнением.
Текст