Infiniti FX35, FX50 (S51). Manual — part 1253
INT-14
< REMOVAL AND INSTALLATION >
REAR DOOR FINISHER
REAR DOOR FINISHER
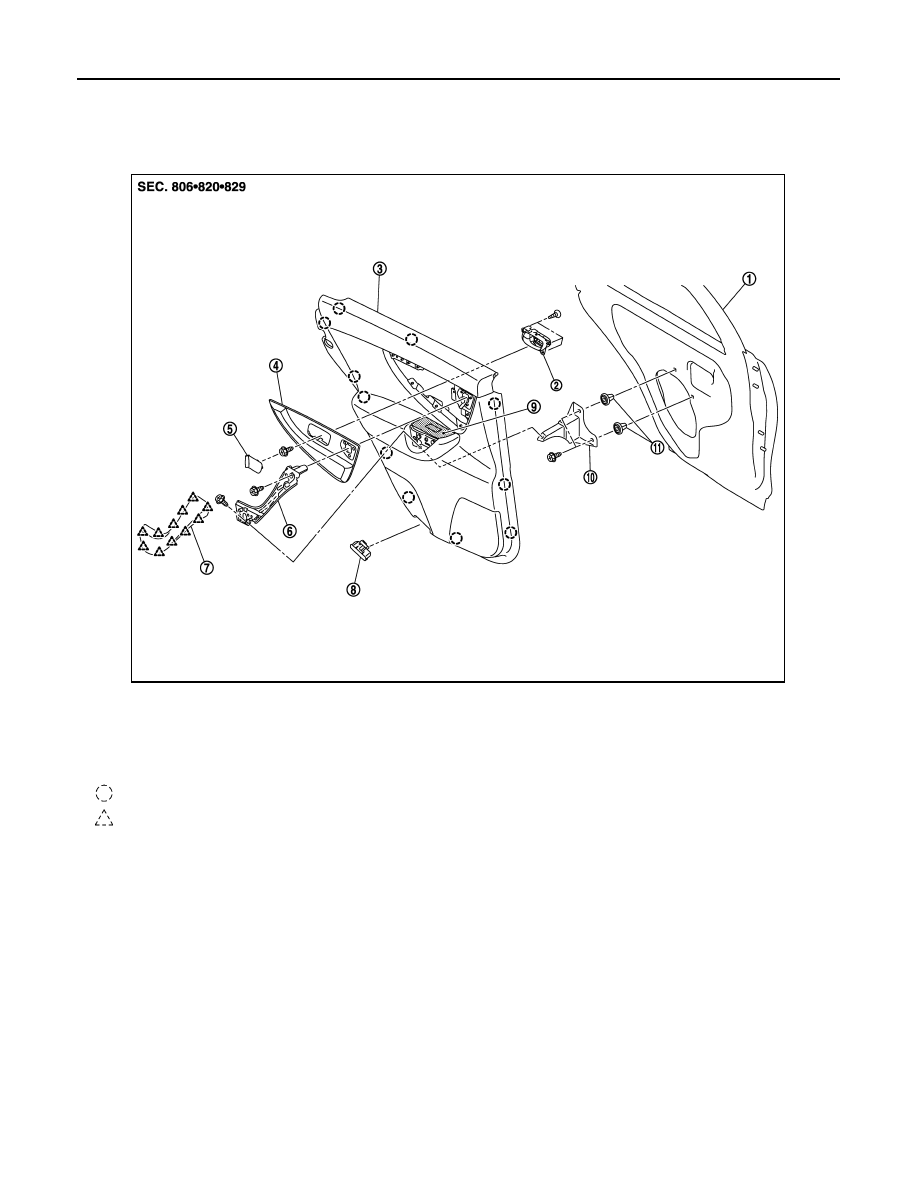
Exploded View
INFOID:0000000005240794
Removal and Installation
INFOID:0000000005240795
CAUTION:
Wrap the tip of flat-bladed screwdriver with a cloth before remove.
REMOVAL
1.
Fully open door window.
1.
Rear door panel
2.
Rear door inside handle
3.
Rear door finisher
4.
Rear door center finisher
5.
Inside handle escutcheon
6.
Rear door grip
7.
Rear door grip cap
8.
Step lamp
9.
Power window switch finisher
10. Rear door grip bracket
11. Grommet
: Clip
: Pawl
JMJIA2048ZZ
REAR DOOR FINISHER
INT-15
< REMOVAL AND INSTALLATION >
C
D
E
F
G
H
I
K
L
M
A
B
INT
N
O
P
2.
Remove inside handle escutcheon (1) with a flat-bladed screw-
driver (A) wrapped in a tape as shown in the figure.
3.
Insert a remover tool (A) between the rear door grip cap (1) and
the rear door grip to disengage the pawls and remove the cap.
4.
Remove the bolts shown by the arrows in the figure with an
appropriate tool.
5.
Remove the step lamp. Refer to
INL-192, "Removal and Installation"
.
6.
Insert a remover tool (A) between the door finisher (1) and door
panel to disengage the clips.
CAUTION:
Insert a remover tool into the part show in the figure.
(Between the clips and the door panel)
7.
Disconnect lock knob cable (1) and inside handle cable (2) from
rear inside handle (3).
: Pawl
JMJIA1506ZZ
: Pawl
JMJIA2052ZZ
: Bolt
JMJIA2053ZZ
: Clip
JMJIA2054ZZ
JMJIA1359ZZ
INT-16
< REMOVAL AND INSTALLATION >
REAR DOOR FINISHER
8.
Remove the mood lamp harness connector. Refer to
INL-190, "REAR DOOR ARMREST : Exploded
.
9.
Disconnect the rear door power window switch harness connector.
10. Remove the rear door finisher.
INSTALLATION
Install in the reverse order of removal.
CAUTION:
When installing door finisher, check that clips are securely fitted in panel holes on body, and then
press them in.
Disassembly and Assembly
INFOID:0000000005240796
DISASSEMBLY
1.
Remove the rear door grip and the rear door center finisher.
NOTE:
The procedure is same as for the front door finisher. Refer to
INT-13, "Disassembly and Assembly"
2.
Remove rear door inside handle. Refer to
DLK-274, "INSIDE HANDLE : Removal and Installation"
.
ASSEMBLY
Assemble in the reverse order of disassembly.
BODY SIDE TRIM
INT-17
< REMOVAL AND INSTALLATION >
C
D
E
F
G
H
I
K
L
M
A
B
INT
N
O
P
BODY SIDE TRIM
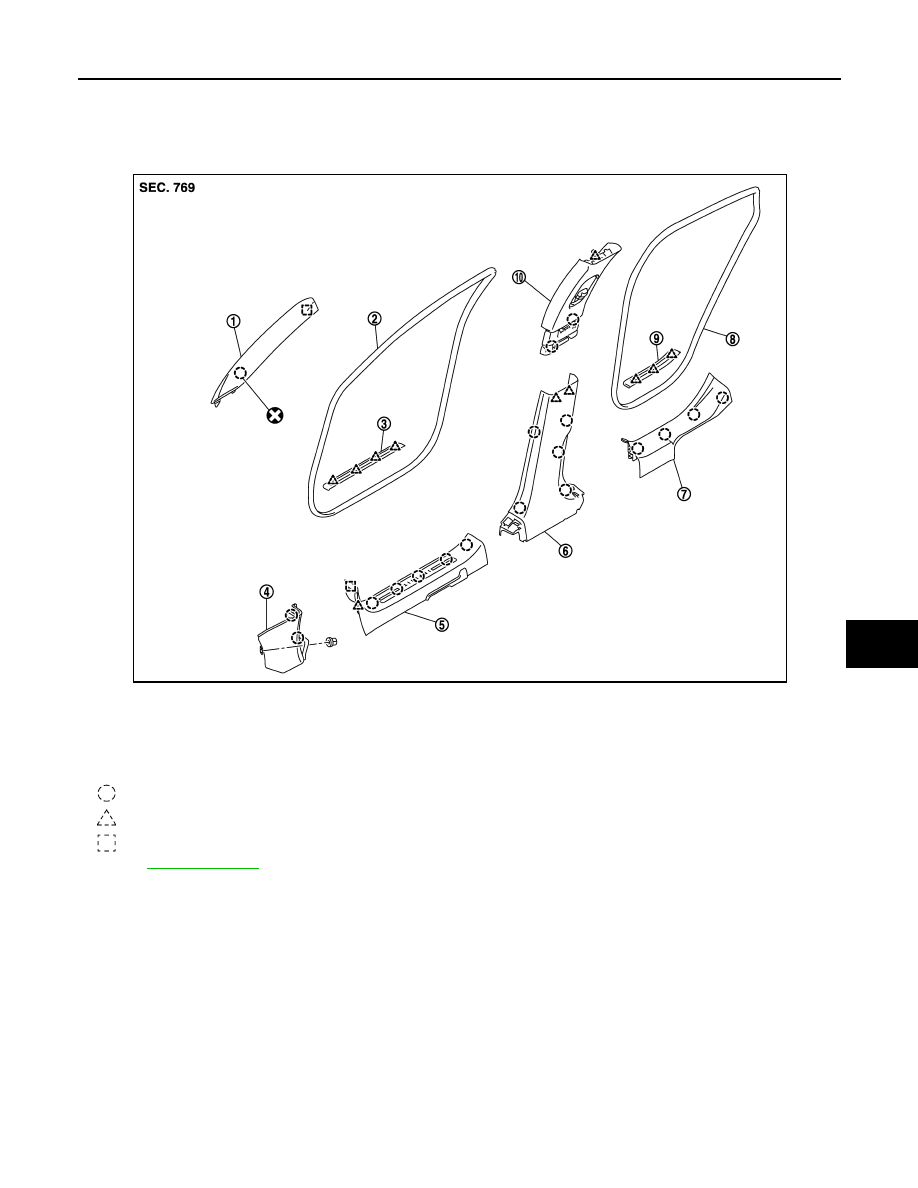
Exploded View
INFOID:0000000005240797
Removal and Installation
INFOID:0000000005240798
CAUTION:
Wrap the tip of flat-bladed screwdriver with a shop cloth when removing metal clips from garnishes.
REMOVAL
FRONT PILLAR GARNISH
1.
Remove front body side welt partially.
1.
Front pillar garnish
2.
Front body side welt
3.
Front kicking plate (outer)
4.
Dash side finisher
5.
Front kicking plate (inner)
6.
Center pillar lower garnish
7.
Rear kicking plate (inner)
8.
Rear body side welt
9.
Rear kicking plate (outer)
10. Center pillar upper garnish
: Clip
: Pawl
: Metal clip
Refer to
for symbols in the figure.
JMJIA2055ZZ
Нет комментариевНе стесняйтесь поделиться с нами вашим ценным мнением.
Текст