Infiniti FX35, FX50 (S51). Manual — part 1352
PREPARATION
LU-5
< PREPARATION >
[VQ35HR]
C
D
E
F
G
H
I
J
K
L
M
A
LU
N
P
O
PREPARATION
PREPARATION
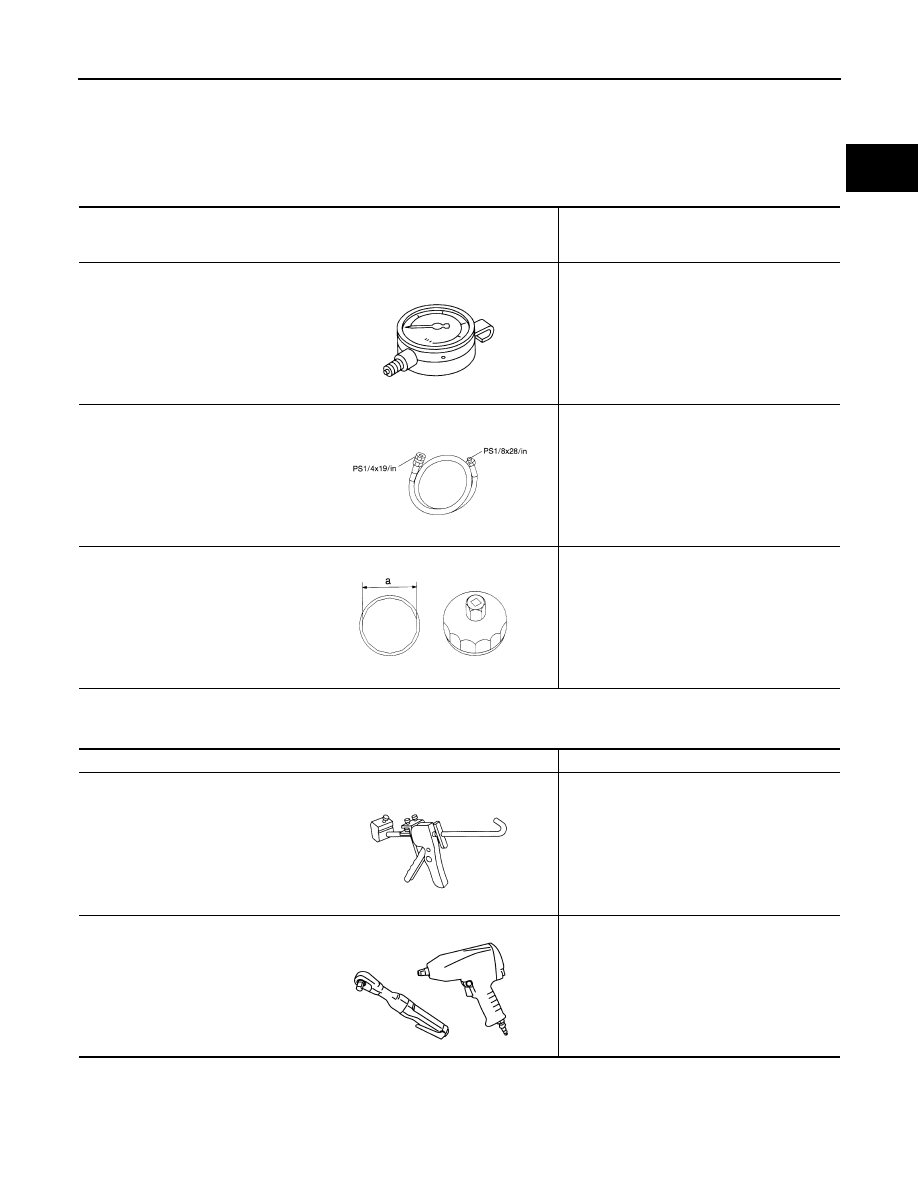
Special Service Tools
INFOID:0000000005245059
The actual shapes of Kent-Moore tools may differ from those of special service tools illustrated here.
Commercial Service Tools
INFOID:0000000005245060
Tool number
(Kent-Moore No.)
Tool name
Description
ST25051001
(J25695-1)
Oil pressure gauge
Measuring oil pressure
Maximum measuring range: 2,452 kPa (25
kg/cm
2
, 356 psi)
ST25052000
(J25695-2)
Hose
Adapting oil pressure gauge to oil pan (upper)
KV10115801
(J38956)
Oil filter wrench
Removing and installing oil filter
a: 64.3 mm (2.531 in)
NT050
S-NT559
S-NT375
Tool name
Description
Tube presser
Pressing tube of liquid gasket
Power tools
Loosening bolts and nuts
NT052
PBIC0190E
LU-6
< PERIODIC MAINTENANCE >
[VQ35HR]
ENGINE OIL
PERIODIC MAINTENANCE
ENGINE OIL
Inspection
INFOID:0000000005245061
ENGINE OIL LEVEL
NOTE:
Before starting engine, put vehicle horizontally and check the engine oil level. If engine is already started, stop
it and allow 10 minutes before checking.
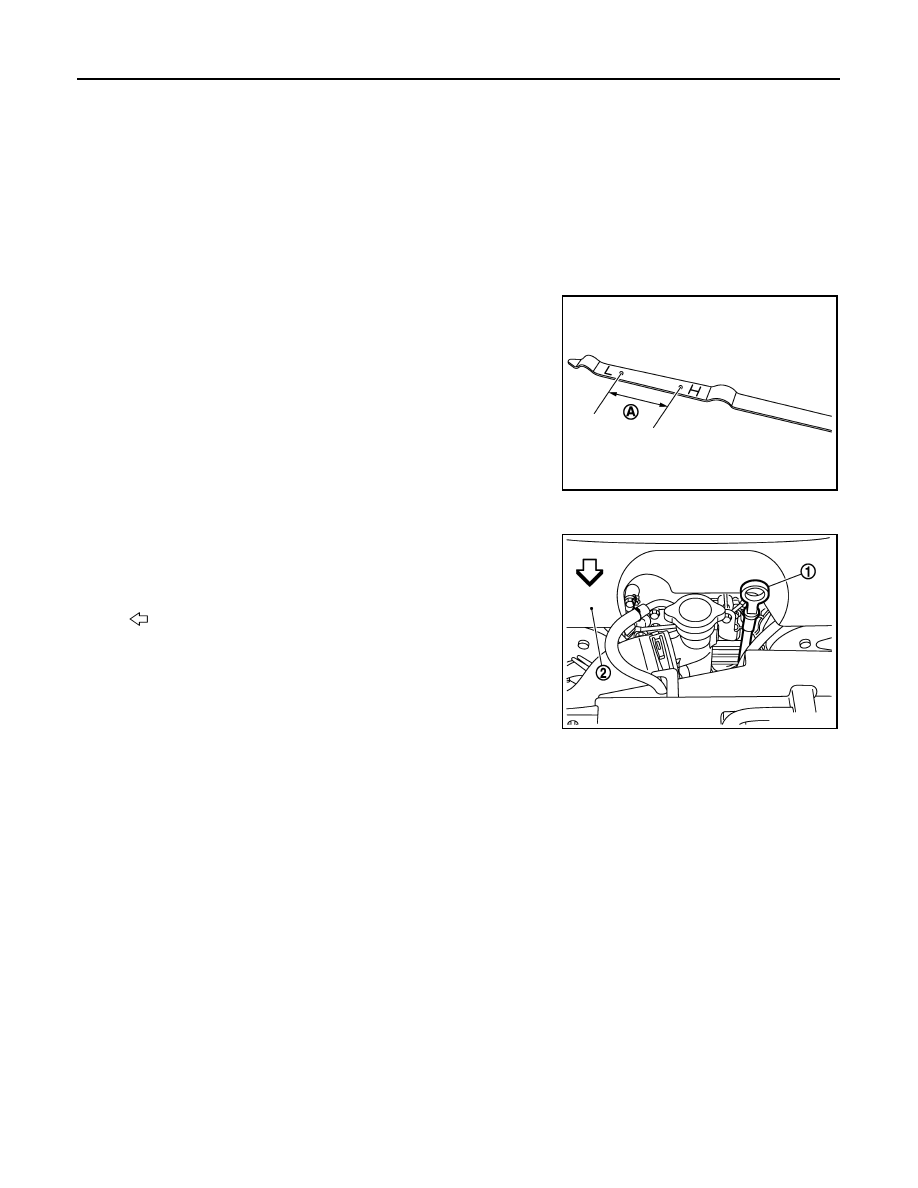
1.
Pull out oil level gauge and wipe it clean.
2.
Insert oil level gauge and check the engine oil level is within the
range (A) shown in the figure.
3.
If it is out of range, adjust it.
NOTE:
When checking the engine oil level, insert oil level gauge (1)
with its tip aligned with oil level gauge guide.
ENGINE OIL APPEARANCE
• Check engine oil for white turbidity or heavy contamination.
• If engine oil becomes turbid and white, it is highly probable that it is contaminated with engine coolant.
Repair or replace damaged parts.
ENGINE OIL LEAKAGE
Check for engine oil leakage around the following areas:
• Oil pans (lower and upper)
• Oil pan drain plug
• Oil pressure switch
• Oil temperature sensor
• Oil filter
• Oil filter bracket (AWD models)
• Valve timing control cover
• Mating surface between cylinder head and rocker cover
• Mating surface between front timing chain case and rear timing chain case
• Mating surface between rear timing chain case and cylinder head
• Mating surface between rear timing chain case and cylinder block
• Mating surface between rear timing chain case and oil pan (upper)
• Mating surface between cylinder block and cylinder head
• Mating surface between lower cylinder block and cylinder block
• Crankshaft oil seals (front and rear)
• Camshaft position sensor (PHASE) and exhaust valve timing control position sensor
JPBIA0070ZZ
2
: Engine cover
: Engine front
JPBIA0071ZZ
ENGINE OIL
LU-7
< PERIODIC MAINTENANCE >
[VQ35HR]
C
D
E
F
G
H
I
J
K
L
M
A
LU
N
P
O
OIL PRESSURE CHECK
WARNING:
• Be careful not to get burned, as engine oil may be hot.
• Oil pressure check should be done in “Parking position”.
1.
Check the engine oil level.
2.
Remove engine undercover with power tool.
3.
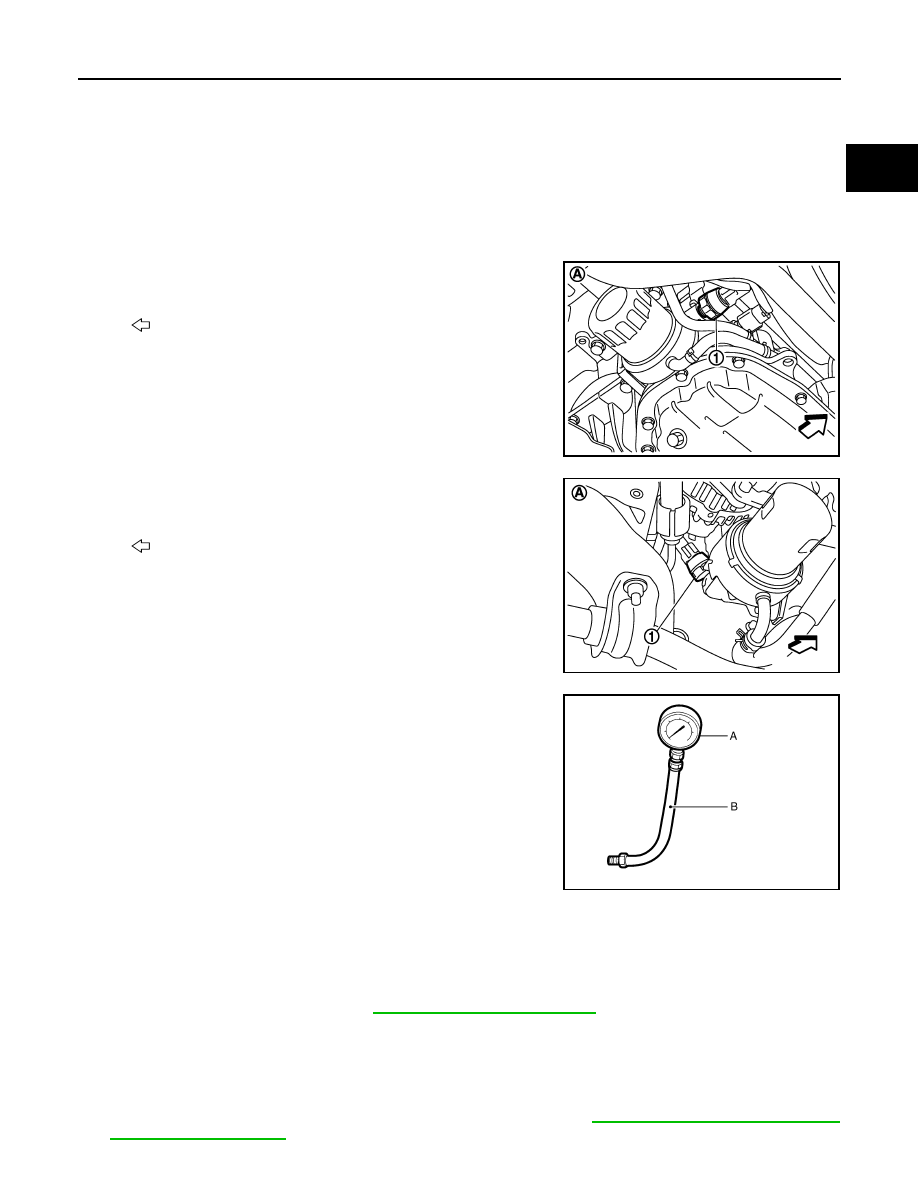
Disconnect harness connector at oil pressure switch, and remove oil pressure switch.
CAUTION:
Never drop or impact oil pressure switch.
• 2WD models (A)
• AWD models (A)
4.
Install the oil pressure gauge [SST: ST25051001 (J25695-1)] (A)
and hose [SST: ST25052000 (J25695-2)] (B).
5.
Start the engine and warm it up to normal operating temperature.
6.
Check the engine oil pressure with engine running under no-load.
NOTE:
When the engine oil temperature is low, the engine oil pressure becomes high.
If difference is extreme, check engine oil passage and oil pump for engine oil leakage.
7.
After the inspections, install oil pressure switch as per the following:
a.
Remove old liquid gasket adhering to oil pressure switch and the mating surface.
b.
Apply liquid gasket and tighten oil pressure switch to the specification.
Use Genuine RTV Silicone Sealant or an equivalent. Refer to
1
: Oil pressure switch
: Vehicle front
JPBIA1907ZZ
1
: Oil pressure switch
: Vehicle front
JPBIA0073ZZ
JPBIA0074ZZ
Engine oil pressure
: Refer to
LU-8
< PERIODIC MAINTENANCE >
[VQ35HR]
ENGINE OIL
c.
After warming up engine, check there is no leakage of engine oil with running engine.
Draining
INFOID:0000000005245062
WARNING:
• Be careful not to get burned, as engine oil may be hot.
• Prolonged and repeated contact with used engine oil may cause skin cancer. Try to avoid direct skin
contact with used engine oil. If skin contact is made, wash thoroughly with soap or hand cleaner as
soon as possible.
1.
Warm up the engine, and check for engine oil leakage from engine components. Refer to
2.
Stop the engine and wait for 10 minutes.
3.
Loosen oil filler cap.
4.
Remove undercover with power tool.
5.
Remove drain plug and then drain engine oil.
Refilling
INFOID:0000000005245063
1.
Install drain plug with new washer. Refer to
.
CAUTION:
Be sure to clean drain plug and install with new washer.
2.
Refill with new engine oil.
Engine oil specification and viscosity: Refer to
MA-12, "Fluids and Lubricants"
CAUTION:
• When filling engine oil, never pull out oil level gauge.
• The refill capacity depends on the engine oil temperature and drain time. Use these specifica-
tions for reference only.
• Always use oil level gauge to determine the proper amount of engine oil in engine.
3.
Warm up the engine and check area around drain plug and oil filter for engine oil leakage.
4.
Stop the engine and wait for 10 minutes.
5.
Check the engine oil level. Refer to
.
Tightening torque
.
Tightening torque
: Refer to
.
Engine oil capacity
: Refer to
Нет комментариевНе стесняйтесь поделиться с нами вашим ценным мнением.
Текст