Infiniti FX35, FX50 (S51). Manual — part 756

PREPARATION
EC-565
< PREPARATION >
[VQ35HR]
C
D
E
F
G
H
I
J
K
L
M
A
EC
N
P
O
Oxygen sensor thread
cleaner
i.e.: (J-43897-18)
(J-43897-12)
Reconditions the exhaust system threads before
installing a new oxygen sensor. Use with anti-
seize lubricant shown below.
a: 18 mm diameter with pitch 1.5 mm for Zirco-
nia Oxygen Sensor
b: 12 mm diameter with pitch 1.25 mm for Tita-
nia Oxygen Sensor
Anti-seize lubricant
i.e.: (Permatex
TM
133AR or equivalent
meeting MIL specifica-
tion MIL-A-907)
Lubricates oxygen sensor thread cleaning tool
when reconditioning exhaust system threads.
Tool name
(Kent-Moore No.)
Description
AEM488
S-NT779
EC-566
< PERIODIC MAINTENANCE >
[VQ35HR]
FUEL PRESSURE
PERIODIC MAINTENANCE
FUEL PRESSURE
Inspection
INFOID:0000000005237136
FUEL PRESSURE RELEASE
With CONSULT-III
1.
Turn ignition switch ON.
2.
Perform “FUEL PRESSURE RELEASE” in “WORK SUPPORT” mode with CONSULT-III.
3.
Start engine.
4.
After engine stalls, crank it 2 or 3 times to release all fuel pressure.
5.
Turn ignition switch OFF.
Without CONSULT-III
1.
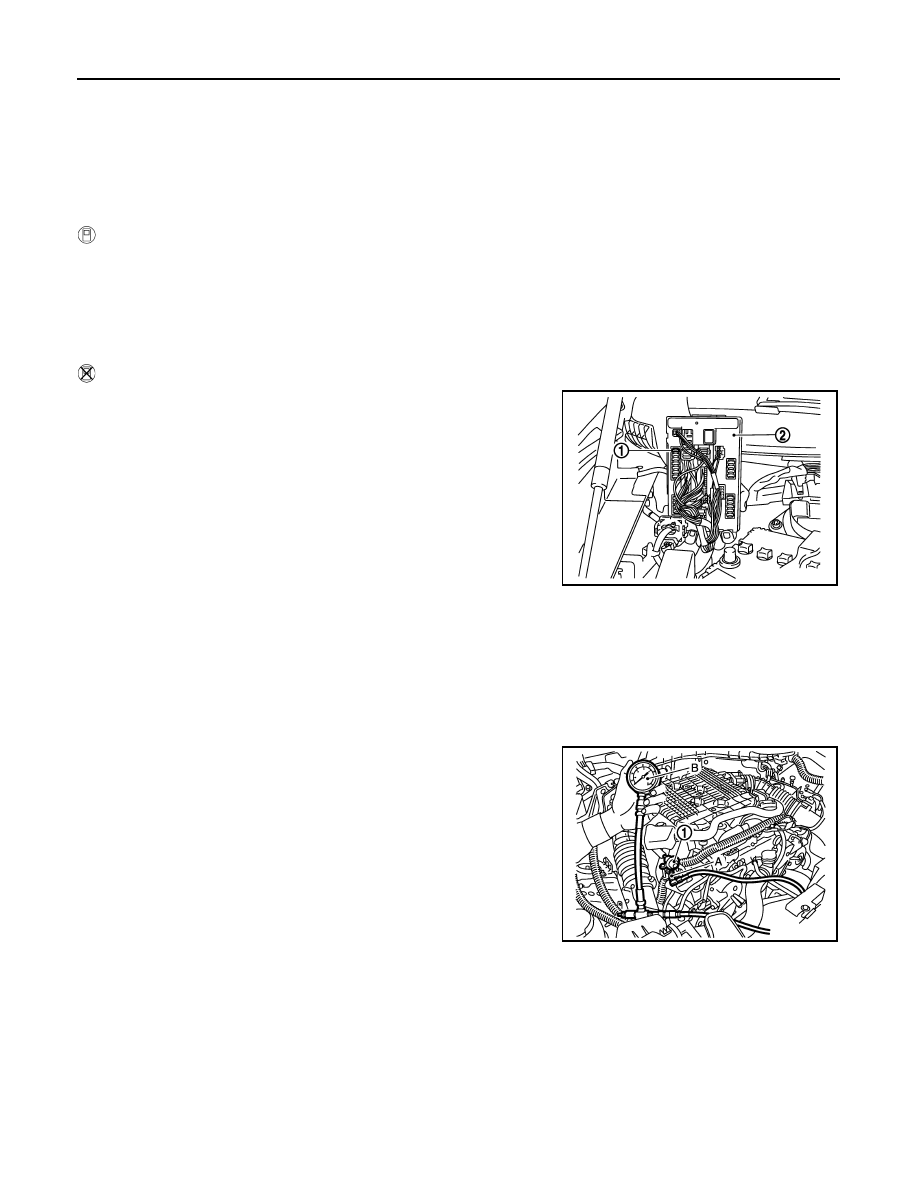
Remove fuel pump fuse (1) located in IPDM E/R (2).
2.
Start engine.
3.
After engine stalls, crank it 2 or 3 times to release all fuel pres-
sure.
4.
Turn ignition switch OFF.
5.
Reinstall fuel pump fuse after servicing fuel system.
FUEL PRESSURE CHECK
CAUTION:
Before disconnecting fuel line, release fuel pressure from fuel line to eliminate danger.
NOTE:
• Prepare pans or saucers under the disconnected fuel line because the fuel may spill out. The fuel
pressure cannot be completely released because S51 models do not have fuel return system.
• Use Fuel Pressure Gauge Kit [SST:(J-44321)] to check fuel pressure.
1.
Release fuel pressure to zero.
2.
Install the inline fuel quick disconnect fitting (A) between fuel
damper (1) and injector tube.
3.
Connect the fuel pressure test gauge (with quick connector
adapter hose) (B) to the inline fuel quick disconnect fitting.
4.
Turn ignition switch ON and check for fuel leakage.
5.
Start engine and check for fuel leakage.
6.
Read the indication of fuel pressure gauge.
7.
If result is unsatisfactory, check fuel hoses and fuel tubes for
clogging.
If OK, Replace “fuel filter and fuel pump assembly”.
If NG, Repair or replace malfunctioning part.
JMBIA1506ZZ
At idling
: Approximately 350 kPa (3.57 kg/cm
2
, 51 psi)
JMBIA1513ZZ

EVAP LEAK CHECK
EC-567
< PERIODIC MAINTENANCE >
[VQ35HR]
C
D
E
F
G
H
I
J
K
L
M
A
EC
N
P
O
EVAP LEAK CHECK
Inspection
INFOID:0000000005237137
CAUTION:
• Never use compressed air or a high pressure pump.
• Never exceed 4.12 kPa (0.042 kg/cm
2
, 0.6 psi) of pressure in EVAP system.
NOTE:
• Do not start engine.
• Improper installation of EVAP service port adapter (commercial service tool) to the EVAP service port may
cause a leak.
WITH CONSULT-III
1.
To locate the EVAP leak, install EVAP service port adapter (com-
mercial service tool) and pressure pump to EVAP service port.
2.
Turn ignition switch ON.
3.
Select the “EVAP SYSTEM CLOSE” of “WORK SUPPORT”
mode with CONSULT-III.
4.
Touch “START”. A bar graph (Pressure indicating display) will
appear on the screen.
5.
Apply positive pressure to the EVAP system until the pressure
indicator reaches the middle of the bar graph.
6.
Remove EVAP service port adapter (commercial service tool)
and hose with pressure pump.
7.
Locate the leak using a leak detector (commercial service tool).
Refer to
WITHOUT CONSULT-III
1.
To locate the EVAP leak, install EVAP service port adapter (com-
mercial service tool) and pressure pump to EVAP service port.
2.
Apply battery voltage between the terminals of EVAP canister
vent control valve to make a closed EVAP system.
3.
To locate the leak, deliver positive pressure to the EVAP system
until pressure gauge points reach 1.38 to 2.76 kPa (0.014 to
0.028 kg/cm
2
, 0.2 to 0.4 psi).
4.
Remove EVAP service port adapter (commercial service tool)
and hose with pressure pump.
SEF462UA
SEF200U
SEF462UA

EC-568
< PERIODIC MAINTENANCE >
[VQ35HR]
EVAP LEAK CHECK
5.
Locate the leak using a leak detector (commercial service tool).
Refer to
SEF200U
Нет комментариевНе стесняйтесь поделиться с нами вашим ценным мнением.
Текст