Infiniti FX35, FX50 (S51). Manual — part 1073

EXT-42
< REMOVAL AND INSTALLATION >
DOOR SASH MOLDING
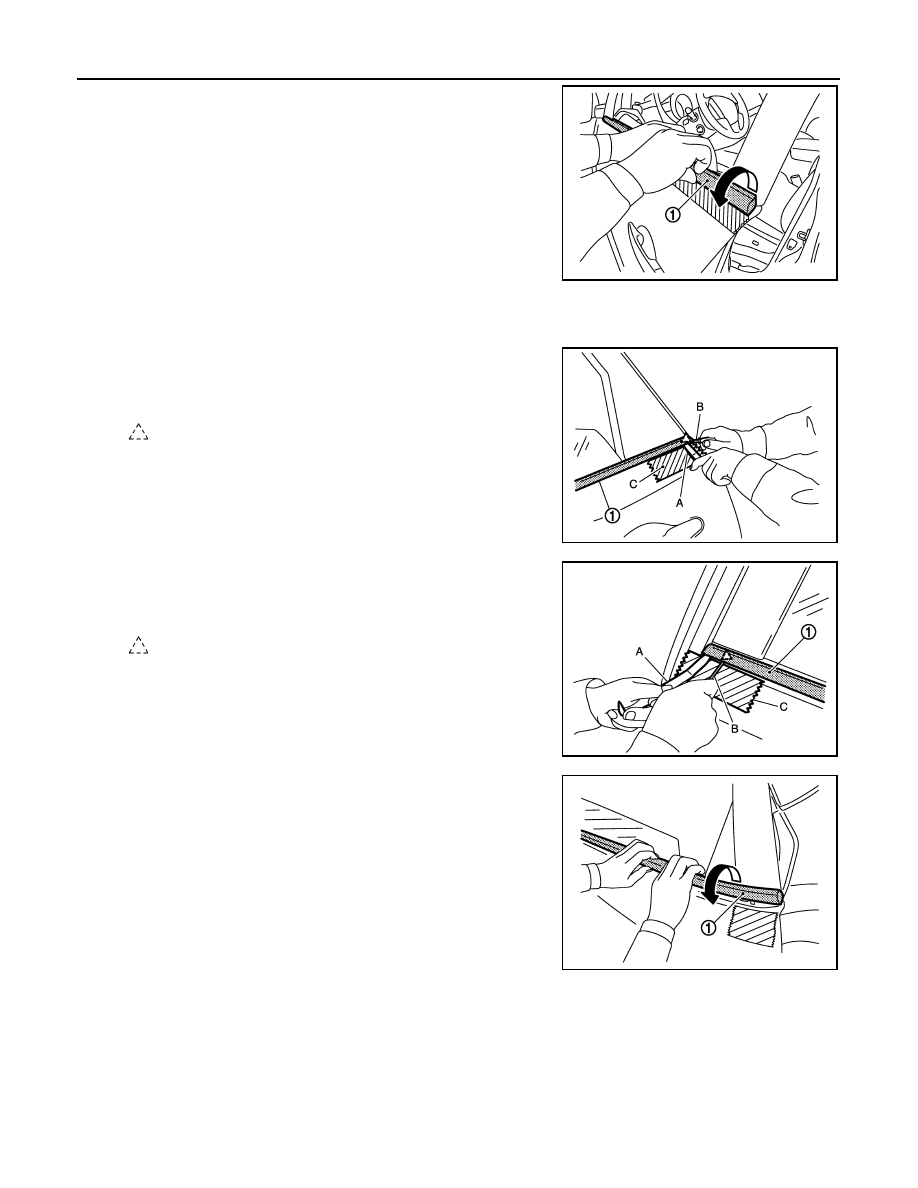
2.
Remove rear door sash outer cover rear mounting screw (A)
and clip (B).
3.
Release rear door sash outer cover rear connection between
rear door panel and cover (1), with a remover tool (A) and cutter
knife (B), and take off double-faced adhesive tape.
CAUTION:
Never use an item as a remover tool that could damage
door panel.
INSTALLATION
Install in the reverse order of removal.
CAUTION:
• Always replace front/rear door sash molding, front/rear door sash cover and rear door sash cover
rear with a new one.
• Remove double-faced adhesive tape remaining on door panel and back of door sash cover with a
double-faced adhesive tape remover, after removing door sash cover.
• Never wash the vehicle within 24 hours after installing so as to keep adhesive.
JMKIA2748ZZ
JMKIA2034ZZ

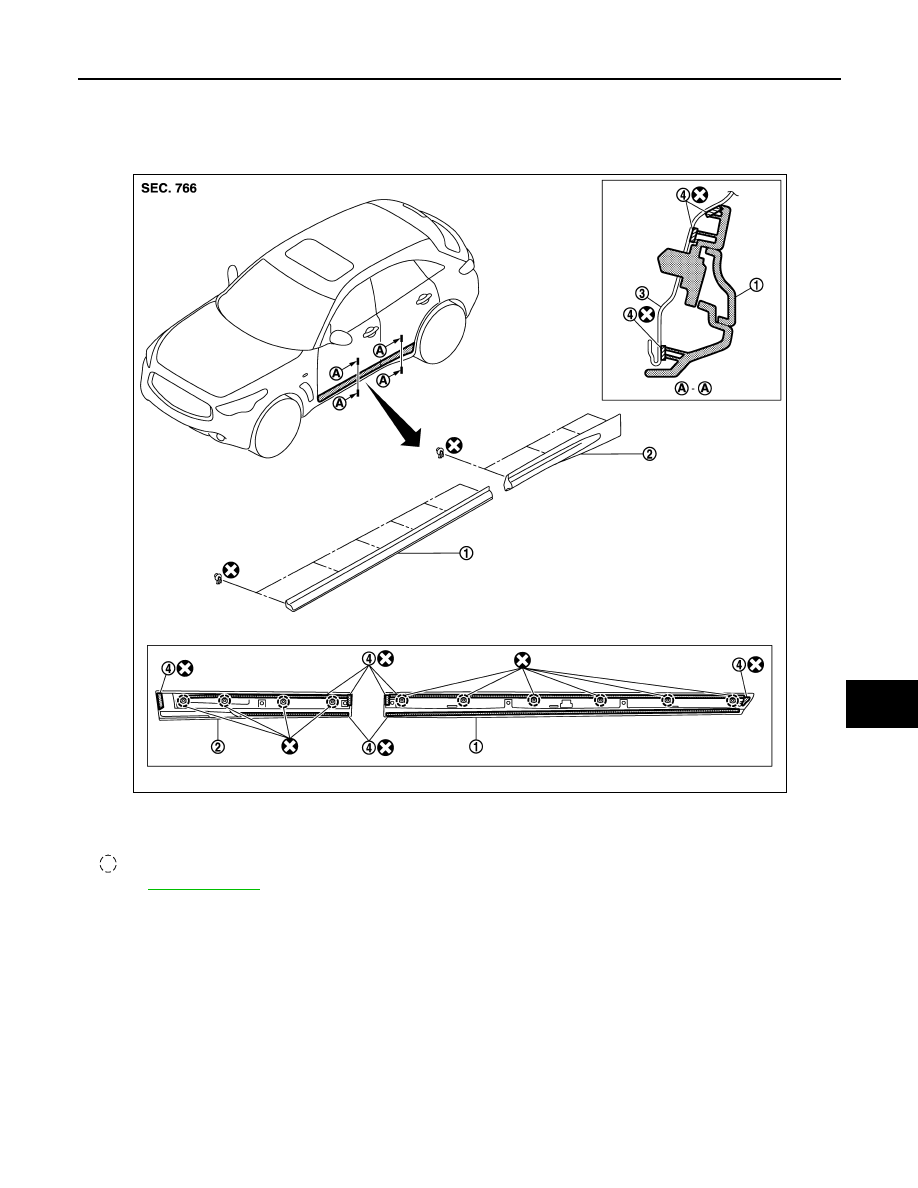
DOOR OUTSIDE MOLDING
EXT-43
< REMOVAL AND INSTALLATION >
C
D
E
F
G
H
I
J
L
M
A
B
EXT
N
O
P
DOOR OUTSIDE MOLDING
Exploded View
INFOID:0000000005248881
Removal and Installation
INFOID:0000000005248882
REMOVAL
FRONT DOOR OUTSIDE MOLDING
1.
Fully open door window.
2.
Insert a remover tool (A) into lower space.
3.
Disengage front door outside molding (1) fixing pawl (rear side)
with flat-bladed screwdriver (B).
CAUTION:
• Apply protection tape (C) on the door panel to protect the
painted surface from damage.
• Never use an item as a remover tool that could damage
door panel.
1.
Front door outside molding
2.
Front door panel
3.
Rear door outside molding
4.
Rear door panel
: Pawl
Refer to
for symbols in the figure.
JMKIA2751ZZ
: Pawl
JMKIA2752ZZ
EXT-44
< REMOVAL AND INSTALLATION >
DOOR OUTSIDE MOLDING
4.
Twist and pull up to upper side, and then remove front door out-
side molding (1).
REAR DOOR OUTSIDE MOLDING
1.
Fully open door window.
2.
Insert a remover tool (A) into lower space.
3.
Disengage rear door outside molding (1) fixing pawl (rear side)
with flat-bladed screwdriver (B).
CAUTION:
• Apply protection tape (C) on the door panel to protect the
painted surface from damage.
• Never use an item as a remover tool that could damage
door panel.
4.
Insert a remover tool (A) into lower space.
5.
Disengage rear door outside molding (1) fixing pawl (front side)
with flat-bladed screwdriver (B).
CAUTION:
• Apply protection tape (C) on the door panel to protect the
painted surface from damage.
• Never use an item as a remover tool that could damage
door panel.
6.
Twist and pull up to upper side, and then remove rear door out-
side molding (1).
INSTALLATION
Install in the reverse order of removal.
JMKIA2024ZZ
: Pawl
JMKIA2753ZZ
: Pawl
JMKIA2757ZZ
JMKIA2026ZZ
DOOR OUTSIDE LOWER MOLDING
EXT-45
< REMOVAL AND INSTALLATION >
C
D
E
F
G
H
I
J
L
M
A
B
EXT
N
O
P
DOOR OUTSIDE LOWER MOLDING
Exploded View
INFOID:0000000005248883
Removal and Installation
INFOID:0000000005248884
REMOVAL
FRONT DOOR OUTSIDE LOWER MOLDING
1.
Front door outside lower molding
2.
Rear door outside lower molding
3.
Front door panel
4.
Double-faced adhesive tape
: Clip
Refer to
for symbols in the figure.
JMKIA2758ZZ
Нет комментариевНе стесняйтесь поделиться с нами вашим ценным мнением.
Текст