Infiniti FX35, FX50 (S51). Manual — part 1364

MA-20
< PERIODIC MAINTENANCE >
ENGINE MAINTENANCE (VQ35HR)
2.
Apply engine oil to the oil seal contact surface of new oil filter.
3.
Screw oil filter manually until it touches the installation surface,
then tighten it by 2/3 turn (A). Or tighten to the specification.
OIL FILTER : Inspection
INFOID:0000000005248724
INSPECTION AFTER INSTALLATION
1.
Check the engine oil level. Refer to
.
2.
Start the engine, and check there is no leakage of engine oil.
3.
Stop the engine and wait for 10 minutes.
4.
Check the engine oil level, and adjust the level. Refer to
.
SPARK PLUG
SPARK PLUG : Removal and Installation
INFOID:0000000005248725
REMOVAL
1.
Remove engine cover with power tool. Refer to
.
2.
Remove air duct. Refer to
3.
Remove electric throttle control actuator. Refer to
.
4.
Remove ignition coil. Refer to
EM-50, "Removal and Installation"
.
5.
Remove spark plug with a spark plug wrench (commercial ser-
vice tool).
INSTALLATION
Installation is the reverse order of removal.
SMA010
Oil filter:
: 17.7 N·m (1.8 kg-m, 13 ft-lb)
JPBIA0077ZZ
a
: 14 mm (0.55 in)
JPBIA0030ZZ

ENGINE MAINTENANCE (VQ35HR)
MA-21
< PERIODIC MAINTENANCE >
C
D
E
F
G
H
I
J
K
L
M
B
MA
N
O
A
SPARK PLUG : Inspection
INFOID:0000000005248726
INSPECTION AFTER REMOVAL
Use the standard type spark plug for normal condition.
CAUTION:
• Never drop or impact spark plug.
• Never use a wire brush for cleaning.
• If plug tip is covered with carbon, spark plug cleaner may be
used.
• Measure spark plug gap. When it exceeds the limit, replace spark plug even if it is within the speci-
fied replacement mileage. Refer to
• Spark plug gap adjustment is not required between replace-
ment intervals.
EVAP VAPOR LINES
EVAP VAPOR LINES : Inspection
INFOID:0000000005248727
1.
Visually inspect EVAP vapor lines for improper attachment and for cracks, damage, loose connections,
chafing and deterioration.
2.
Inspect fuel tank filler cap vacuum relief valve for clogging, sticking, etc.
Refer to
Spark plug (Standard type)
: Refer to
Cleaner air pressure:
Less than 588 kPa (6 kg/cm
2
, 85
psi)
Cleaning time:
Less than 20 seconds
SMA773C
JPBIA0031ZZ
MA-22
< PERIODIC MAINTENANCE >
ENGINE MAINTENANCE (VK50VE)
ENGINE MAINTENANCE (VK50VE)
DRIVE BELTS
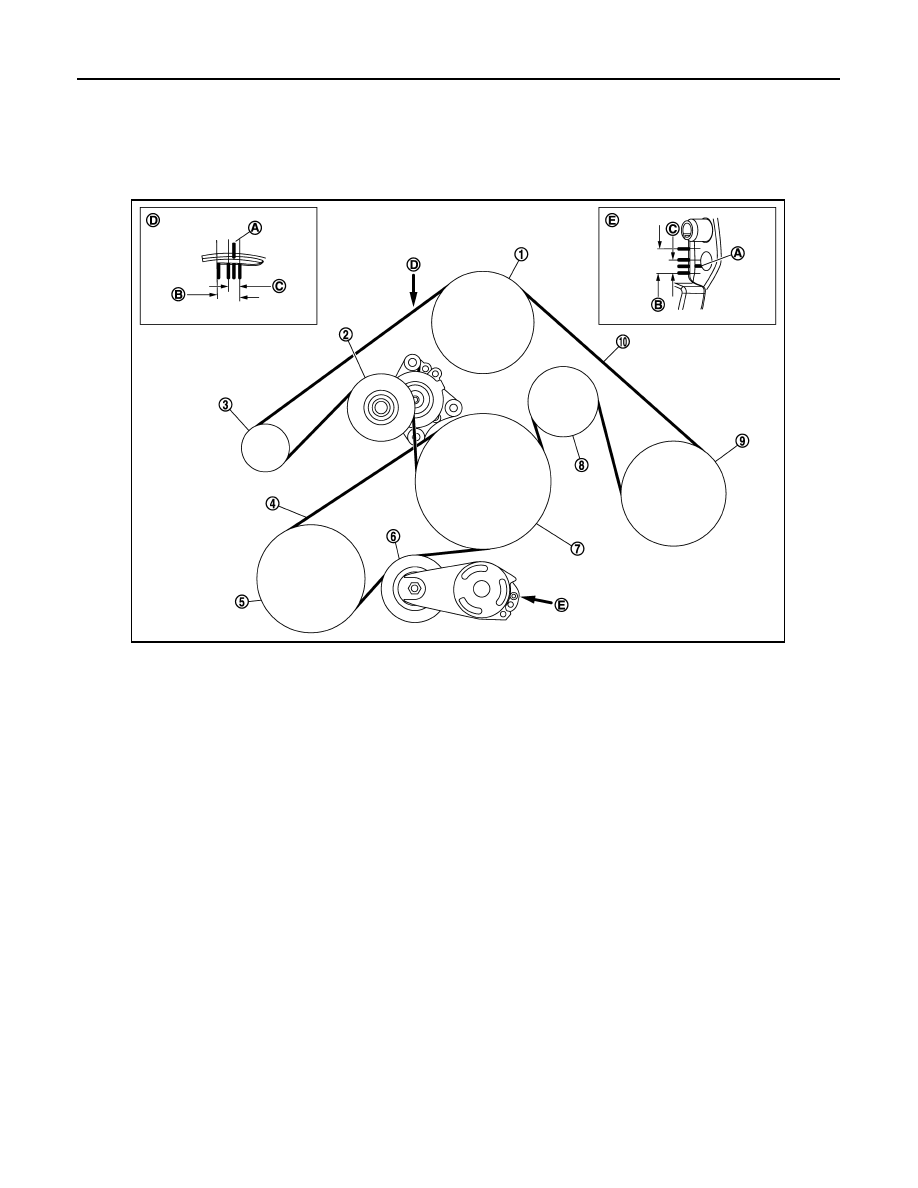
DRIVE BELTS : Exploded View
INFOID:0000000005248728
DRIVE BELTS : Checking
INFOID:0000000005248729
WARNING:
Be sure to perform the these steps when engine is stopped.
• Remove air duct (inlet) when inspecting alternator, water pump and A/C compressor belt.
• Remove engine undercover with power tool when inspecting power steering oil pump belt.
• Check that the indicator (A) (notch on fixed side) of each auto-tensioner is within the possible use range (B).
NOTE:
• Check the each auto-tensioners indication when the engine is cold.
• When new drive belts is installed, the indicator (notch on fixed side) should be within the range (C) in the
figure.
• Visually check all drive belts for wear, damage or cracks.
• If the indicator (notch on fixed side) is out of the possible use range or drive belts are damaged, replace drive
belts.
1.
Water pump
2.
Auto-tensioner (for alternator, water
pump and A/C compressor belt)
3.
Alternator
4.
Power steering oil pump belt
5.
Power steering oil pump
6.
Auto-tensioner (for power steering oil
pump belt)
7.
Crankshaft pulley
8.
Idler pulley
9.
A/C compressor
10.
Alternator, water pump and A/C com-
pressor belt
A.
Indicator
B.
Possible use range
C.
Range when new drive belt is installed
D.
View D
E.
View E
JPBIA2065ZZ
ENGINE MAINTENANCE (VK50VE)
MA-23
< PERIODIC MAINTENANCE >
C
D
E
F
G
H
I
J
K
L
M
B
MA
N
O
A
DRIVE BELTS : Tension Adjustment
INFOID:0000000005248730
ENGINE COOLANT
ENGINE COOLANT : Draining
INFOID:0000000005248731
WARNING:
• Never change engine coolant when the engine is hot to avoid being scalded.
• Wrap a thick cloth around radiator cap and carefully remove radiator cap. First, turn radiator cap a
quarter of a turn to release built-up pressure. Then turn radiator cap all the way.
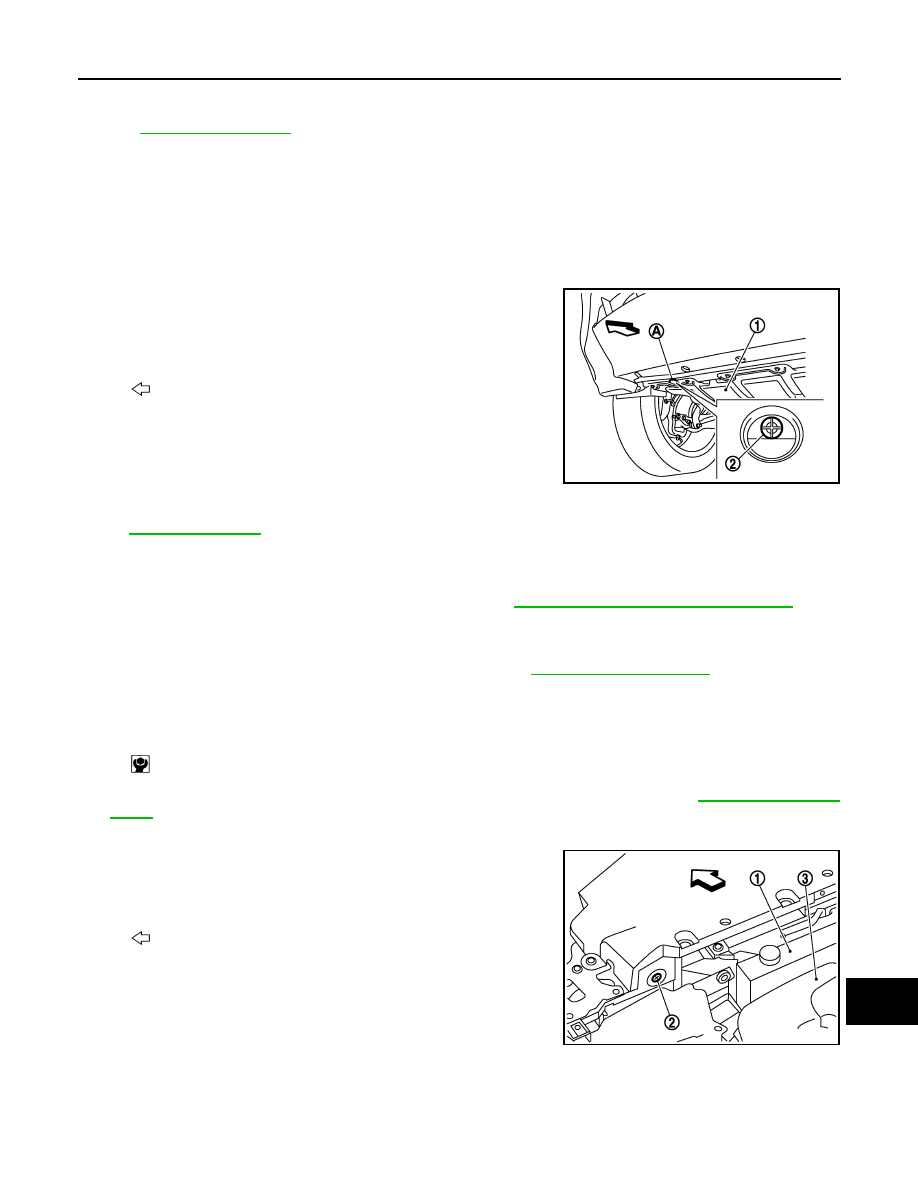
1.
Open radiator drain plug (2) at the bottom of radiator, and then
remove radiator cap.
When draining all of engine coolant in the system, open water drain plug on cylinder block. Refer
to
2.
Remove reservoir tank if necessary, and drain engine coolant and clean reservoir tank before installing.
3.
Check drained engine coolant for contaminants such as rust, corrosion or discoloration.
If contaminated, flush the engine cooling system. Refer to
MA-25, "ENGINE COOLANT : Flushing"
ENGINE COOLANT : Refilling
INFOID:0000000005248732
1.
Remove engine cover and engine room cover (LH). Refer to
2.
Install reservoir tank if removed, and radiator drain plug.
CAUTION:
Be sure to clean drain plug and install with new O-ring.
If water drain plug on cylinder block is removed, close and tighten it. Refer to
3.
Check that each hose clamp is firmly tightened.
4.
Remove air relief plug (2) on radiator left side.
1
: Engine under cover
A
: Radiator drain plug hole
: Vehicle front
JPBIA2345ZZ
: 1.2 N·m (0.12 kg-m, 11 in-lb)
1
: Reservoir tank
3
: Water inlet
: Vehicle front
JPBIA0260ZZ
Нет комментариевНе стесняйтесь поделиться с нами вашим ценным мнением.
Текст