Infiniti FX35, FX50 (S51). Manual — part 1574

SUNROOF UNIT ASSEMBLY
RF-77
< REMOVAL AND INSTALLATION >
C
D
E
F
G
H
I
J
L
M
A
B
RF
N
O
P
SUNROOF UNIT ASSEMBLY
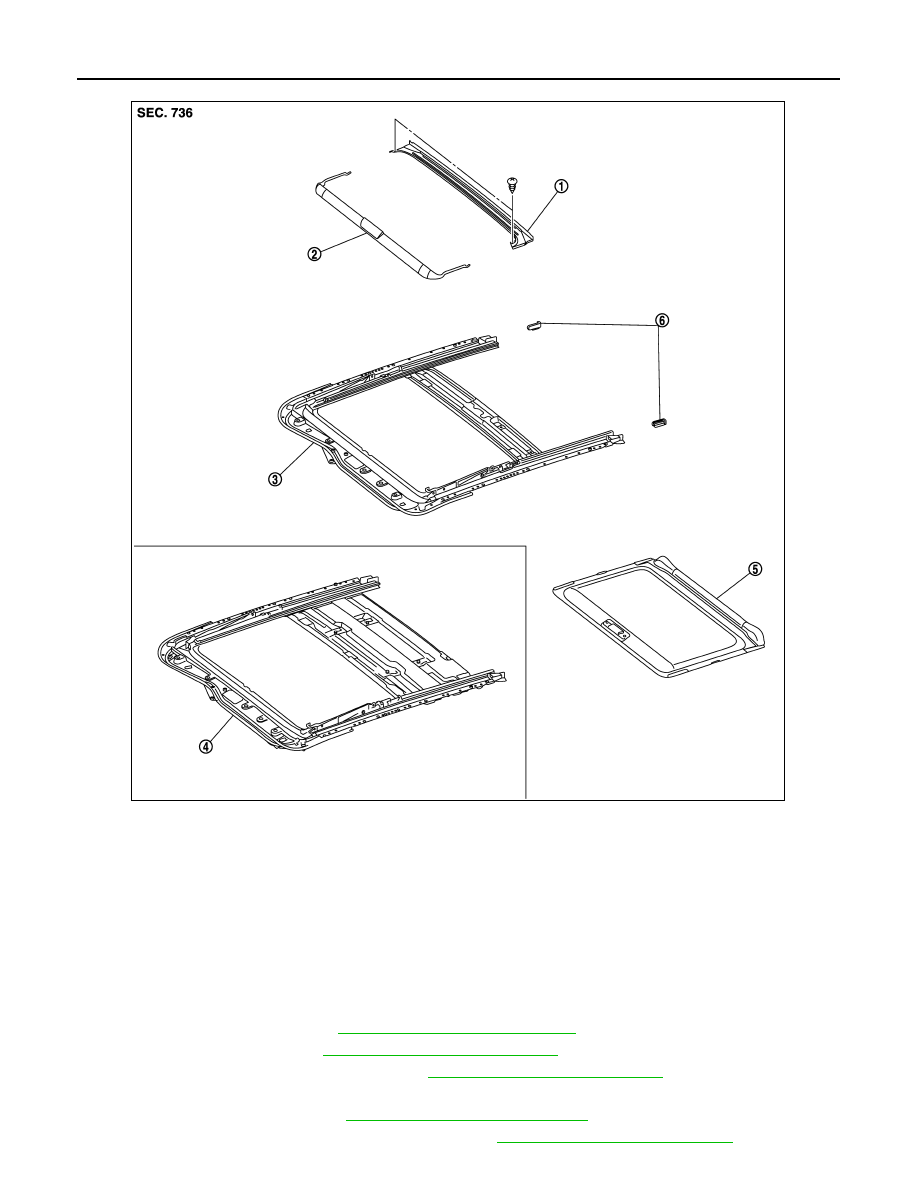
Exploded View
INFOID:0000000005248649
REMOVAL
DISASSEMBLY
1.
Glass lid
2.
TORX bolt
3.
Inner blind (LH/RH)
4.
Drain hose (front)
5.
Drain connector (front)
6.
Sunroof motor assembly
7.
Sunroof front bracket (LH/RH)
8.
Sunroof rear bracket (LH/RH)
9.
Drain hose (rear)
10. Drain connector (rear)
11.
Sunroof unit assembly
Refer to
JMKIA2688GB
RF-78
< REMOVAL AND INSTALLATION >
SUNROOF UNIT ASSEMBLY
Removal and Installation
INFOID:0000000005248650
REMOVAL
CAUTION:
• Always work with 2 workers.
• Fully close the glass lid, before removal, then never operate sunroof motor assembly after removal.
• When taking sunroof unit assembly out, use shop cloths to protect the seats and trim from damage.
1.
Remove the headlining. Refer to
INT-24, "Removal and Installation"
.
2.
Remove the glass lid. Refer to
RF-72, "Removal and Installation"
3.
Remove the sunroof motor assembly. Refer to
RF-75, "Removal and Installation"
4.
Disconnect drain hoses.
5.
Remove the rear display. Refer to
AV-565, "Removal and Installation"
. (With rear display model only)
6.
Remove the side curtain air bag mounting bolt. Refer to
SR-19, "Removal and Installation"
.
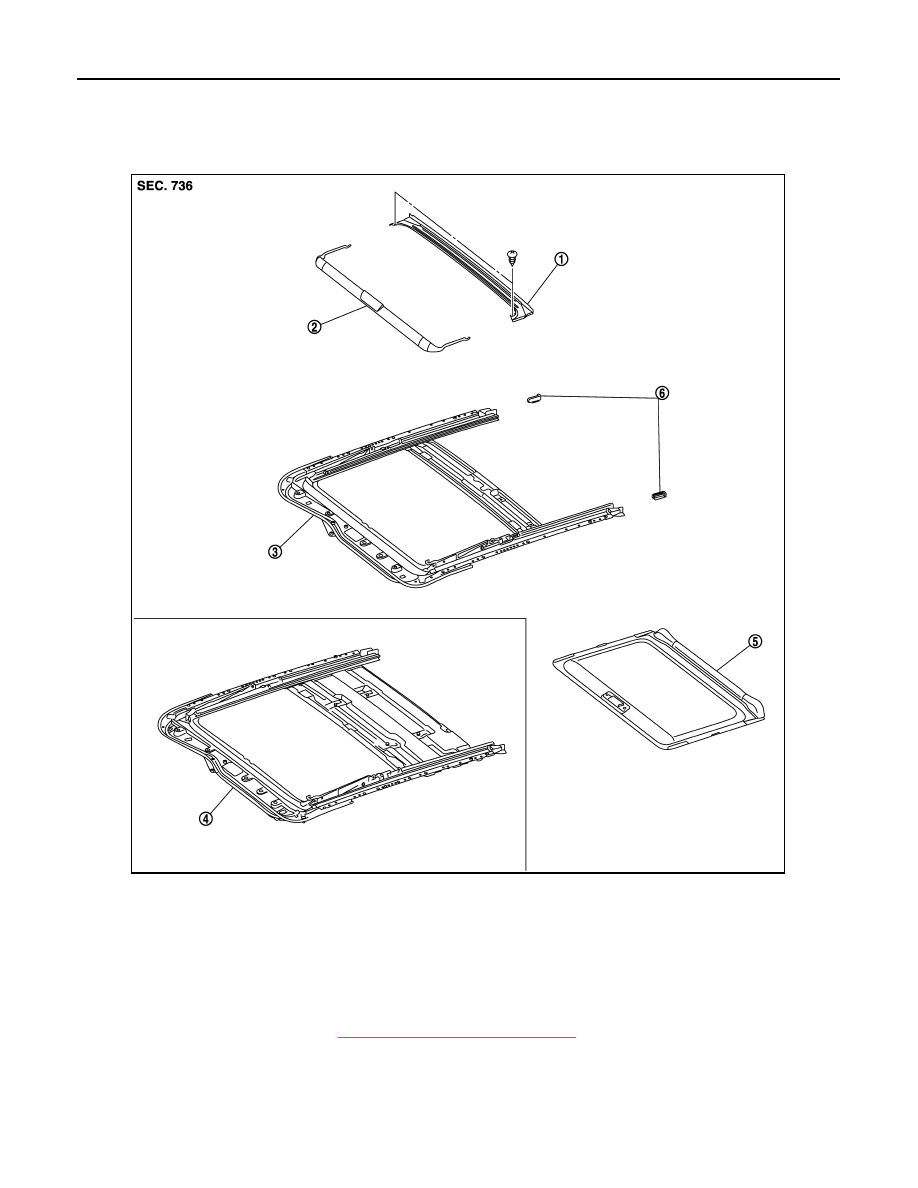
1.
Rear drain
2.
Wind deflector
3.
Sunroof frame
4.
Sunroof frame (with rear display
model)
5.
Sunshade
6.
Sunshade stopper (LH/RH)
JMKIA2689ZZ

SUNROOF UNIT ASSEMBLY
RF-79
< REMOVAL AND INSTALLATION >
C
D
E
F
G
H
I
J
L
M
A
B
RF
N
O
P
7.
Remove the sunroof front brackets (LH/RH).
8.
Remove the sunroof rear brackets (LH/RH).
9.
Remove nuts from the front end and side rail, and then remove sunroof unit assembly from roof panel.
10. Remove sunroof unit assembly through the back door while being careful not to damage the seats and
trim.
INSTALLATION
CAUTION:
After installing the sunroof unit assembly and glass lid, perform the leak test and check that there is
no malfunction.
1.
Temporarily tighten the mounting bolts to the sunroof rear brackets (LH/RH).
2.
Temporarily tighten the mounting bolts to the sunroof front brackets (LH/RH).
3.
Bring sunroof unit into back door.
4.
Temporarily tighten the mounting nuts to the side rail of sunroof unit assembly.
5.
Temporarily tighten the mounting nuts to the front end of sunroof unit assembly.
6.
Tighten the installation points diagonally excluding the installation points of the sunroof brackets around
the roof opening.
7.
Tighten the sunroof bracket bolts of the vehicle side, and then tighten the bolt of the rail side.
8.
Install the side curtain air bag mounting bolt. Refer to
SR-19, "Removal and Installation"
.
9.
Install the rear display. Refer to
AV-565, "Removal and Installation"
. (With rear display model only)
10. Install the sunroof motor assembly. Refer to
RF-75, "Removal and Installation"
11. Install the glass lid. Refer to
RF-72, "Removal and Installation"
.
NOTE:
After installation, perform fitting adjustment. Refer to
.
12. Connect drain hoses.
13. Install the headlining. Refer to
INT-24, "Removal and Installation"
Disassembly and Assembly
INFOID:0000000005248651
DISASSEMBLY
1.
Remove the screw, and then rear drain.
2.
Remove the sunshade. Refer to
RF-80, "Removal and Installation"
.
3.
Remove the wind deflector. Refer to
RF-82, "Removal and Installation"
.
ASSEMBLY
Assemble in the reverse order of disassembly.
RF-80
< REMOVAL AND INSTALLATION >
SUNSHADE
SUNSHADE
Exploded View
INFOID:0000000005248652
Removal and Installation
INFOID:0000000005248653
REMOVAL
1.
Remove the headlining. Refer to
INT-24, "Removal and Installation"
.
1.
Rear drain
2.
Wind deflector
3.
Sunroof frame
4.
Sunroof frame (with rear display
model)
5.
Sunshade
6.
Sunshade stopper (LH/RH)
JMKIA2689ZZ
Нет комментариевНе стесняйтесь поделиться с нами вашим ценным мнением.
Текст