Infiniti FX35, FX50 (S51). Manual — part 1119
BACK DOOR WINDOW GLASS
GW-17
< REMOVAL AND INSTALLATION >
C
D
E
F
G
H
I
J
L
M
A
B
GW
N
O
P
Apply primer (if necessary) and then urethane adhesive to the leakage point to stop the leakage.
GW-18
< REMOVAL AND INSTALLATION >
FRONT DOOR GLASS
FRONT DOOR GLASS
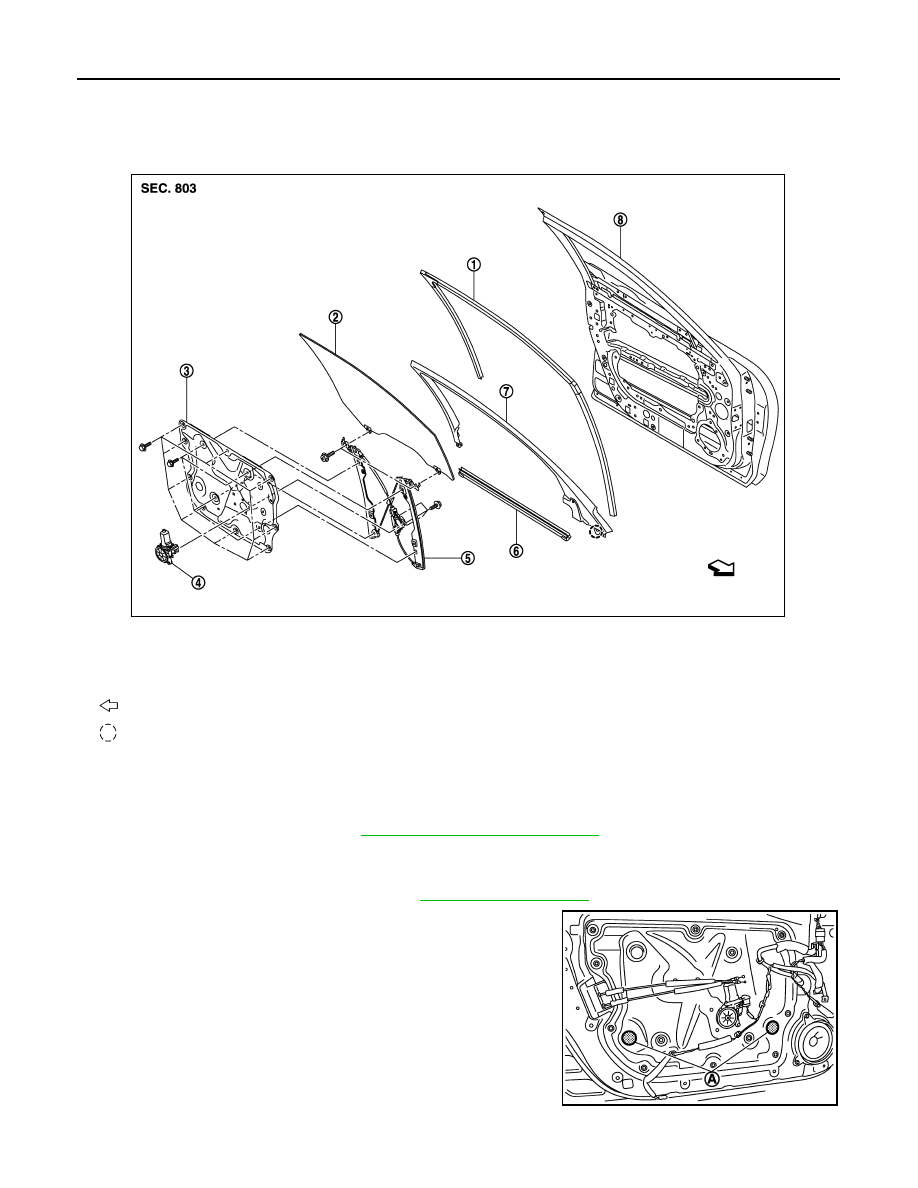
Exploded View
INFOID:0000000005235086
Removal and Installation
INFOID:0000000005235087
REMOVAL
1.
Remove front door finisher. Refer to
INT-11, "Removal and Installation"
2.
Remove front door sash inner cover.
3.
Remove front door inside seal.
4.
Remove the front door grip bracket. Refer to
5.
Remove both seals (A) as shown in the figure.
1. Front door glass run
2.
Front door glass
3.
Module base
4.
Power window motor
5.
Regulator assembly
6.
Front door inside seal
7.
Front door sash inner cover
8.
Front door panel
: Vehicle front
: Clip
JMKIA2659ZZ
JMKIA1945ZZ
FRONT DOOR GLASS
GW-19
< REMOVAL AND INSTALLATION >
C
D
E
F
G
H
I
J
L
M
A
B
GW
N
O
P
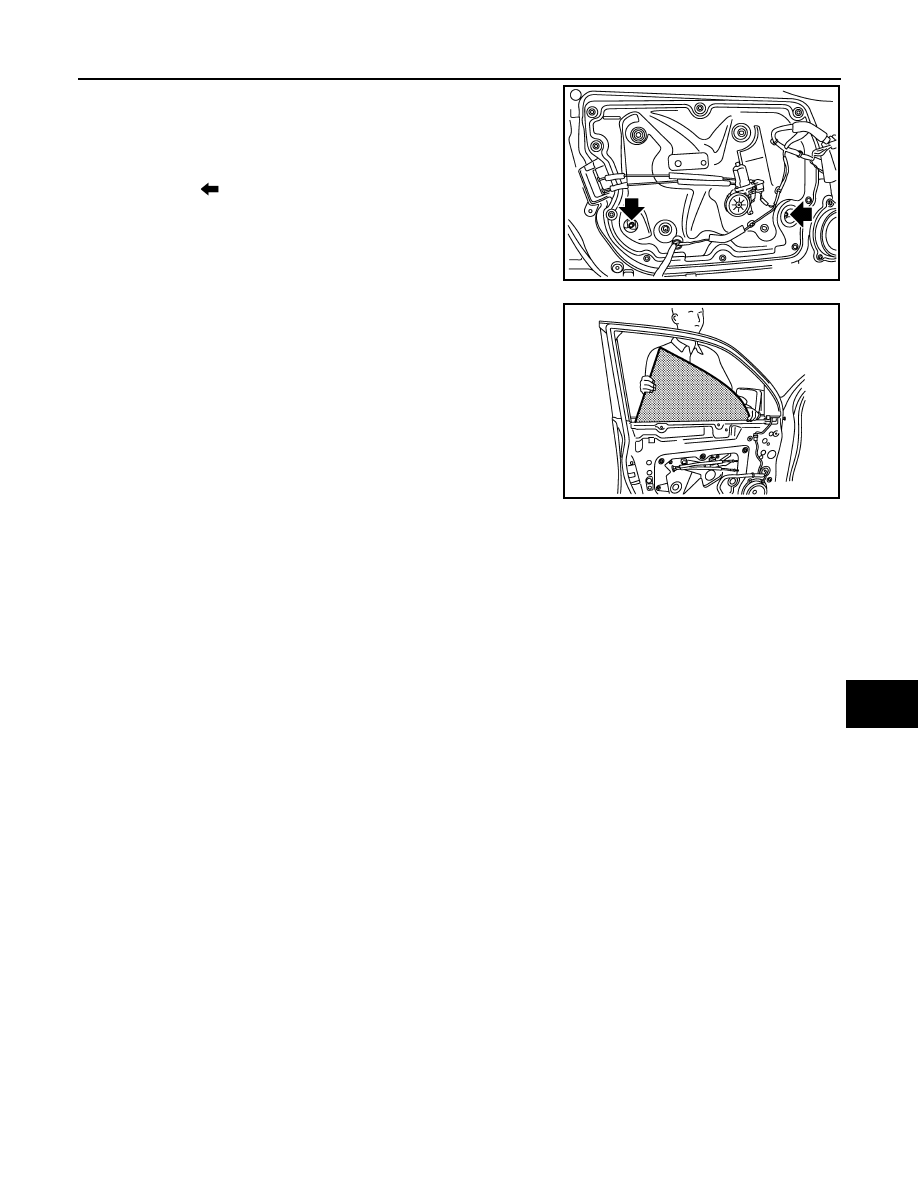
6.
Reconnect the power window main switch and then operate the
power window main switch to raise or lower the door window
until the glass mounting bolts can be seen.
7.
Remove the front door glass mounting bolts.
8.
Hold securely the front door glass and pull it out of the sash to
remove the door glass.
INSTALLATION
Install in the reverse order of removal.
Inspection and Adjustment
INFOID:0000000005235088
SYSTEM INITIALIZATION
Initialize the system if any of the following work has been done.
• Electric power supply to power window switch or motor is interrupted by blown fuse or disconnecting battery
cable, etc.
• Removal and installation of the regulator assembly.
• Removal and installation of the motor from the regulator assembly.
• Removal and installation of the harness connector of the power window switch.
• Removal and installation of the door glass.
• Removal and installation of the front door glass run.
• Disconnection and connection of the negative terminal of the battery.
Initialization
Follow the steps below after installing each component to the vehicle.
1.
Disconnect the negative terminal of battery or disconnect power window switch harness connector tempo-
rarily. Then reconnect after at least 1 minute.
2.
Turn ignition switch ON.
3.
Operate power window switch to make over a half of the window open area.
4.
Draw fully the power window switch in the up direction (auto close position) and hold. Continue holding
the switch even when window is completely closed and then release after more than 2 seconds.
5.
Inspect the anti-pinch system function.
NOTE:
Initialization may be cancelled with continuous opening and closing operation. In this case, initialize the
system.
INSPECT THE FUNCTION OF THE ANTI-PINCH SYSTEM
1.
Fully open the door glass.
2.
Place a wooden piece (wooden hammer handle, etc.) at near fully closed position.
3.
Perform fully closing operation with auto up switch.
: Bolt
JMKIA1946ZZ
JMKIA0626ZZ
GW-20
< REMOVAL AND INSTALLATION >
FRONT DOOR GLASS
• Check that the glass reverses without pinching the wooden piece, is lowered approximately 150 mm (5.906
in) or for more than 2 seconds and then stops.
• The glass should not be raised with power window main switch operated while it is reversing or lowering.
CAUTION:
• Be careful not to be pinched.
• Check that the auto up function is normal before the inspection following the system initialization.
FITTING INSPECTION
• Check that the glass is fit securely into the sash groove.
• Lower the glass slightly [approximately 10 to 20 mm (0.394 to 0.787 in)], and check that the clearance to the
sash is parallel. Loosen the regulator mounting bolts, guide rail mounting bolts, and glass and guide rail
mounting bolts to correct the glass position if the clearance between the glass and sash is not parallel.
Нет комментариевНе стесняйтесь поделиться с нами вашим ценным мнением.
Текст