Infiniti FX35, FX50 (S51). Manual — part 1095
FRONT COIL SPRING AND SHOCK ABSORBER
FSU-27
< REMOVAL AND INSTALLATION >
[AWD]
C
D
F
G
H
I
J
K
L
M
A
B
FSU
N
O
P
REMOVAL AND INSTALLATION
FRONT COIL SPRING AND SHOCK ABSORBER
Exploded View
INFOID:0000000005246445
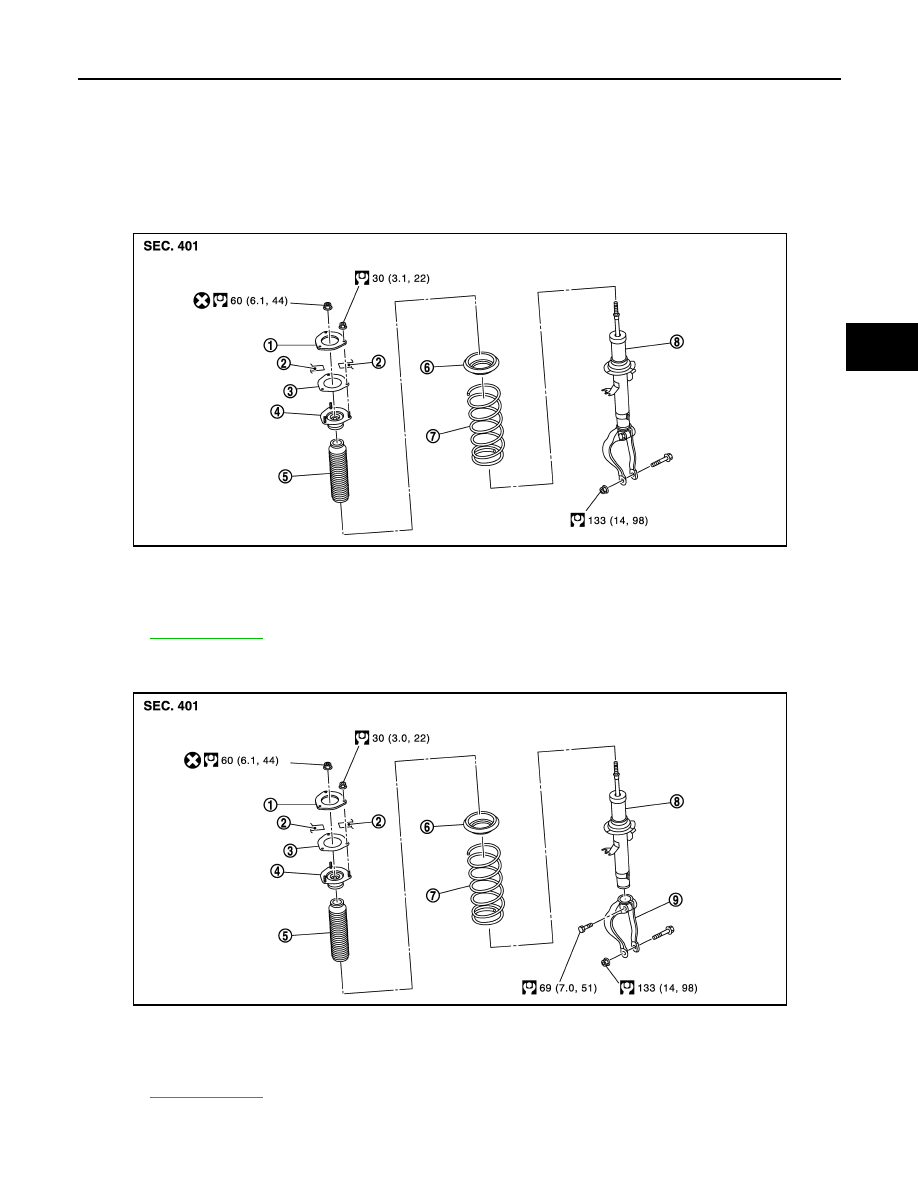
WITHOUT CONTINUOUS DAMPING CONTROL
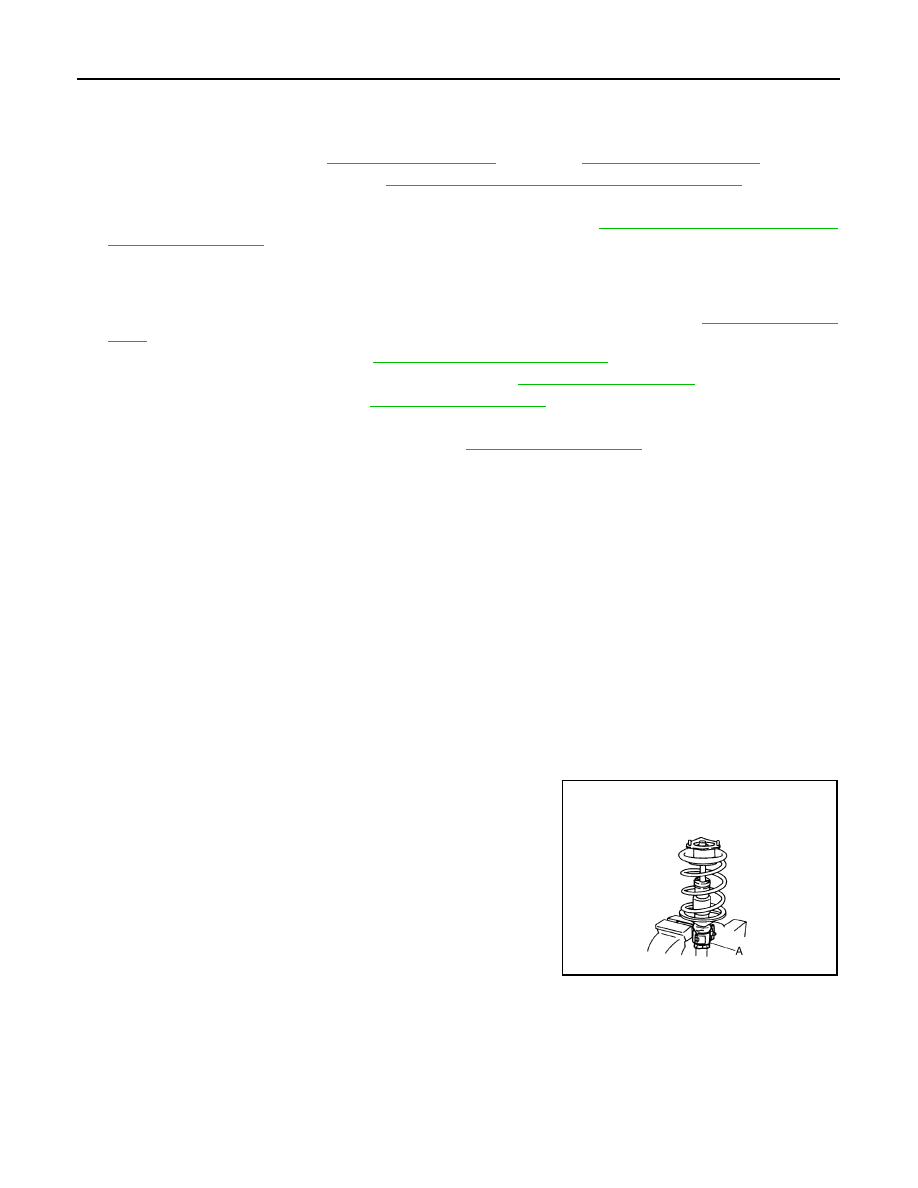
WITH CONTINUOUS DAMPING CONTROL
1.
Gusset
2.
Vehicle body
3.
Mounting seal
4.
Shock absorber mounting bracket
5.
Bound bumper
6.
Rubber seat
7.
Coil spring
8.
Shock absorber
Refer to
JPEIA0109GB
1.
Gusset
2.
Vehicle body
3.
Mounting seal
4.
Shock absorber mounting bracket
5.
Bound bumper
6.
Rubber seat
7.
Coil spring
8.
Shock absorber
9.
Shock absorber arm
Refer to
JPEIA0122GB
FSU-28
< REMOVAL AND INSTALLATION >
[AWD]
FRONT COIL SPRING AND SHOCK ABSORBER
Removal and Installation
INFOID:0000000005246446
REMOVAL
1.
Remove engine cover. Refer to
(VQ35HR),
2.
Remove front fender protector. Refer to
EXT-25, "FENDER PROTECTOR : Exploded View"
3.
Remove tires with power tool.
4.
Remove wheel sensor and harness connector from vehicle. Refer to
.
CAUTION:
Never pull on wheel sensor harness.
5.
Remove shock absorber actuator harness connector (with Continuous Damping Control).
6.
Remove front wheel vertical G sensor (with Continuous Damping Control). Refer to
.
7.
Remove brake hose bracket. Refer to
BR-20, "FRONT : Exploded View"
.
8.
Remove stabilizer connecting rod with power tool. Refer to
.
9.
Remove wheel hub lock nut. Refer to
10. Remove shock absorber from transverse link with power tool.
11. Separate upper link from steering knuckle. Refer to
.
12. Separate drive shaft from wheel hub and bearing assembly.
13. Remove shock absorber assembly.
NOTE:
If removing shock absorber is difficult, loosen upper link mounting bolts (vehicle side).
INSTALLATION
Note the following, and install in the reverse order of removal.
• Never tap on the ball joint cap of the stabilizer connecting rod with a hammer or a similar item when inserting
the stabilizer connecting rod into the transverse link.
• Perform final tightening of bolts and nuts at the shock absorber lower side (rubber bushing), under unladen
conditions with tires on level ground.
Disassembly and Assembly
INFOID:0000000005246447
DISASSEMBLY
CAUTION:
Never damage shock absorber piston rod when removing components from shock absorber.
1.
Remove shock absorber arm. (With continuous damping control)
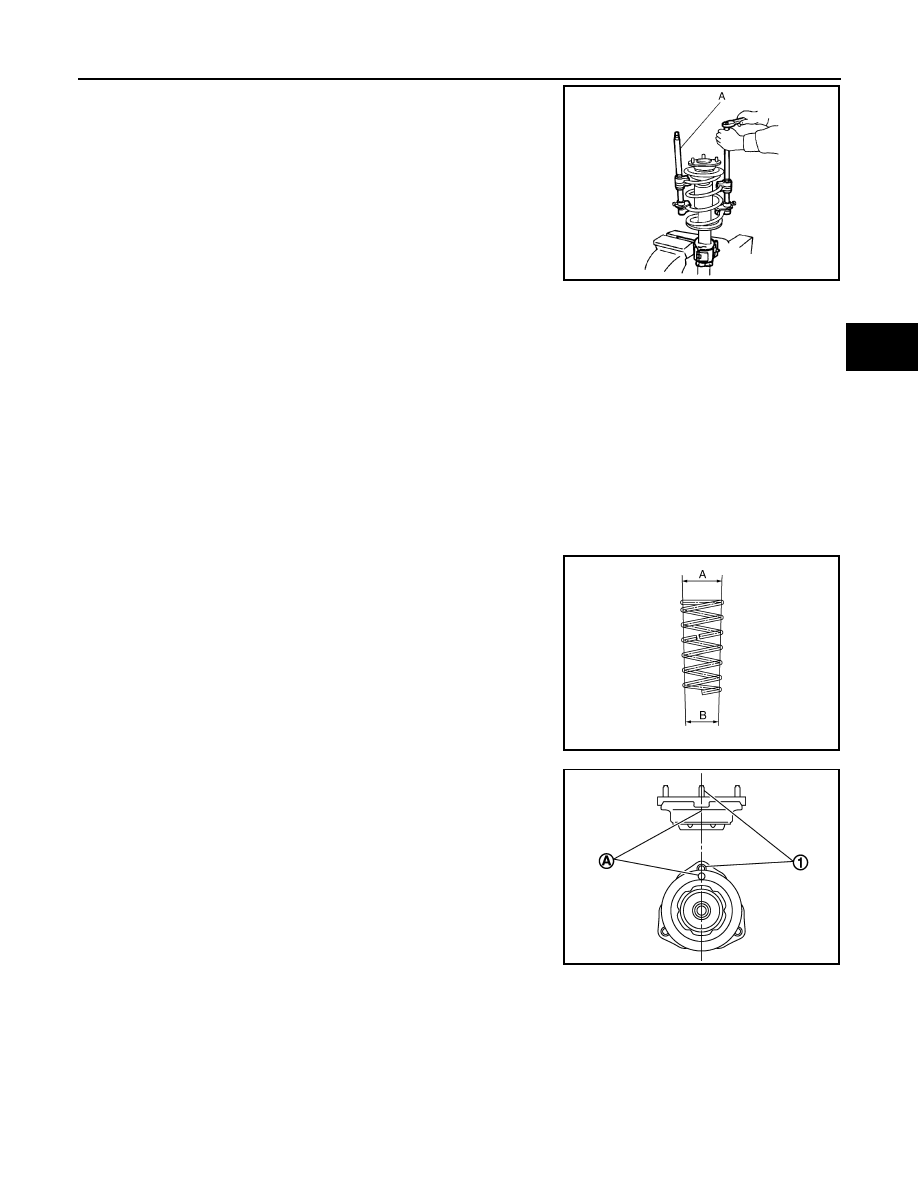
2.
Install shock absorber attachment (A) [SST: ST35652000 (
–
)] to shock absorber and secure it in a vise.
CAUTION:
When installing the shock absorber attachment to shock
absorber, wrap a shop cloth around shock absorber to pro-
tect it from damage.
JPEIA0006ZZ
FRONT COIL SPRING AND SHOCK ABSORBER
FSU-29
< REMOVAL AND INSTALLATION >
[AWD]
C
D
F
G
H
I
J
K
L
M
A
B
FSU
N
O
P
3.
Using a spring compressor (A) (commercial service tool), com-
press coil spring between rubber seat and shock absorber until
coil spring with a spring compressor is free.
CAUTION:
Be sure a spring compressor is securely attached coil
spring. Compress coil spring
4.
Make sure coil spring with a spring compressor between rubber
seat and shock absorber is free. And then remove piston rod
lock nut while securing the piston rod tip so that piston rod does
not turn.
5.
Remove mounting seal, shock absorber mounting bracket, rub-
ber seat, bound bumper from shock absorber.
6.
After removing coil spring with a spring compressor, then gradually release a spring compressor.
CAUTION:
Loosen while making sure coil spring attachment position does not move.
7.
Remove the shock absorber attachment from shock absorber.
ASSEMBLY
1.
Install shock absorber attachment (A) [SST: ST35652000 (
−
)] to shock absorber and secure it in a
vise.
CAUTION:
When installing the shock absorber attachment to shock absorber, wrap a shop cloth around
shock absorber to protect it from damage.
2.
Compress coil spring using a spring compressor (commercial service tool), and install it onto shock
absorber.
CAUTION:
• Install with the large-diameter side (A) facing up and the
small-diameter side (B) facing down.
• Be sure a spring compressor is securely attached to coil
spring. Compress coil spring.
3.
Install the shock absorber mounting bracket and rubber seat.
CAUTION:
Align the paint mark (A) to the stud bolt (1) position when
assembling.
4.
Apply soapy water to bound bumper.
CAUTION:
Never use machine oil.
5.
Remove shock absorber arm. (With continuous damping con-
trol)
6.
Insert bound bumper into shock absorber mounting bracket, and then install it to shock absorber together
with rubber seat.
JPEIA0168ZZ
PEIA0108E
JPEIA0009ZZ

FSU-30
< REMOVAL AND INSTALLATION >
[AWD]
FRONT COIL SPRING AND SHOCK ABSORBER
• Install the shock absorber mounting bracket as shown in the figure.
• Check that the lower end of the coil spring (C) is positioned at the spring lower seat of the shock
absorber.
7.
Secure piston rod tip so that piston rod does not turn, then tighten piston rod lock nut to the specified
torque.
8.
Gradually release a spring compressor, and remove coil spring.
CAUTION:
Loosen while making sure coil spring attachment position does not move.
9.
Remove the shock absorber attachment from shock absorber.
10. Install the mounting seal to shock absorber mounting bracket.
Inspection
INFOID:0000000005246448
INSPECTION AFTER INSTALLATION
1.
Check shock absorber actuator harness connector for proper connection (with Continuous Damping Con-
trol).
2.
Check wheel sensor harness for proper connection. Refer to
BRC-131, "FRONT WHEEL SENSOR :
.
3.
Check wheel alignment. Refer to
4.
Adjust neutral position of steering angle sensor. Refer to
BRC-9, "ADJUSTMENT OF STEERING ANGLE
SENSOR NEUTRAL POSITION : Special Repair Requirement"
.
INSPECTION AFTER DISASSEMBLY
Shock Absorber
1.
Shock absorber mounting bracket
A.
Right side
B.
Left side
C.
Coil spring lower end position
: Vehicle front
Angle (a)
: 30.0
°
JPEIA0080ZZ
Нет комментариевНе стесняйтесь поделиться с нами вашим ценным мнением.
Текст