Infiniti FX35, FX50 (S51). Manual — part 556
FRONT OIL SEAL
DLN-59
< REMOVAL AND INSTALLATION >
[TRANSFER: ETX13C]
C
E
F
G
H
I
J
K
L
M
A
B
DLN
N
O
P
FRONT OIL SEAL
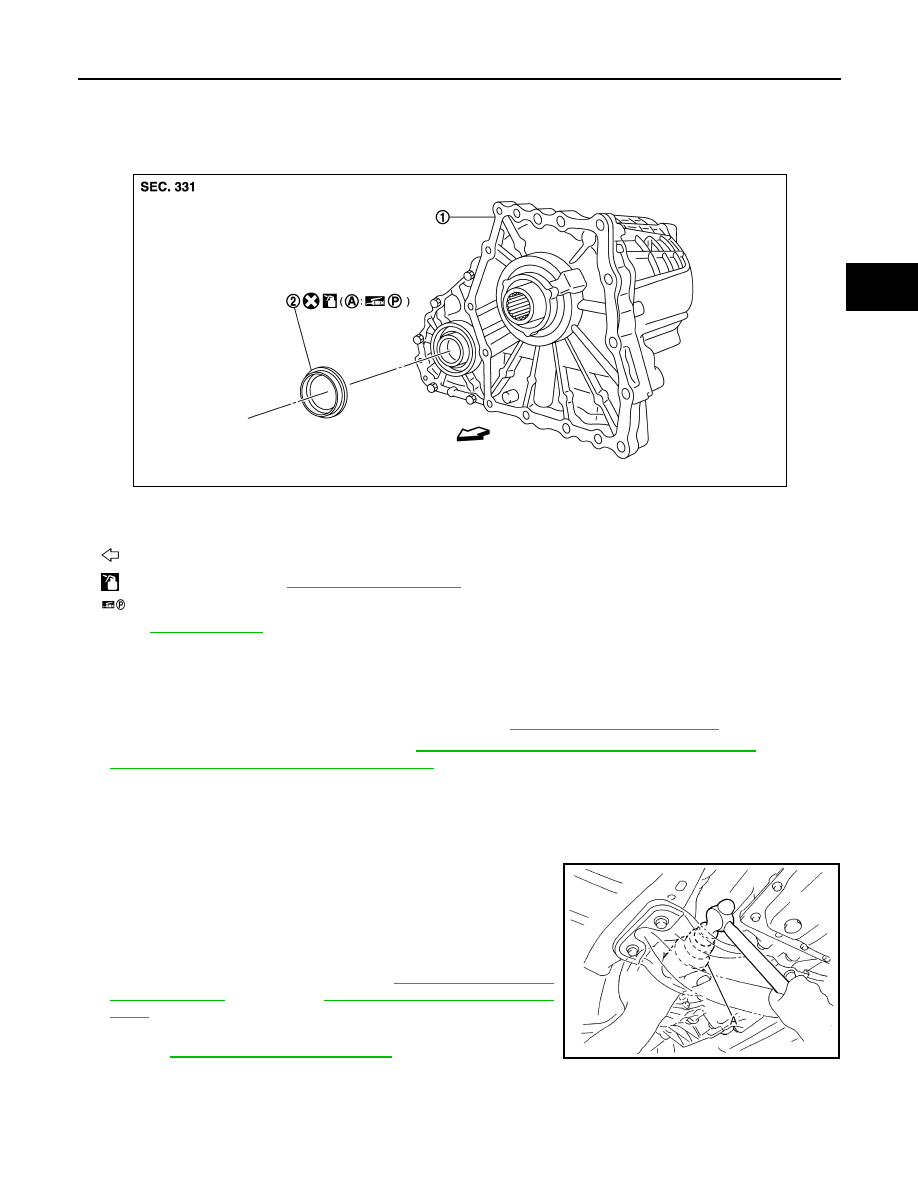
Exploded View
INFOID:0000000005249107
Removal and Installation
INFOID:0000000005249108
REMOVAL
1.
Remove the drain plug to drain the transfer fluid. Refer to
2.
Remove the front propeller shaft. Refer to
DLN-109, "VQ35HR : Removal and Installation"
DLN-111, "VK50VE : Removal and Installation"
(VK50VE).
3.
Remove front oil seal.
CAUTION:
Never damage the front case and front drive shaft.
INSTALLATION
1.
Apply transfer fluid to outside of front oil seal, install it with a drift
(A) [SST: ST27862000 (
—
)] until the end face of front case.
CAUTION:
• Never reuse front oil seal.
• Apply petroleum jelly to oil seal lip.
• When installing, never incline front oil seal.
2.
Install front propeller shaft. Refer to
(VQ35HR),
(VK50VE).
3.
Fill with new transfer fluid, check fluid level and for fluid leakage.
Refer to
1.
Transfer assembly
2.
Front oil seal
A.
Oil seal lip
: Vehicle front
: Apply transfer fluid. Refer to
MA-12, "Fluids and Lubricants"
: Apply petroleum jelly.
Refer to
for symbols not described above.
JPDIE0097ZZ
JPDIE0058ZZ
DLN-60
< REMOVAL AND INSTALLATION >
[TRANSFER: ETX13C]
REAR OIL SEAL
REAR OIL SEAL
VQ35HR
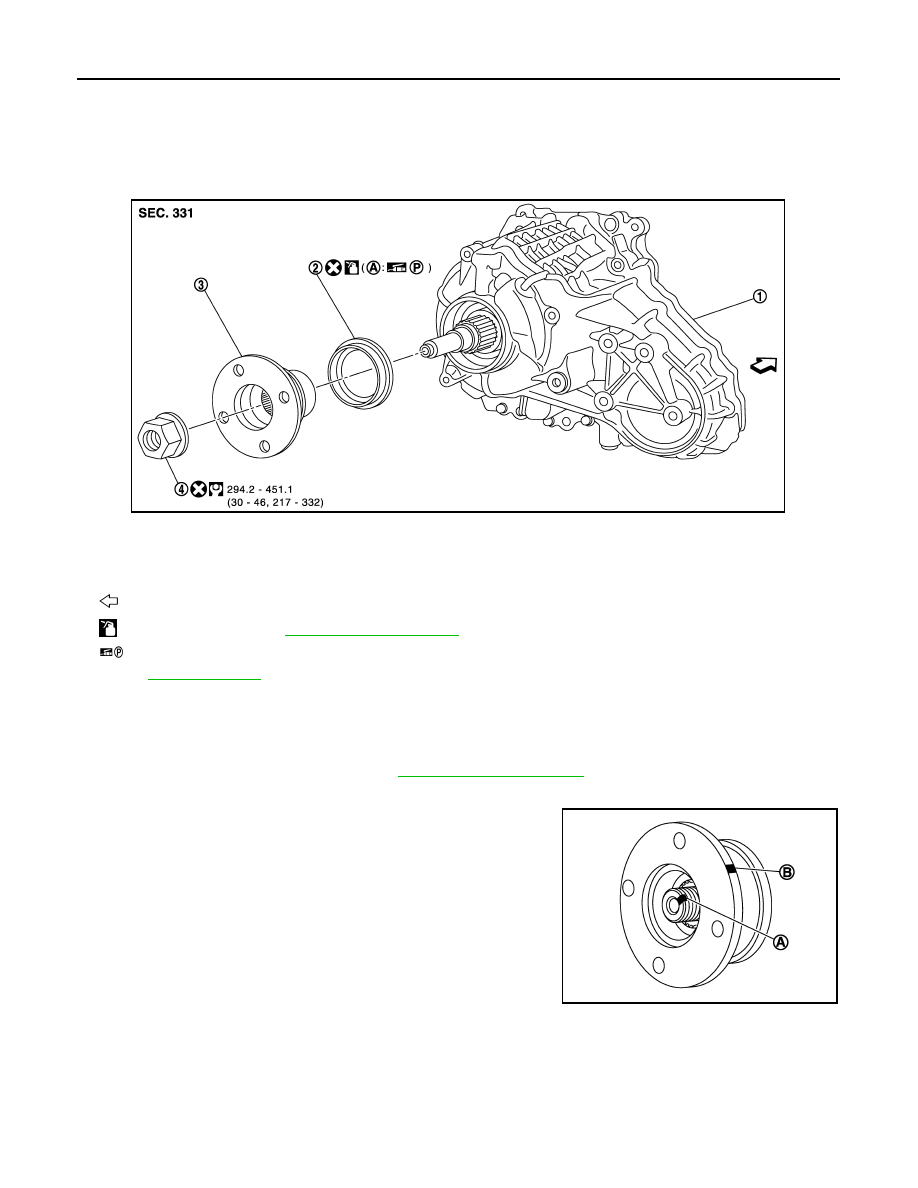
VQ35HR : Exploded View
INFOID:0000000005249109
VQ35HR : Removal and Installation
INFOID:0000000005249110
REMOVAL
1.
Remove the rear propeller shaft. Refer to
2.
Remove self-lock nut of companion flange with a flange wrench (commercial service tool).
3.
Put matching mark (A) on the end of the main shaft. The mark
should be in line with the mark (B) on the companion flange.
CAUTION:
For matching mark, use paint. Never damage main shaft.
1.
Transfer assembly
2.
Rear oil seal
3.
Companion flange
4.
Self-lock nut
A.
Oil seal lip
: Vehicle front
: Apply transfer fluid. Refer to
MA-12, "Fluids and Lubricants"
: Apply petroleum jelly.
Refer to
for symbols not described above.
JSDIA0854GB
JPDIE0060ZZ

REAR OIL SEAL
DLN-61
< REMOVAL AND INSTALLATION >
[TRANSFER: ETX13C]
C
E
F
G
H
I
J
K
L
M
A
B
DLN
N
O
P
4.
Remove the companion flange with a puller (A) (commercial ser-
vice tool).
CAUTION:
Never damage the companion flange.
5.
Remove the rear oil seal with the puller (A) [SST: KV381054S0
(J-34286)].
CAUTION:
Never damage the rear case.
INSTALLATION
1.
Apply transfer fluid to rear oil seal, install it with the drifts within
the dimension (L) shown as follows.
CAUTION:
• Never reuse rear oil seal.
• Apply petroleum jelly to oil seal lip.
• When installing, never incline rear oil seal.
2.
Align the matching mark (A) of main shaft with the mark (B) of
companion flange, then install the companion flange.
JPDIE0061ZZ
JPDIE0132ZZ
A
: Drift [SST: ST30720000 (J-25405)]
B
: Drift [SST: KV40104830 (
—
)]
L
: 6.7 – 7.3 mm (0.264 – 0.287 in)
JPDIE0133ZZ
JPDIE0060ZZ

DLN-62
< REMOVAL AND INSTALLATION >
[TRANSFER: ETX13C]
REAR OIL SEAL
3.
Using a flange wrench (A) (commercial service tool), install the
self-lock nut of companion flange and tighten to the specified
torque. Refer to
DLN-60, "VQ35HR : Exploded View"
CAUTION:
Never reuse self-lock nut.
4.
Install the rear propeller shaft. Refer to
.
5.
Check fluid level. Refer to
VK50VE
VK50VE : Exploded View
INFOID:0000000005249111
VK50VE : Removal and Installation
INFOID:0000000005249112
REMOVAL
1.
Remove the rear propeller shaft. Refer to
2.
Remove self-lock nut of companion flange with a flange wrench (commercial service tool).
JPDIE0131ZZ
1.
Transfer assembly
2.
Rear oil seal
3.
Companion flange
4.
Self-lock nut
A.
Oil seal lip
: Vehicle front
: Apply transfer fluid. Refer to
MA-12, "Fluids and Lubricants"
: Apply petroleum jelly.
Refer to
for symbols not described above.
JPDIE0098GB
Нет комментариевНе стесняйтесь поделиться с нами вашим ценным мнением.
Текст