Infiniti EX35. Manual — part 1058
MA-22
< ON-VEHICLE MAINTENANCE >
CHASSIS MAINTENANCE
• Using ATF other than Genuine NISSAN Matic S ATF or Matic J ATF will cause deterioration in
driveability and A/T durability, and may damage the A/T, which is not covered by the INFINITI new
vehicle limited warranty.
• When filling ATF, be careful not to scatter heat generating parts such as exhaust.
• Do not reuse drain plug gasket.
4.
Run engine at idle speed for 5 minutes.
5.
Check A/T fluid level and condition. Refer to
MA-20, "A/T FLUID : Inspection"
. If ATF is still dirty, repeat
step 2. through 5.
6.
Install the removed A/T fluid level gauge into A/T fluid charging pipe.
TRANSFER FLUID
TRANSFER FLUID : Inspection
INFOID:0000000003759975
FLUID LEAKAGE
Check transfer surrounding area (oil seal, drain plug, and filler plug etc.) for fluid leakage.
FLUID LEVEL
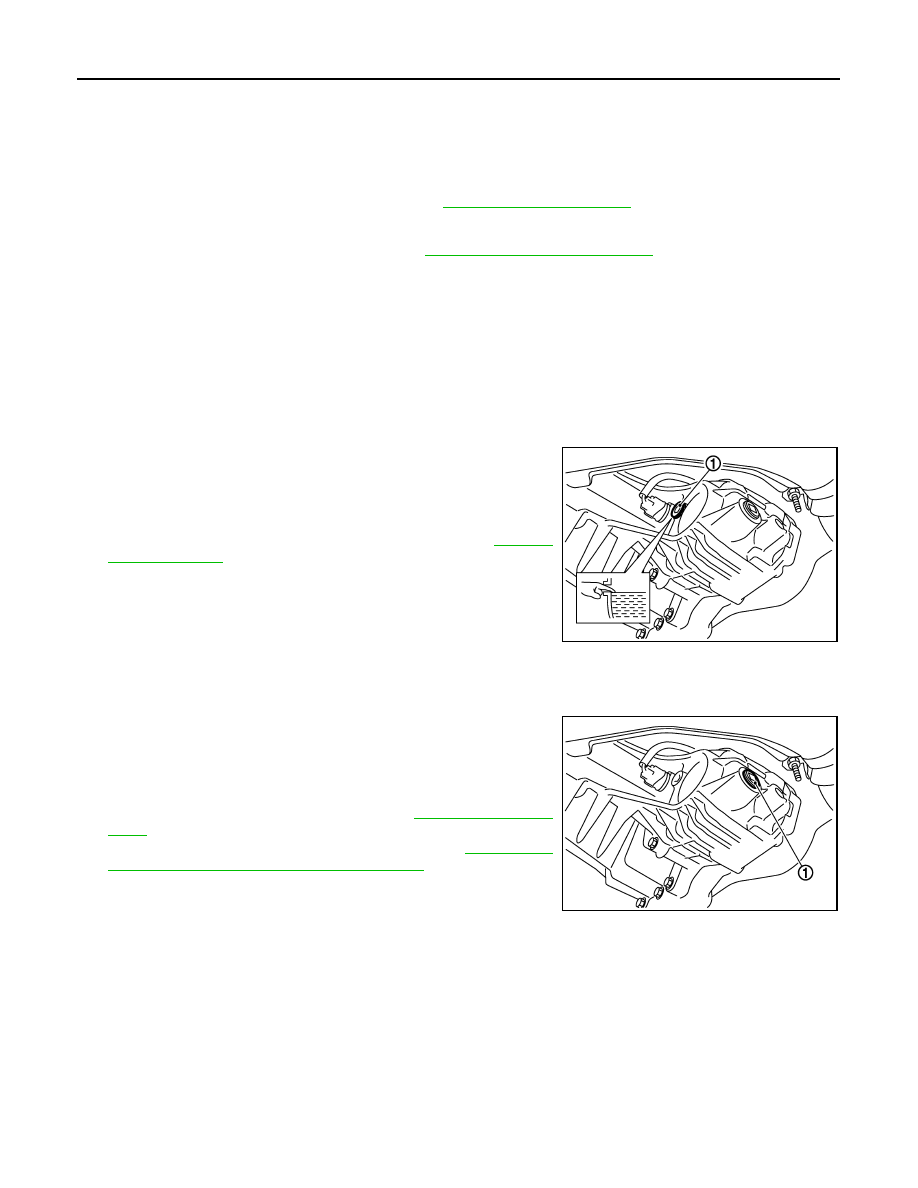
1.
Remove filler plug (1) and gasket. Then check that fluid is filled
up from mounting hole for the filler plug.
CAUTION:
Never start engine while checking fluid level.
2.
Before installing filler plug, set a new gasket. Install filler plug on
transfer and tighten to the specified torque. Refer to
CAUTION:
Never reuse gasket.
TRANSFER FLUID : Draining
INFOID:0000000003759976
1.
Run the vehicle to warm up the transfer unit sufficiently.
2.
Stop the engine, and remove the drain plug (1) to drain the
transfer fluid.
CAUTION:
When draining fluid, protect exhaust tube flange with cover.
3.
Apply sealant to drain plug. Install drain plug on transfer and
tighten to the specified torque. Refer to
.
Use Genuine Silicone RTV or equivalent. Refer to
ommended Chemical Products and Sealants"
CAUTION:
Remove old sealant adhering to mounting surfaces. Also
remove any moisture, oil, or foreign material adhering to
application and mounting surfaces.
Drain plug - tightening torque
: Refer to
JSDIA0096ZZ
JSDIA0095ZZ

CHASSIS MAINTENANCE
MA-23
< ON-VEHICLE MAINTENANCE >
C
D
E
F
G
H
I
J
K
L
M
B
MA
N
O
A
TRANSFER FLUID : Refilling
INFOID:0000000003759977
1.
Remove filler plug (1) and gasket. Then fill fluid up to mounting
hole for the filler plug.
CAUTION:
Carefully fill the fluid. (Fill up for approximately 3 minutes.)
2.
Leave the vehicle for 3 minutes, and check the fluid level again.
3.
Set a new gasket onto filler plug and install it on transfer and
tighten to the specified torque. Refer to
.
CAUTION:
Never reuse gasket.
FRONT PROPELLER SHAFT: 2S56A
FRONT PROPELLER SHAFT: 2S56A : Inspection
INFOID:0000000003759978
NOISE
Check the propeller shaft tube surface for dents or cracks. If damaged, replace propeller shaft assembly.
VIBRATION
If vibration is present at high speed, inspect propeller shaft runout first.
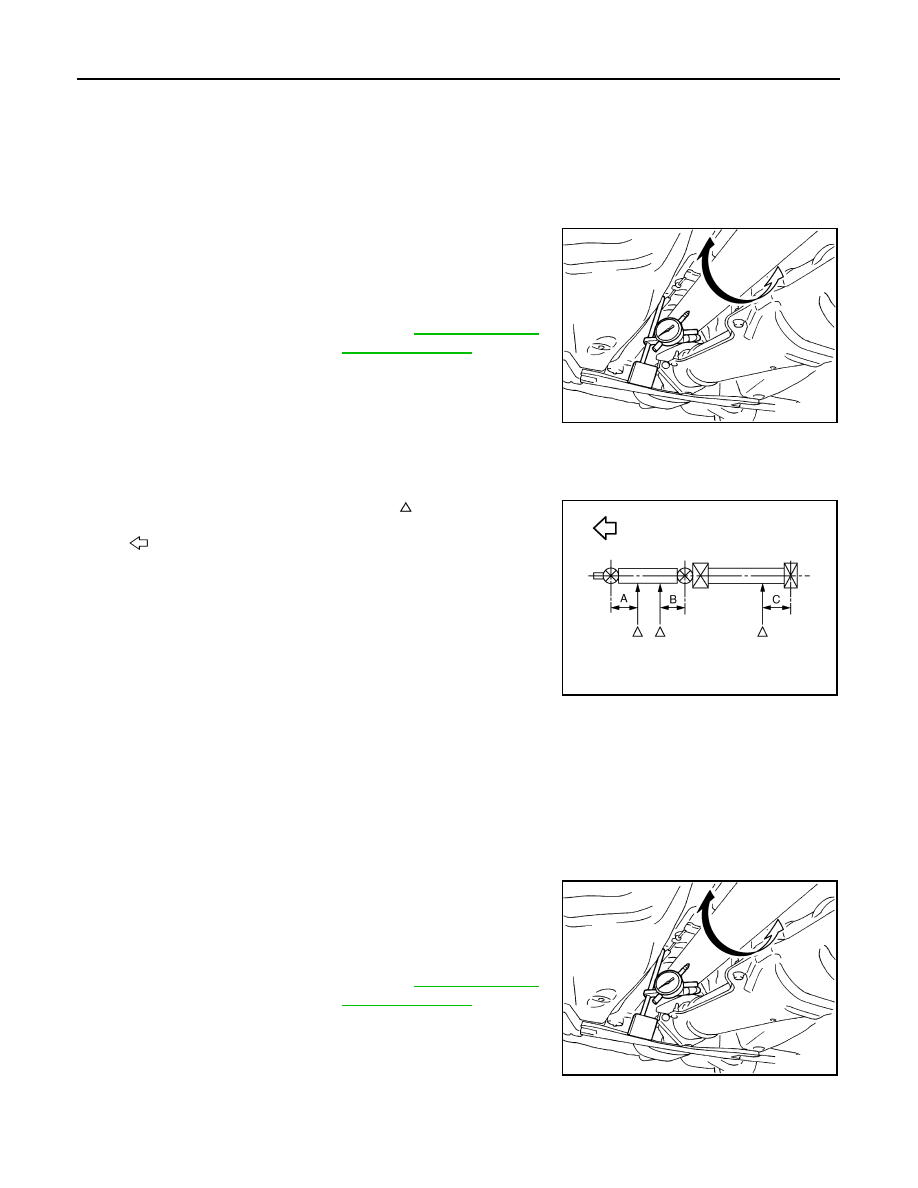
1.
With a dial indicator, measure propeller shaft runout at runout
measuring points by rotating final drive companion flange with
hands.
2.
If runout still exceeds specifications, separate propeller shaft at
final drive companion flange; then rotate companion flange 90,
180, 270 degrees and install propeller shaft.
3.
Check runout again. If runout still exceeds specifications, replace propeller shaft assembly.
4.
Check the vibration by driving vehicle.
RUNOUT MEASURING POINT
Propeller shaft runout measuring point (Point “ ”).
REAR PROPELLER SHAFT: 3S80A-R
Fluid and viscosity
: Refer to
.
Fluid capacity
: Refer to
.
JSDIA0096ZZ
: Vehicle front
Limit
Propeller shaft runout
: Refer to
.
JPDID0185ZZ
Standard
A
: 381.5 mm (15.02 in)
PDIA0768J
MA-24
< ON-VEHICLE MAINTENANCE >
CHASSIS MAINTENANCE
REAR PROPELLER SHAFT: 3S80A-R : Inspection
INFOID:0000000003759979
NOISE
• Check the propeller shaft tube surface for dents or cracks. If damaged, replace propeller shaft assembly.
• If center bearing is noisy or damaged, replace propeller shaft assembly.
VIBRATION
If vibration is present at high speed, inspect propeller shaft runout first.
1.
With a dial indicator, measure propeller shaft runout at runout
measuring points by rotating final drive companion flange with
hands.
2.
If runout still exceeds specifications, separate propeller shaft at
final drive companion flange; then rotate companion flange 120,
240 degrees and install propeller shaft.
3.
Check runout again. If runout still exceeds specifications,
replace propeller shaft assembly.
4.
Check the vibration by driving vehicle.
RUNOUT MEASURING POINT
Propeller shaft runout measuring point (Point “ ”).
REAR PROPELLER SHAFT: 3F80A-1VL107
REAR PROPELLER SHAFT: 3F80A-1VL107 : Inspection
INFOID:0000000003759980
NOISE
• Check the propeller shaft tube surface for dents or cracks. If damaged, replace propeller shaft assembly.
• If center bearing is noisy or damaged, replace propeller shaft assembly.
VIBRATION
If vibration is present at high speed, inspect propeller shaft runout first.
1.
With a dial indicator, measure propeller shaft runout at runout
measuring points by rotating final drive companion flange with
hands.
2.
If runout still exceeds specifications, separate propeller shaft at
final drive companion flange, then rotate companion flange 60,
120, 180, 240, 300 degrees and install propeller shaft.
3.
Check runout again. If runout still exceeds specifications,
replace propeller shaft assembly.
4.
Check the vibration by driving vehicle.
Limit
Propeller shaft runout
SDIA1087E
: Vehicle front
Standard
A
: 192 mm (7.56 in)
B
: 172 mm (6.77 in)
C
: 172 mm (6.77 in)
JSDIA0169ZZ
Limit
Propeller shaft runout
SDIA1087E

CHASSIS MAINTENANCE
MA-25
< ON-VEHICLE MAINTENANCE >
C
D
E
F
G
H
I
J
K
L
M
B
MA
N
O
A
RUNOUT MEASURING POINT
Propeller shaft runout measuring point (Point “ ”).
FRONT DIFFERENTIAL GEAR OIL: F160A
FRONT DIFFERENTIAL GEAR OIL: F160A : Inspection
INFOID:0000000003759981
OIL LEAKAGE
Make sure that oil is not leaking from final drive assembly or around it.
OIL LEVEL
• Remove filler plug (1) and check oil level from filler plug mounting
hole as shown in the figure.
CAUTION:
Never start engine while checking oil level.
• Set a gasket on filler plug (1) and install it on final drive assembly.
.
CAUTION:
Never reuse gasket.
FRONT DIFFERENTIAL GEAR OIL: F160A : Draining
INFOID:0000000003759982
1.
Stop engine.
2.
Remove drain plug (1) and drain gear oil.
3.
Set a gasket on drain plug (1) and install it to final drive assem-
bly and tighten to the specified torque. Refer to
CAUTION:
Never reuse gasket.
: Vehicle front
Standard
A
: 162 mm (6.38 in)
B
: 245 mm (9.65 in)
C
: 185 mm (7.28 in)
PDIA0772J
JPDID0188ZZ
JPDID0189ZZ
Нет комментариевНе стесняйтесь поделиться с нами вашим ценным мнением.
Текст