Infiniti EX35. Manual — part 499
DLK-210
< ON-VEHICLE REPAIR >
[INTELLIGENT KEY SYSTEM]
HOOD
ON-VEHICLE REPAIR
HOOD
HOOD ASSEMBLY
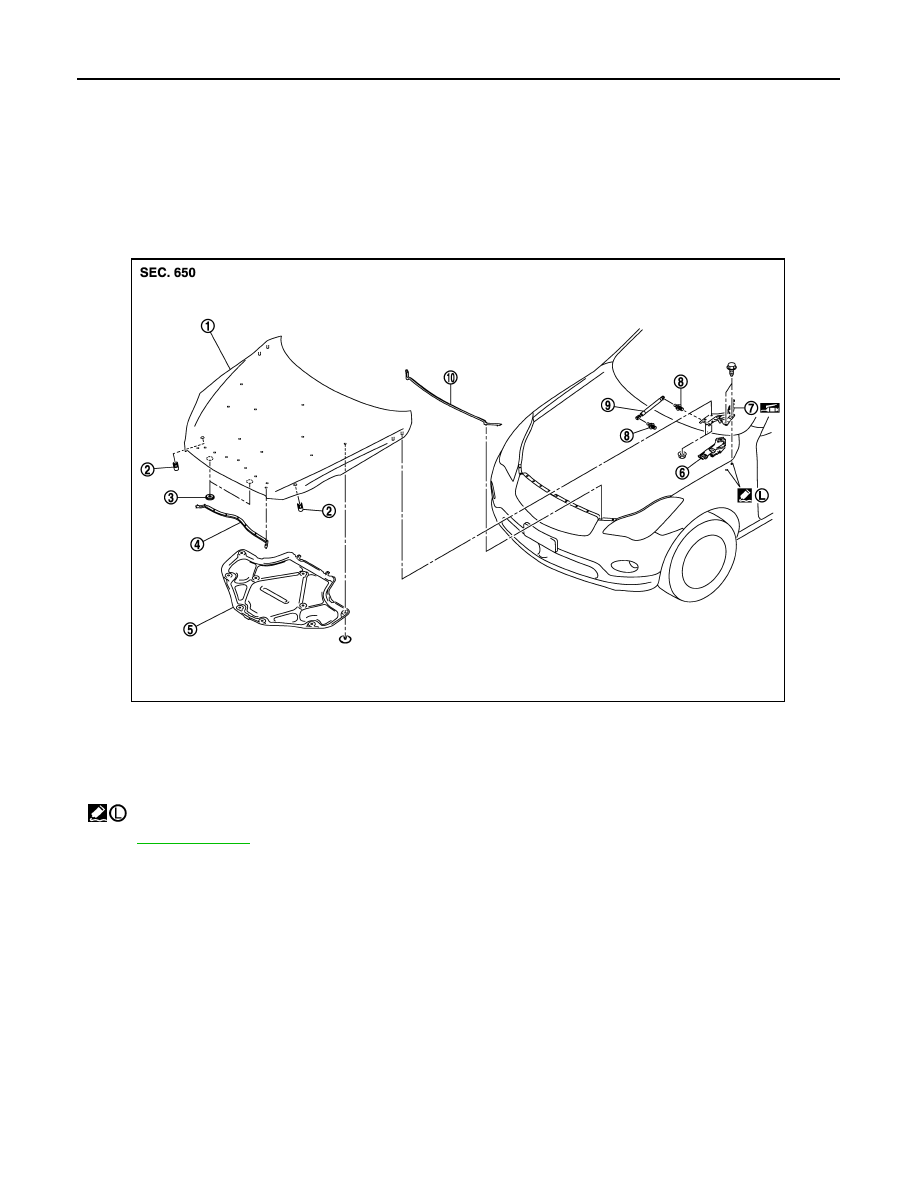
HOOD ASSEMBLY : Exploded View
INFOID:0000000003579482
REMOVAL
ADJUSTMENT
1.
Hood assembly
2.
Bumper rubber
3.
Seal
4.
Radiator core seal
5.
Hood insulator
6.
Hood hinge cover
7.
Hood hinge
8.
Stud ball
9.
Hood stay
10.
Hood seal (front)
: Apply Genuine High Strength Locking Sealant or equivalent.
for symbols in the figure.
JMKIA2046ZZ
HOOD
DLK-211
< ON-VEHICLE REPAIR >
[INTELLIGENT KEY SYSTEM]
C
D
E
F
G
H
I
J
L
M
A
B
DLK
N
O
P
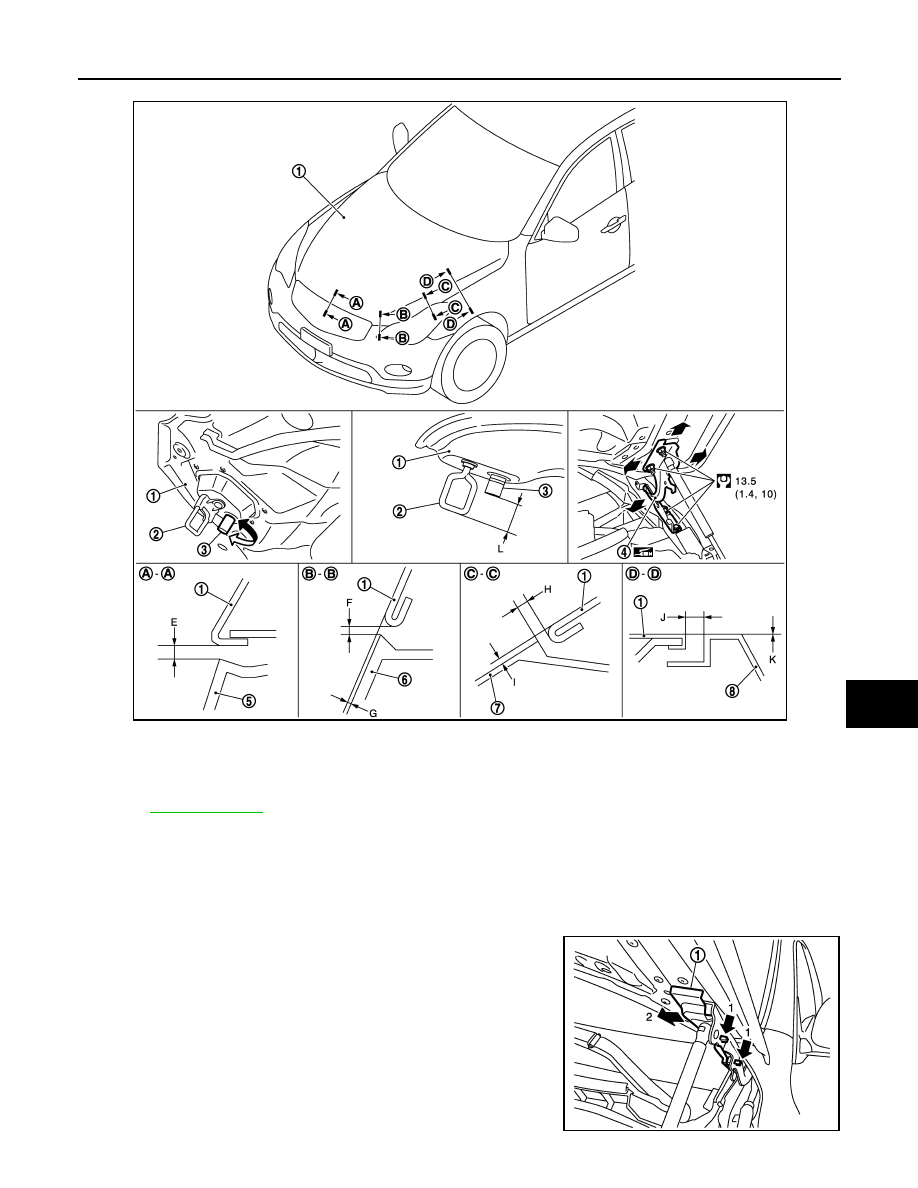
HOOD ASSEMBLY : Removal and Installation
INFOID:0000000003579483
CAUTION:
Operate with two workers, because of its heavy weight.
REMOVAL
1.
Remove hood hinge cover (RH/LH) (1).
NOTE:
While pushing the pawls, pull hood hinge cover in the direction
of the arrow.
1.
Hood assembly
2.
Hood striker
3.
Hood bumper rubber
4.
Hood hinge
5.
Front grill
6.
Front bumper fascia
7.
Front combination lamp
8.
Front fender
Refer to
JMKIA2086GB
JMKIA2090ZZ
DLK-212
< ON-VEHICLE REPAIR >
[INTELLIGENT KEY SYSTEM]
HOOD
2.
Remove washer nozzle, washer tube. Refer to
WW-103, "Removal and Installation"
3.
Support hood lock assembly with a proper material to prevent it from falling.
WARNING:
Body injury may occur if no supporting rod is holding the hood open when removing the hood
stay.
4.
Remove the metal clip located on the connection between the hood stay and the stud ball (hood side), by
using a flatted-blade screwdriver.
5.
Remove hinge mounting nuts on the hood to remove the hood assembly.
6.
Remove following parts after removing the hood assembly.
• Radiator core seal
• Hood insulator
• Hood bumper rubber
• Hood seal (front)
• Hood striker
INSTALLATION
Install in the reverse order of removal.
CAUTION:
• Before installing hood seal (front), apply double-faced adhesive tape.
• Make sure hood seal (front)
• Before installing hood hinge, apply anticorrosive agent onto the mounting surface of the vehicle
body.
• After installing, perform hood fitting adjustment. Refer to
DLK-212, "HOOD ASSEMBLY : Adjust-
• After installing, perform front washer nozzle and tube inspection and adjustment. Refer to
.
HOOD ASSEMBLY : Adjustment
INFOID:0000000003579484
Check the clearance and the surface height between hood and each part visually and by touching. (Fitting
standard dimension in the table below should be satisfied.
If the clearance and the surface height are out of specification, adjust them according to the procedures
shown below.
Unit: mm (in)
1.
Remove striker and adjust the surface height of hood, front bumper fascia and front fender according to
the fitting standard dimension, by rotating hood bumper rubbers.
Portion
Standard
Right/Left
Clearance (MAX)
Hood – Front grille
A – A
E
Clearance
2.6 – 7.4
(0.102 – 0.291)
—
Hood – Front bumper
fascia
B – B
F
Clearance
1.5 – 5.5
(0.059 – 0.217)
2.5
(0.098)
G
Surface height
–1.0 – 3.0
(–0.039 – 0.118)
2.0
(0.079)
Hood – Front combina-
tion lamp
C – C
H
Clearance
1.5 – 5.5
(0.059 – 0.217)
2.0
(0.079)
I
Surface height
–2.0 – 2.0
(–0.079 – 0.079)
2.1
(0.083)
Hood – Front fender
D – D
J
Clearance
2.5 – 4.5
(0.098 – 0.177)
2.0
(0.079)
K
Surface height
–1.0 – 1.0
(–0.039 – 0.039)
—
Hood striker – Bumper
rubber
—
L
Clearance
32.5 – 33.5
(1.280 – 1.319)
—
HOOD
DLK-213
< ON-VEHICLE REPAIR >
[INTELLIGENT KEY SYSTEM]
C
D
E
F
G
H
I
J
L
M
A
B
DLK
N
O
P
2.
Adjust the height difference of striker, hood bumper rubber according to the fitting standard dimension.
3.
Loosen hood hinge mounting nuts on the hood.
4.
Adjust the clearance of hood, front bumper fascia, front grill and front fender according to the fitting stan-
dard dimension, for the hood.
5.
Check that hood lock primary latch is securely engaged with striker by dropping hood from approximately
200 mm (7.874 in) height or pressing lightly on the hood.
CAUTION:
Never drop hood from a height of 300 mm (11.811 in) or more.
6.
Install as static closing face of hood is 94 – 490 N·m (9.6 – 50.0 kg-m).
NOTE:
• Exercise vertical force on right side and left side of hood lock.
• Never press simultaneously both sides.
7.
After adjustment tighten hood hinge mounting nuts to the specified torque.
HOOD HINGE
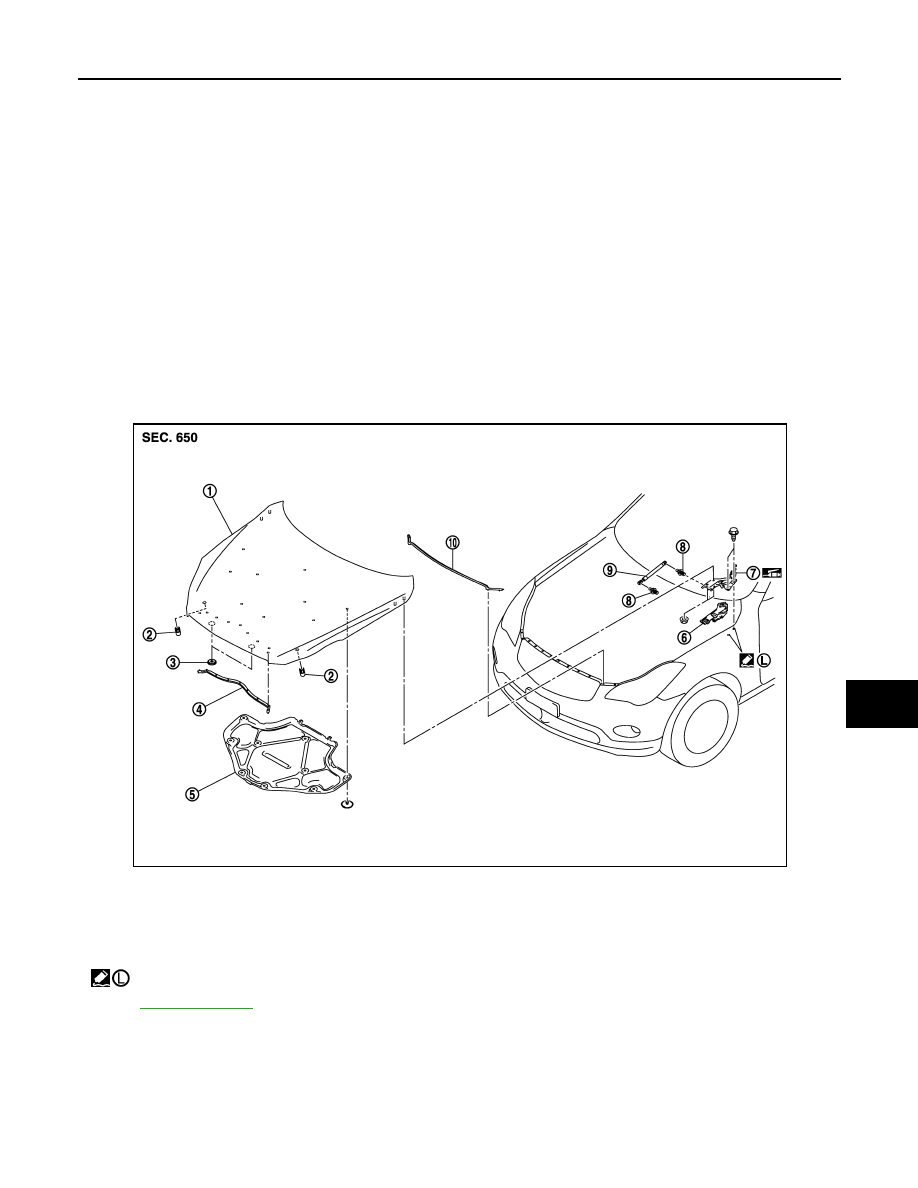
HOOD HINGE : Exploded View
INFOID:0000000003733709
HOOD HINGE : Removal and Installation
INFOID:0000000003579489
REMOVAL
1.
Hood assembly
2.
Bumper rubber
3.
Seal
4.
Radiator core seal
5.
Hood insulator
6.
Hood hinge cover
7.
Hood hinge
8.
Stud ball
9.
Hood stay
10.
Hood seal (front)
: Apply Genuine High Strength Locking Sealant or equivalent.
for symbols in the figure.
JMKIA2046ZZ
Нет комментариевНе стесняйтесь поделиться с нами вашим ценным мнением.
Текст