Infiniti EX35. Manual — part 902
HAC-4
Precaution Necessary for Steering Wheel Rota-
tion after Battery Disconnect . . . . . . . . .
Precaution for Procedure without Cowl Top Cover ..
Precautions For Xenon Headlamp Service . . ...
Working with HFC-134a (R-134a) . . . . . . .
General Refrigerant Precaution . . . . . . . .
Refrigerant Connection . . . . . . . . . . .
Service Equipment . . . . . . . . . . . .
COMPRESSOR . . . . . . . . . . . .
General Precautions . . . . . . . . . . . .
LEAK DETECTION DYE . . . . . . . . ..

DIAGNOSIS AND REPAIR WORKFLOW
HAC-5
< BASIC INSPECTION >
[AUTOMATIC AIR CONDITIONER]
C
D
E
F
G
H
J
K
L
M
A
B
HAC
N
O
P
BASIC INSPECTION
DIAGNOSIS AND REPAIR WORKFLOW
Work Flow
INFOID:0000000003545559
DETAILED FLOW
1.
LISTEN TO CUSTOMER COMPLAINT
Listen to customer complaint. (Get detailed information about the conditions and environment when the symp-
tom occurs.)
>> GO TO 2.
2.
VERIFY THE SYMPTOM WITH OPERATIONAL CHECK
Verify the symptom with operational check. Refer to
HAC-6, "WITHOUT LEFT AND RIGHT VENTILATION
TEMPERATURE SEPARATELY CONTROL SYSTEM : Description & Inspection"
(Without left and right venti-
lation temperature separately control system) or
HAC-11, "WITH LEFT AND RIGHT VENTILATION TEMPER-
ATURE SEPARATELY CONTROL SYSTEM : Description & Inspection"
(With left and right ventilation
temperature separately control system).
>> GO TO 3.
3.
GO TO APPROPRIATE TROUBLE DIAGNOSIS
Go to appropriate trouble diagnosis (Refer to
HAC-132, "Diagnosis Chart By Symptom"
>> GO TO 4.
4.
REPAIR OR REPLACE
Repair or replace the specific parts.
>> GO TO 5.
5.
FINAL CHECK
Final check.
Is the inspection result normal?
YES
>> CHECK OUT
NO
>> GO TO 3.
HAC-6
< BASIC INSPECTION >
[AUTOMATIC AIR CONDITIONER]
INSPECTION AND ADJUSTMENT
INSPECTION AND ADJUSTMENT
WITHOUT LEFT AND RIGHT VENTILATION TEMPERATURE SEPARATELY
CONTROL SYSTEM
WITHOUT LEFT AND RIGHT VENTILATION TEMPERATURE SEPARATELY CON-
TROL SYSTEM : Description & Inspection
INFOID:0000000003545560
DESCRIPTION
The purpose of the operational check is to check that the individual system operates normally.
INSPECTION PROCEDURE
Memory Function
1.
Turn temperature control dial clockwise until 32
°
C (90
°
F) is displayed.
2.
Press OFF switch.
3.
Turn ignition switch OFF.
4.
Turn ignition switch ON.
5.
Press AUTO switch.
6.
Confirm that the set temperature remains at previous temperature.
7.
Press OFF switch.
If NG, go to trouble diagnosis procedure for
HAC-142, "Inspection procedure"
If OK, continue the check.
Blower
1.
Turn fan control dial clockwise. Blower should operate on low speed. The fan symbol should have one
blade lit.
2.
Turn fan control dial clockwise again, and continue checking blower speed and fan symbol until all speeds
are checked.
3.
Leave blower on max. speed.
If NG, go to trouble diagnosis procedure for
HAC-81, "WITHOUT LEFT AND RIGHT VENTILATION TEMPER-
ATURE SEPARATELY CONTROL SYSTEM : Diagnosis Procedure"
If OK, continue the check.
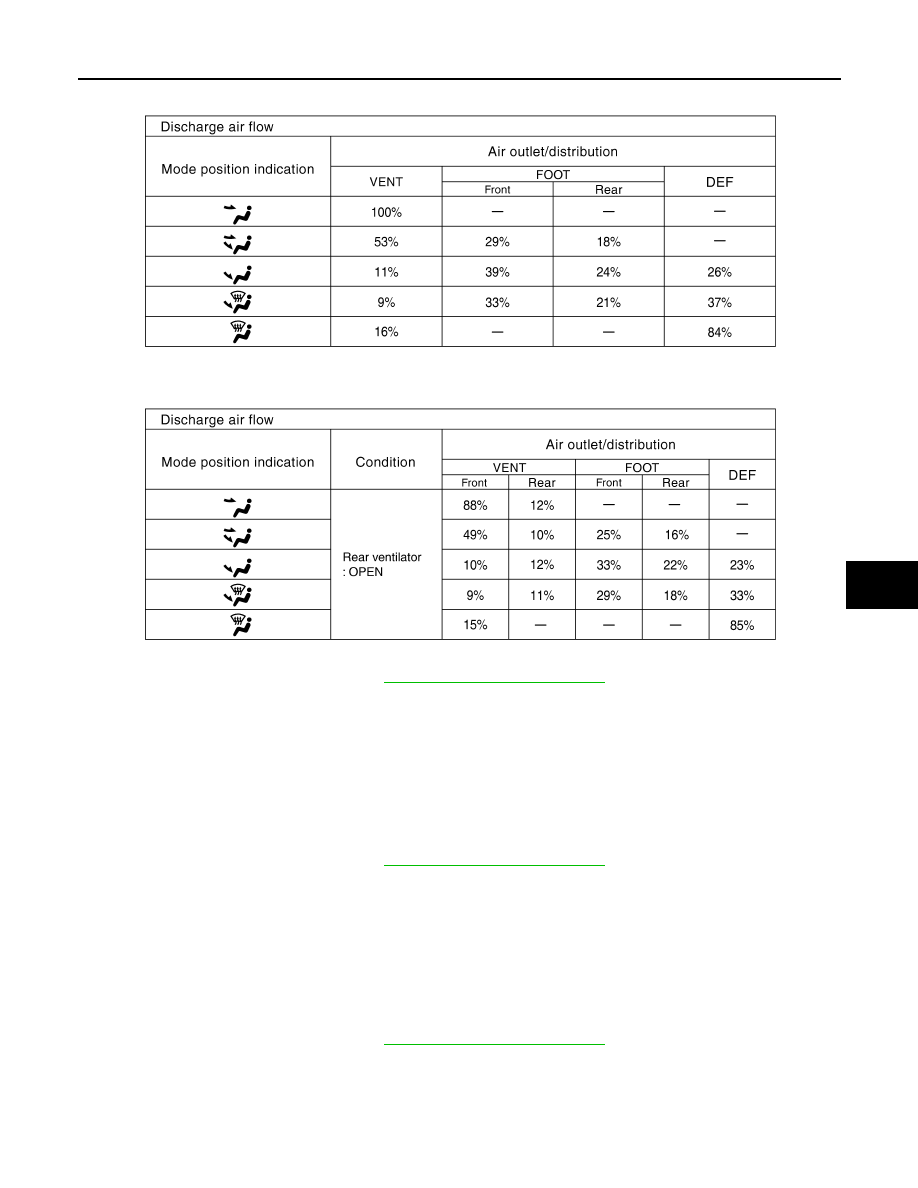
Discharge Air
1.
Press MODE switches and DEF switch.
2.
Each position indicator turns ON.
3.
Confirm that discharge air comes out according to the air distribution table. Refer to
LEFT AND RIGHT VENTILATION TEMPERATURE SEPARATELY CONTROL SYSTEM : System
Description"
.
Conditions
: Engine running at normal operating temperature
INSPECTION AND ADJUSTMENT
HAC-7
< BASIC INSPECTION >
[AUTOMATIC AIR CONDITIONER]
C
D
E
F
G
H
J
K
L
M
A
B
HAC
N
O
P
Without rear ventilation
With rear ventilation
If NG, go to trouble diagnosis procedure for
.
If OK, continue the check.
NOTE:
Confirm that the compressor clutch is engaged (sound or visual inspection) and intake door position is at FRE
when the D/F or DEF is selected.
Intake Air
1.
Press intake switch. REC indicator turns ON.
2.
Press intake switch again. FRE indicator turns ON.
3.
Listen for intake door position change. (Slight change of blower sound can be heard.)
If NG, go to trouble diagnosis procedure for
.
If OK, continue the check.
NOTE:
Confirm that the compressor clutch is engaged (sound or visual inspection) and intake door position is at FRE
when the D/F or DEF is selected.
A/C Switch
1.
Press A/C switch.
2.
A/C switch indicator turns ON.
• Confirm that the compressor clutch engages (sound or visual inspection).
If NG, go to trouble diagnosis procedure for
.
If OK, continue the check.
Temperature Decrease
1.
Turn temperature control dial counterclockwise until 18
°
C (60
°
F) is displayed.
2.
Check for cool air at discharge air outlets.
JSIIA0242GB
JSIIA0893GB
Нет комментариевНе стесняйтесь поделиться с нами вашим ценным мнением.
Текст