Seat Mii (2019 year). Manual in english — page 5
Opening and closing
same range of frequencies (for example,
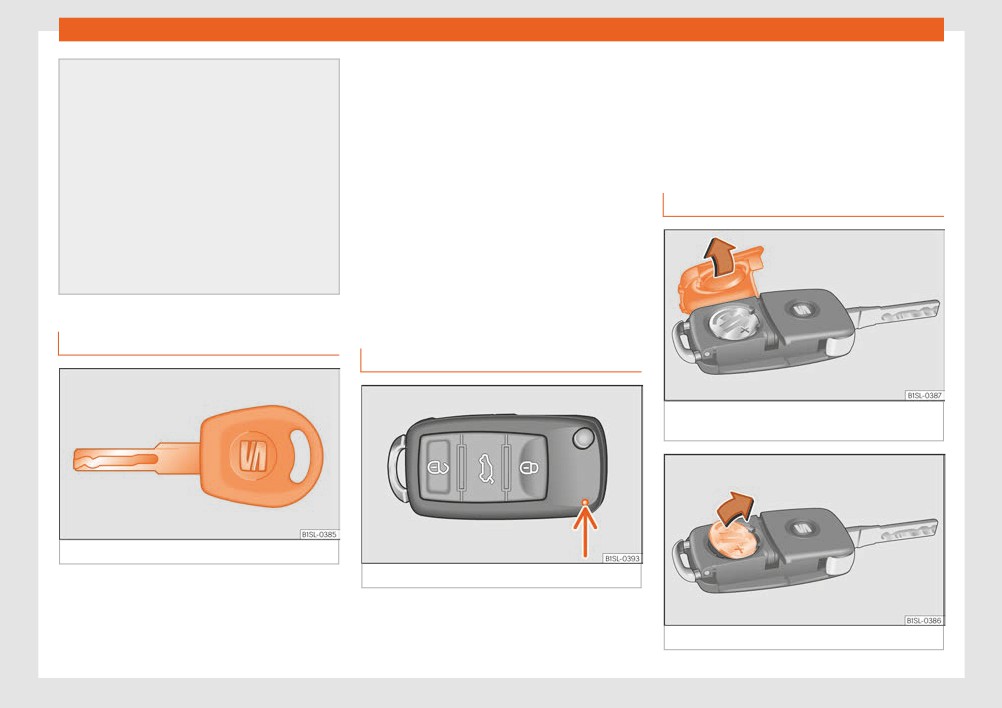
Duplicate keys
the indicator blinks several times, for exam-
radio transmitters, mobile telephones).
To obtain a spare key and other vehicle keys,
ple: for the convenience opening function.
● Obstacles between the remote control
the vehicle chassis number is required.
When the control lamp does not light upon
and the vehicle, bad weather conditions
pushing a button, the vehicle key batteries
Each new key must contain a microchip and
and draining batteries can considerably re-
must be changed ››› page 93.
be coded with the data from the vehicle elec-
duce the range of the remote control.
tronic immobiliser. A vehicle key will not work
● If the buttons of the vehicle key are
if it does not contain a microchip or the mi-
pressed ››› Fig. 97 or one of the central
crochip has not been encoded. This is also
Replacing the battery
locking buttons ››› page 94 is pressed re-
true for keys cut for the vehicle.
peatedly in quick succession, the central
locking briefly disconnects as protection
The vehicle keys or new spare keys can be
against overloading. The vehicle is then un-
obtained from a SEAT dealership, a special-
locked. Lock it if necessary.
ised workshop or an approved locksmith
qualified to create them.
Mechanical vehicle key
Control lamp on the vehicle key
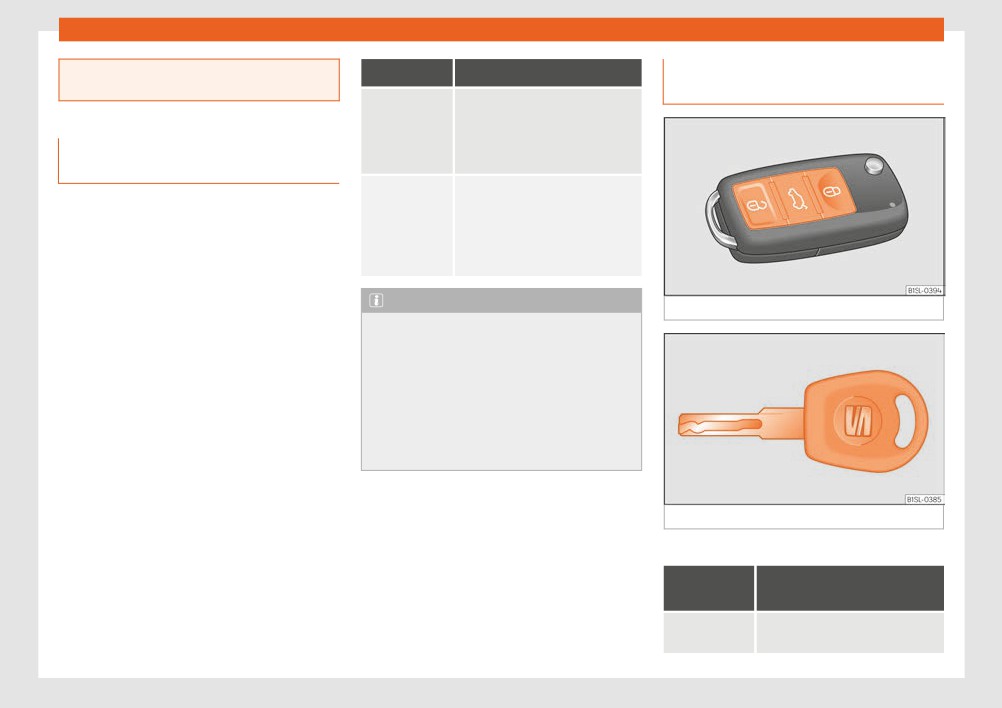
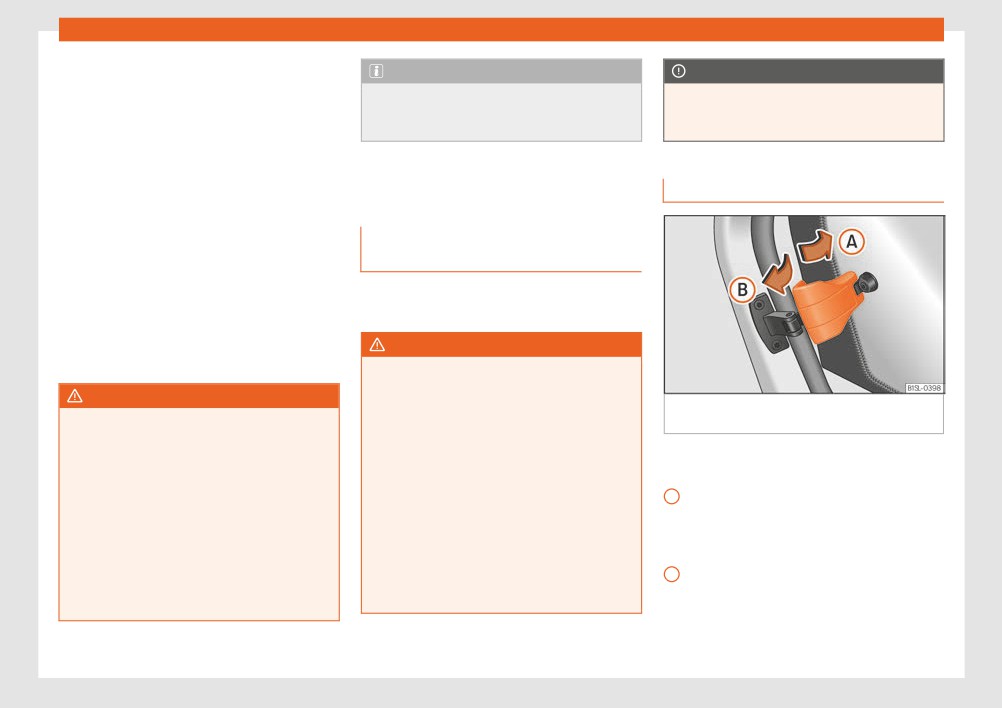
Fig. 100 Vehicle key: battery compartment
cover.
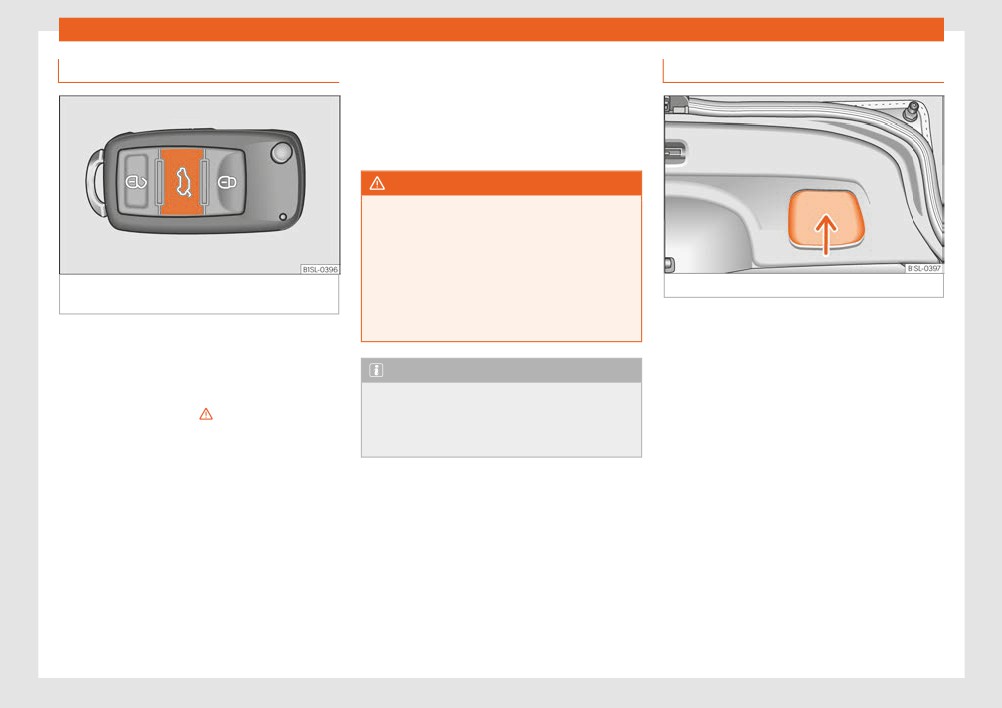
Fig. 98 Vehicle mechanical key
Fig. 99 Control lamp on the vehicle key
The vehicle key set may include a mechani-
cal key ››› Fig. 98.
When a button on the vehicle key is pressed,
the control lamp flashes ››› Fig. 99 (arrow)
Fig. 101 Vehicle key: remove the battery.
»
once briefly. If the button is pressed and held,
93

Operation
SEAT recommend having the batteries
For the sake of the environment
Central locking functions correctly when all
changed in a specialised workshop.
the doors and the rear lid are correctly shut. If
Please dispose of your used batteries cor-
the driver door is open, the vehicle cannot be
The battery is located to the rear of the vehi-
rectly and with respect for the environ-
locked with the key.
cle key, under a cover.
ment.
The battery of an unlocked vehicle parked for
Changing the battery
a long period (e.g. in a private garage) may
run down and fail to start the motor.
● Unfold the vehicle key blade ››› page 92.
Synchronising the vehicle key
● Remove the cover from the back of the ve-
WARNING
If the button is pressed frequently outside
hicle key ››› Fig. 100 in the direction of the ar-
of the vehicle range, it is possible that the ve-
The incorrect use of the central locking
row ›››
hicle can no longer be locked or unlocked us-
system may cause serious injuries.
● Extract the battery from the compartment
ing the key. In this case, the vehicle key must
● The central locking system will lock all
using a suitable thin object ››› Fig. 101.
be synchronised once more as follows:
doors. A vehicle locked from the inside can
● Place the new battery in the compartment,
prevent any non-authorised individual from
pressing in the direction of the arrow as
● Unfold the vehicle key blade ››› page 92.
opening the doors and accessing the vehi-
shown ››› Fig. 101 ›››
● Press the button on the vehicle key. For
cle. Nevertheless, in case of emergency or
this, it must remain with the vehicle.
accident, locked doors will complicate ac-
● Fit the battery compartment cover, press-
cess to the vehicle interior to help the pas-
ing in the direction of the arrow as shown
● Open the vehicle within one minute using
sengers.
››› Fig. 100 until it clicks into place.
the key shaft.
● Never leave children or disabled people
● Turn on the ignition using the vehicle key.
CAUTION
alone in the vehicle. The central locking
The key has been synchronised.
button can be used to lock all the doors
● If the battery is not changed correctly,
● If necessary, fit the cap.
from within. Therefore, passengers will be
the vehicle key may be damaged.
locked inside the vehicle. Individuals locked
● Use of unsuitable batteries may damage
in the vehicle can be exposed to very high
the vehicle key. For this reason, always re-
or very low temperatures.
place the dead battery with another of the
Central locking* and locking
● Depending on the time of the year, tem-
same voltage, size and specifications.
peratures inside a locked and closed vehi-
system
● When fitting the battery, check that the
cle can be extremely high or extremely low
polarity is correct.
resulting in serious injuries and illness or
Introduction
even death, particularly for young children.
● Never leave individuals locked in a closed
Read the additional information carefully
and locked vehicle. In case of emergency,
››› page 10
94
Opening and closing
they may not be able to exit the vehicle by
Function
Necessary operations
Unlocking and locking the vehicle
themselves or get help.
from outside
Lock the vehi-
- Turn off the ignition and turn it on
cle, by push-
again.
ing the central
- Push the central locking button
Description of the central locking
locking but-
.
ton:
system
Use the key to
- Turn off the ignition and turn it on
The central locking system allows all doors
lock the vehi-
again.
and the rear lid to be locked and unlocked
cle:
OR: Remove the key from the igni-
tion.
centrally.
- Open any door just once.
- Lock the vehicle with the key.
● From outside, using the vehicle key.
● From inside, by pushing the central locking
Note
button ››› page 97.
Fig. 102
Buttons on the vehicle key
If the buttons of the vehicle key are pressed
The central locking system can be activated
››› page 92 or one of the central locking
or deactivated at a specialised workshop.
buttons ››› Fig. 104 is pressed repeatedly in
short succession, the central locking brief-
In case of a vehicle key fault or central lock-
ly disconnects as protection against over-
ing system fault, all doors can be locked or
loading. In this case, the vehicle remains
unlocked manually.
unlocked for about 30 seconds. If no door
nor the rear lid is opened during this time,
Locking the vehicle after the airbags have
the vehicle will then automatically lock.
been deployed
If the airbags are deployed due to an acci-
dent, the vehicle will be automatically and
Fig. 103
Vehicle mechanical key
completely unlocked. Depending on the
amount of damage, it can be locked follow-
Central locking
ing an accident in the following ways:
Function
Handling the buttons on the
vehicle ››› Fig. 102
Unlocking the
Press button .
»
vehicle.
95

Operation
The vehicle key only locks and unlocks the
Function
Handling the buttons on the
Using the vehicle's me-
vehicle if it is within range of the vehicle and if
vehicle ››› Fig. 102
Function
chanical key ››› Fig. 103 in
the battery has enough power.
the lock cylinder
Lock the vehi-
Press button .
cle.
● Upon locking the vehicle, all turn signals will
To unlock, insert the vehicle key
flash once in confirmation.
into the lock cylinder of the driver
Unlocking the
Press button .
door and turn the key in an anti-
rear lid.
● Upon unlocking the vehicle, all turn signals
Locking and un-
clockwise direction.
will flash twice in confirmation.
locking the rear
Locking the
Press button .
lid.
To lock, insert the vehicle key into
rear lid.
If the turn signals do not flash in confirmation,
the lock cylinder of the driver
at least one of the doors or the rear lid has
door and turn the key in a clock-
Function
Handling the vehicle key
been left unlocked.
wise direction.
››› Fig. 102 in the lock cylin-
If the driver door is open, the vehicle cannot
If the driver's door is open, it cannot be
der or with the vehicle me-
be locked with the key. If you unlock the vehi-
locked with the vehicle key.
chanical key ››› Fig. 103.
cle without opening any doors or the rear lid,
Unlocking the
Insert the vehicle key into the lock
it will lock again automatically after a few
vehicle.
cylinder of the driver door and turn
seconds. This function prevents the vehicle
the key in an anticlockwise di-
from remaining unlocked if the unlocking but-
rection.
ton is pressed by mistake.
Lock the vehi-
Insert the vehicle key into the lock
cle.
cylinder of the driver door and turn
Mechanical locking
the key in a clockwise direction.
Using the vehicle's me-
Unlocking the
Insert the vehicle key into the lock
Function
chanical key ››› Fig. 103 in
rear lid.
cylinder of the driver door and turn
the lock cylinder
the key in an anticlockwise di-
rection.
To unlock, insert the vehicle key
into the lock cylinder of the driver
Locking the
Insert the vehicle key into the lock
door and turn the key in an anti-
rear lid.
cylinder of the driver door and turn
Locking the
clockwise direction.
the key in a clockwise direction.
driver door
manually.
To lock, insert the vehicle key into
Warning: in accordance with the central
the lock cylinder of the driver
locking function set by a specialised work-
door and turn the key in a clock-
shop, in order to unlock all the doors and the
wise direction.
rear lid, press the button twice.
96
Opening and closing
Locking or unlocking the vehicle
Central locking
Mechanical locking
from the inside
The doors are locked by pressing the door
Push the button ››› Fig. 104:
lever, so that the red mark becomes visible
Unlocking the vehicle.
››› Fig. 105
1 .
Locking the vehicle.
To unlock a door, pull its corresponding door
lever.
The central locking button is still operative
If the vehicle becomes locked, take note of
when the ignition is switched off.
the following:
If the vehicle has been locked with the vehicle
● The "Safe" security system will not activate
key, the central locking button does not oper-
››› page 97.
ate.
● It will not be possible to open the doors
Please note the following when you use the
from the outside, when stopped at traffic
Fig. 104
On the driver's door: central locking
central locking button to lock your vehicle:
button.
lights for example.
● The "Safe" security system will not activate
● The doors can be opened and unlocked in-
››› page 97.
dividually from the inside by pulling the door
● It will not be possible to open the doors or
handle.
the rear lid from the outside. This may offer
● The driver door cannot be locked using the
extra safety, for example when stopped at
central locking system when it is still open.
traffic lights.
This avoids locking the vehicle key inside the
● The doors can be opened and unlocked in-
vehicle when there is nobody inside.
dividually from the inside by pulling the door
handle. If necessary, pull the door release
lever twice.
Safe security system “Safe”*
Fig. 105
On the passenger door: door handle
● The driver door cannot be locked when
for mechanical locking.
open. This avoids locking the vehicle key in-
Function
Necessary operations
side the vehicle when there is nobody inside.
Lock the vehicle and
Press the button once on
activate the “Safe”
the vehicle key.
»
security system.
97
Operation
Function
Necessary operations
When the vehicle is
Meaning
● Always stop immediately and close the
locked:
door.
Press the button on the
Lock the vehicle with-
vehicle key twice.
● When closing, ensure that the door has
The red LED flashes for
There is a fault in the
out activating the
closed correctly. A closed door should be
about two seconds at short
locking system. Con-
“Safe” security sys-
Press the central locking
flush with the corresponding parts of the
intervals. Subsequently, the
tact a specialised
tem.
button on the driver door
light will remain switched on
workshop.
bodywork.
once.
for about 30 seconds.
● Open and close doors only when nobody
is in the way of the door.
When the vehicle is locked, the “Safe” securi-
WARNING
ty system deactivates the door handles, pre-
venting people from opening the vehicle. The
Careless use of the "Safe" security system
WARNING
doors cannot be opened from inside ›››
can cause serious injury.
A door held open by its retainer could be
● Never leave anybody inside the vehicle if
blown closed by the wind or close if the ve-
Upon switching off the ignition, the instrument
it has been locked using the key. When the
hicle is on a hill, causing injury.
panel display will show that the “deadlock” is
"Safe" security system is activated, doors
activated or (SAFELOCK or SAFELOCK).
● When opening and closing doors, always
cannot be opened from the inside!
use the door handle.
● When the doors are locked, it is difficult
When the “Safe” security system is deac-
to get to passengers in the vehicle interior
tivated, the following occurs:
in case of an emergency. Passengers could
● The vehicle can be opened and unlocked
remain trapped inside and unable to unlock
Childproof lock
from the inside using an inside door handle.
the doors in case of an emergency.
Control lamp on the driver door
When the vehicle is
Meaning
Doors
locked:
The red LED flashes for ap-
The "Safe" security
Introduction
proximately 2 seconds at
system is switched
short intervals and then
on.
WARNING
more slowly.
If a door is not correctly closed, it could
The red LED flashes for
The "Safe" security
open unexpectedly when driving and cause
about two seconds then
system is switched
Fig. 106 Childproof lock on the left hand side
serious injuries.
turns off. After 30 seconds,
off.
door
the LED flashes again.
98

Opening and closing
The childproof lock prevents the rear doors
activated by inserting the key in the groove
on it. If necessary, press down on the rear
from being opened from the inside. This sys-
when the door is open, as described above.
lid and remove the load.
tem prevents minors from opening a door ac-
● Close and lock both the rear lid and all
cidentally while the vehicle is running.
the other doors when you are not using the
This function is independent of the vehicle
vehicle. Ensure that nobody remains inside
Rear lid
electronic opening and locking systems. It
the vehicle.
only affects rear doors. It can only be activa-
● Never allow children to play inside or
Introduction
ted and deactivated manually, as described
around the vehicle without supervision, es-
below:
pecially if the rear lid is open. Children
WARNING
could enter the luggage compartment,
Activating the childproof lock
Careless and unsuitable locking, opening
close the rear lid and become trapped. De-
and closing of the rear lid can cause acci-
pending on the time of the year, tempera-
- Unlock the vehicle and open the door in
dents and serious injury.
tures inside a locked and closed vehicle
which you wish to activate the childproof
can be extremely high or extremely low re-
lock.
● Open and close the rear lid only when
sulting in serious injuries and illness or even
nobody is in the way.
death, particularly for young children.
- With the door open, rotate the groove in the
● Do not close the rear lid by pushing it
door using the ignition key, anti-clockwise
● Never leave children or disabled people
down with your hand on the rear window.
for the left-hand side doors ››› Fig. 106 and
alone in the vehicle. If the vehicle key or the
This could break and cause injury.
clockwise for the right-hand side doors.
central locking button is used, they may be
● Ensure the rear lid is locked after closing,
locked in the vehicle.
otherwise, it may open unexpectedly while
Deactivating the childproof lock
driving. A closed rear lid should be flush
CAUTION
- Unlock the vehicle and open the door
with the corresponding parts of the body-
whose childproof lock you want to deacti-
work.
Before opening the rear lid, ensure that
vate.
● Always keep the rear lid closed while
there is sufficient free space to open and
driving to avoid toxic gases entering the ve-
close it, for example if you are in a garage.
- With the door open, rotate the groove in the
hicle interior.
door using the ignition key, anti-clockwise
for the right-hand side doors, and clock-
● Do not open the rear lid when there is a
wise for the left-hand side doors
load installed, for example a carrier sys-
tem. Likewise, the boot hatch cannot be
››› Fig. 106.
opened when a load is attached to it, for
Once the childproof lock is activated, the
example bicycles. An open rear lid could
door can only be opened from the outside.
close itself if there is an additional weight
The childproof lock can be activated or de-
99
Operation
Opening the rear lid
Opening with the vehicle mechanical key
Closing the rear lid
● Insert the vehicle key into the lock cylinder
of the driver door and turn the key in an anti-
clockwise direction ››› page 94.
● Opening the rear lid with the button.
WARNING
Unsuitable or careless unlocking and open-
ing of the rear lid could cause serious inju-
ries.
● If there is a loaded luggage carrier on the
rear lid, it could be unlocked or open but
Fig. 107 On the vehicle key: button to unlock
Fig. 108 Rear lid open: space for pulling.
not recognised as such. An unlocked or
and open the boot hatch.
open rear lid could open unexpectedly
Closing the rear lid
Read the additional information carefully
while driving.
● Grab the handgrip inside the rear lid
››› page 11
››› Fig. 108 (arrow).
Note
If bicycles are attached to a rack on the boot
● Push the rear lid downwards until it locks in-
hatch, for example, in some cases, it may not
At outside temperatures of less than 0°C
to place in the lock.
open automatically ››› . Remove the load
(+32°F), the pressurised gas struts cannot
always automatically lift the rear lid. In this
● Ensure that it is correctly closed by pulling
from the carrier and support the open rear lid.
case, open the rear lid manually.
on it firmly.
Opening with central locking
Locking the rear lid with central locking*
● Press the button on the vehicle key
If you unlock the vehicle without opening any
››› Fig. 107 for about one second to unlock
doors or the rear lid, it will lock again auto-
the rear lid.
matically after about 30 seconds. This func-
● OR: Press the button on the vehicle key
tion prevents the vehicle from remaining un-
until the rear lid opens automatically several
locked if the unlocking button is pressed by
centimetres.
mistake.
● Opening the rear lid with the button.
Locking is only possible when the rear lid is
correctly and fully closed.
100
Opening and closing
● The rear lid is also locked by a central lock-
Note
CAUTION
ing.
Before closing the rear lid, make sure that
When the windows are open, rain can enter
● If the vehicle rear lid is locked or unlocked
the key has not been left inside the luggage
the vehicle, dampening the interior equip-
using the button of the vehicle key, when it
compartment.
ment and causing damage to the vehicle.
is closed again it will lock automatically.
● A closed but not locked rear lid will lock au-
tomatically at a speed above about 9 km/h
Side-opening rear windows
(6 mph).
Controls for the windows
Locking the rear lid with the vehicle me-
Opening and closing the windows
chanical key
electrically
Locking is only possible when the rear lid is
correctly and fully closed.
Read the additional information carefully
›››
page 13
● Insert the vehicle key into the lock cylinder
of the driver door and turn the key in a clock-
WARNING
wise direction ››› page 94.
Careless use of the electric windows can
cause serious injury.
WARNING
● Only operate the electric windows when
Fig. 109 Lever to open and close the rear win-
Unsuitable or careless closing and locking
nobody is in the way.
dow
of the rear lid could cause serious injuries.
● Never leave children or disabled people
● Never leave the vehicle unattended, or
Opening
alone in the vehicle if the doors are to be
allow children to play inside or around the
locked. The windows cannot be opened in
Pull the release lever in the direction of arrow
vehicle without supervision, especially if
case of an emergency.
A and press outward until the lever engages.
the rear lid is open. Children could enter
● Always take all the keys with you when-
the luggage compartment, close the rear
ever you leave the vehicle. After turning off
Closing
lid and become trapped. A locked vehicle
the ignition, the windows can be opened
can be subjected to extremely high and low
Pull the release lever in the direction of arrow
and closed for a short time using the but-
temperatures, depending on the time of
B and then press the lever backward until it
tons on the door as long as the driver door
year, thus causing serious injuries/illness
engages.
or passenger side door is not open.
and even death.
101
Operation
Sliding/tilting electric pan-
WARNING
Note
oramic sunroof
If the sliding/tilting electric panoramic sun-
● Leaves and other loose objects that land
roof is used negligently or without paying
in the guides of the sliding/tilting sunroof
due attention, it can cause serious injury.
should be removed periodically by hand or
Opening and closing the panoram-
● The sliding/tilting sunroof should only be
using a vacuum cleaner.
ic sunroof
opened or closed when no one is blocking
● If the sliding/tilting sunroof does not work
its path.
correctly, the anti-trap function will not
Read the additional information carefully
work either. In this case, you should take
● After switching off, it is still possible to
››› page 13
the vehicle to a specialised workshop.
open or close the sliding/tilting sunroof
The sliding/tilting sunroof only works when
during a short space of time provided that
● The convenience position permits suffi-
switched on. After switching off, it is still possi-
neither the driver nor passenger door is
cient ventilation with a level of sound pro-
ble to open or close the sliding/tilting sunroof
opened.
duced by low wind.
during a short space of time provided that
neither the driver nor passenger door is
CAUTION
opened.
● To prevent damage, when there are win-
Anti-trap function of the slid-
All operations are interrupted when the rotary
ter temperatures any ice or snow that there
ing/tilting electric panoramic sun-
knob is actuated.
may be on the roof of the vehicle must be
roof
removed before opening or raising the slid-
If it were not possible to close the sliding/tilt-
ing/tilting electric panoramic sunroof.
The anti-trap function can reduce the risk of
ing sunroof electrically, it would need to be
● Before leaving the vehicle or in the case
injury when closing the sliding/tilting electric
closed manually. It is not possible to do an
of heavy rain, the sliding/tilting sunroof
panoramic sunroof ››› . If the sliding/tilting
emergency close of the sliding/tilting sunroof
must always be closed. With the slid-
sunroof encounters resistance or an obstacle
without removing components of the vehicle.
ing/tilting sunroof open or raised, water
when closing, it will immediately reopen.
In such a case, obtain professional assis-
can enter the passenger compartment and
tance.
can cause considerable damage to the
● Check why the sliding/tilting sunroof has
electrical system. As a result, other dam-
not closed.
Sliding blind
age can occur in the vehicle.
● Try to close it again.
With the roof grab handle situated in the rear
● In the case of heavy rain, if the slid-
● If it is still not possible to close it due to an
part of the roof opening, it is possible to move
ing/tilting sunroof is open, the interior
obstacle or resistance, it will remain in the
the sliding blind to the required position.
equipment of the vehicle may get wet, de-
corresponding position. Close it without the
stroying the seat heating and damaging
anti-trap function.
the electrical system of the vehicle.
102
Lights and visibility
Closing the sliding/tilting electric panor-
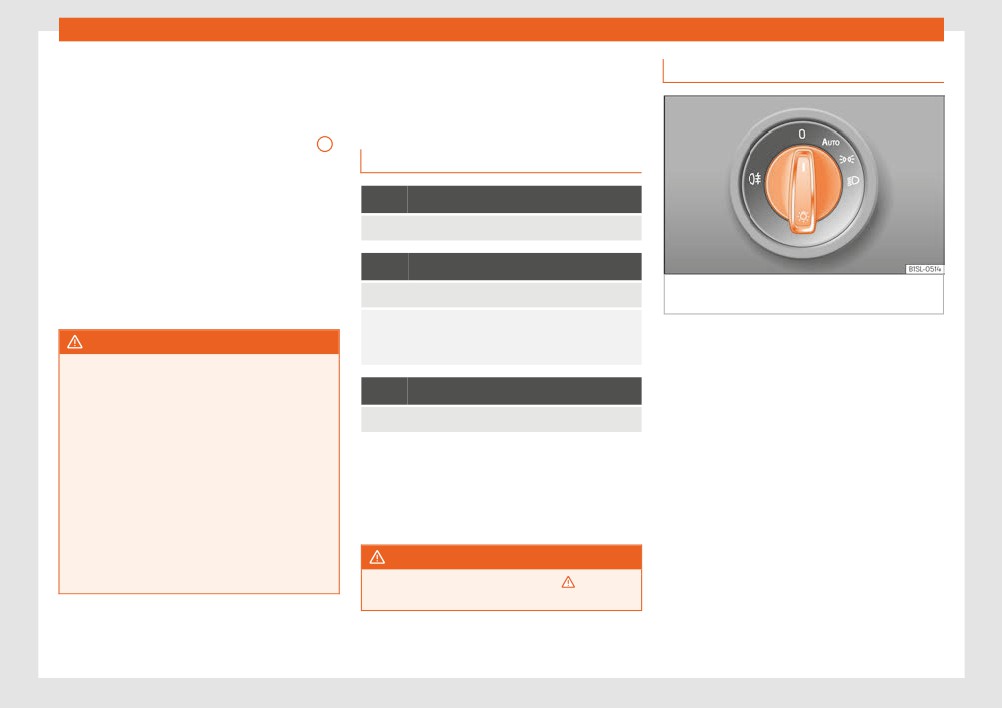
Switching lights on and off
Lights and visibility
amic sunroof without the anti-trap func-
tion
Lights
● Within about 5 seconds of activating the
anti-trap function, pull knob ››› Fig. 13 5
until the sliding/tilting sunroof is fully closed.
Control lamps
● As such, the sliding/tilting sunroof will
close without the anti-trap function!
It lights up
● If the sunroof still cannot be closed, visit a
Rear fog light switched on ››› page 22.
specialised workshop.
If the knob is released during the closing op-
It lights up
eration, the sliding/tilting electric panoramic
Fig. 110 On the side of the steering wheel: dia-
Left or right turn signal.
sunroof opens automatically.
gram of some of the types of light switch
The control lamp flashes twice as fast when a vehicle
turn signal is faulty. If necessary, check the vehicle's
Read the additional information carefully
WARNING
lights.
››› page 22
Closing the sliding/tilting electric panor-
The driver is personally responsible for the
amic sunroof without the anti-trap function
It lights up
correct use and adjustment of the lights in all
can result in serious injury.
situations.
● The sliding/tilting sunroof should always
Main beam on or flasher on ››› page 105.
be closed carefully.
Several warning and control lamps light up
Audible warnings to advise the driver that
● No person should ever remain in the way
for a few seconds when the ignition is switch-
the lights have not been switched off
of the sliding/tilting sunroof, especially
when closing without the anti-trap func-
ed on, signalling that the function is being
If the key is not in the ignition and the driver
tion.
verified. They will switch off after a few sec-
door is open, an audible warning signal is
onds.
heard in the following cases: this will remind
● The anti-trap function does not prevent
fingers or other parts of the body from be-
you to turn the light off.
WARNING
coming trapped against the roof frame and
● When the light switch is in position .
injuries occurring.
Observe the safety warnings ››› in Con-
trol and warning lamps on page 27.
● When the light switch is in position .
»
103
Operation
WARNING
Daytime running lights
Automatic dipped beam control
The daytime driving light consists of individu-
*
The side lights or daytime running lights
are not bright enough to illuminate the road
al lights in the front headlamps.
ahead and to ensure that other road users
The automatic dipped beam control is merely
When the daytime driving light is switched on,
are able to see you.
intended as an aid and is not able to recog-
only the individual lights come on ›››
nise all driving situations.
● Always use your dipped beam head
The daytime lights are switched on each time
lights if it is raining or if visibility is poor.
When the light switch is in position , the
the ignition is turned on if the light setting is in
vehicle lights and the instrument panel and
position or in position .
WARNING
switch lighting switch on and off automatical-
ly in the following situations ››› in Light and
If the headlights are set too high and not
WARNING
visibility: functions on page 104:
used correctly, there is a risk of dazzling or
If the road is not well-lit and the vehicle is
distracting other road users. This could re-
not clearly visible to other drivers, an acci-
Automatic switch-
Automatic switch-
sult in a serious accident.
dent may occur.
ing on
ing off
● Always make sure that the headlights are
● Never use the daytime driving light if the
correctly adjusted.
The photo sensor de-
When adequate lighting
road is not well-lit as a result of the weath-
tects darkness, for exam-
is detected.
er conditions and poor visibility. The day-
ple, when driving through
Note
time driving lights are not bright enough to
a tunnel.
illuminate the road ahead and to ensure
The legal requirements regarding the use
that other road users are able to see you.
The rain sensor detects
When the windscreen
of vehicle lights in each country must be
rain and activates the
wipers have been inac-
observed.
● The rear lights do not come on with the
windscreen wipers.
tive for a few minutes.
daytime driving light. A vehicle which does
not have the rear lights on may not be visi-
ble to other drivers in the darkness, if it is
WARNING
Light and visibility: functions
raining or in conditions of poor visibility.
If the road is not well lit and other road
users cannot see the vehicle well enough
Parking light remains on both sides
Note
or at all, accidents may occur.
If when switching off the ignition, the light
● The automatic dipped beam control
The headlights, rear lights and turn signals
control remains in the position and the ve-
() only switches on the dipped beam
may mist up temporarily on the inside in
hicle is closed from outside, both headlights,
when there are no changes in brightness,
cool or damp weather. This is normal and in
in addition to the side lights and the rear
and not, for example when it is foggy.
no way effects the useful life of the vehicle
lights will light up.
lighting system.
104

Lights and visibility
“Coming home” and “Leaving
● OR: switch on the ignition.
fuse other road users. This could result in a
home” function (guidance lights)
serious accident.
Activating the “Leaving Home” function
● Always give warning when you are going
The “Coming Home” and “Leaving Home”
● Unlock the vehicle (the light switch must be
to change lane, overtake or when turning,
function lights up the vehicle’s immediate
at the position and the rain and light sen-
activating the turn signal in good time.
proximity when getting into and out of it in the
sor must detect darkness).
● As soon as you have finished changing
dark.
lane, overtaking or turning, switch the turn
Deactivating the “Leaving Home” function
signal off.
The “Coming home” function is switched on
manually. However, the “Leaving home” func-
● It is automatically deactivated once the
tion is automatically controlled by a rain and
light switch-off delay time has elapsed.
WARNING
light sensor.
● OR: lock the vehicle.
Incorrect use of the headlights may cause
● OR: rotate the light switch to position .
accidents and serious injury, as the main
Activating the “Coming Home” function
beam may distract or dazzle other drivers.
● OR: switch on the ignition.
● Switch the ignition off.
● Activates the headlight flasher for approx. 1
Note
second ››› page 23.
● If the convenience turn signals are oper-
Turn signal and main beam lever
ating (three flashes) and the other conven-
When the driver door is opened, the “Coming
Read the additional information carefully
ience turn signals are switched on, the ac-
Home” lighting comes on. The delay in
tive part stops flashing and only flashes
switching off the headlights is counted from
››› page 23
once in the new part selected.
when the last door or rear lid of the vehicle is
closed.
Convenience turn signals
● The turn signal only works when the igni-
tion is switched on. The hazard warning
For the convenience turn signals, move the
lights also work when the ignition is switch-
Deactivating the “Coming Home” function
lever as far as possible upwards or down-
ed off ››› page 70.
● It is automatically deactivated once the
wards and release the lever. The turn signal
● If any of both turn signals fails, the warn-
will flash 3 times.
time set for the light switch-off delay has
ing lamp will start flashing twice faster
elapsed.
The convenience indicators can be deactiva-
than normal.
● OR: it is automatically deactivated if, 30
ted at a Specialised workshop.
● The main beam headlights can only be
seconds after the function has been activa-
switched on if the dipped beam headlights
ted, any vehicle door or the rear lid is still
WARNING
are already on.
open.
Improper or lack of use of the turn signals,
● OR: rotate the light switch to position .
or forgetting to deactivate them can con-
105
Operation
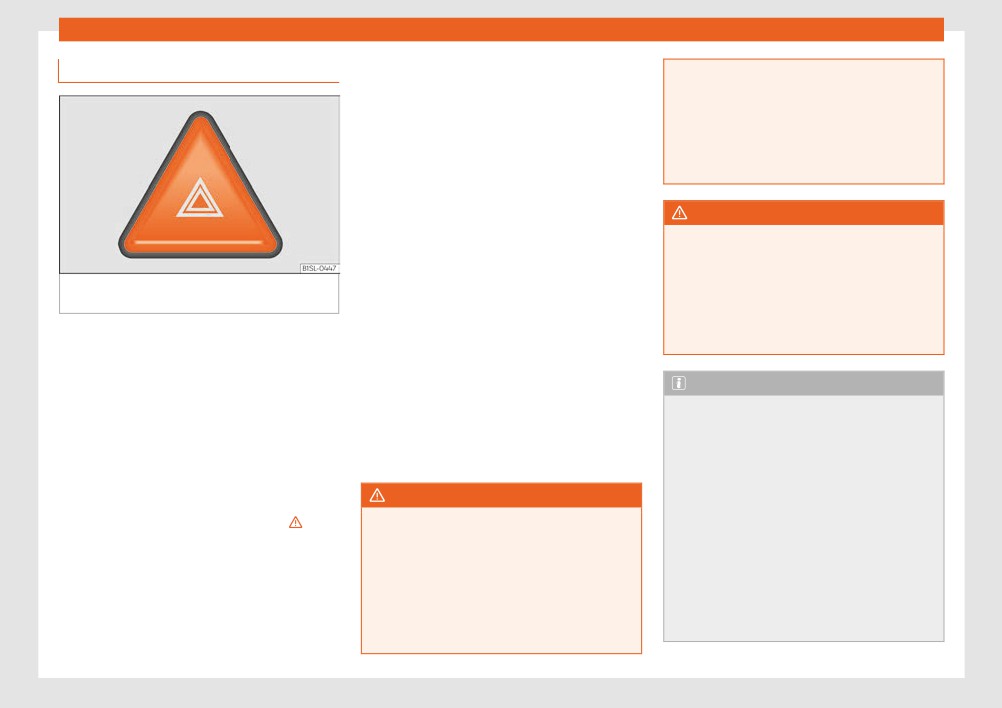
Hazard warning lights
5.
Switch off the engine and remove the
● Never leave children or disabled people
key from the ignition.
alone in the vehicle if the doors are to be
6.
Have all occupants leave the vehicle
locked. In case of an emergency, passen-
and move to safety, for example behind
gers will be trapped inside the vehicle. Indi-
a guard rail.
viduals locked in the vehicle can be ex-
posed to very high or very low tempera-
When leaving the vehicle, take all keys
7.
tures.
with you.
Place an emergency warning triangle to
8.
WARNING
indicate the position of your vehicle to
other road users.
The components of the exhaust system
reach very high temperatures. This could
9.
Allow the engine to cool and check if a
cause a fire and considerable damage.
Fig. 111 Instrument panel: button for switching
specialist is required.
● Always park your vehicle so that no part
the hazard lights warning system on and off.
When being towed with the hazard warning
of the exhaust system can come in contact
lights on, a change in direction or traffic lane
with flammable materials (such as dried
Read the additional information carefully
can be indicated as usual using the turn sig-
grass or fuel).
››› page 23
nal lever. The hazard lights will be interrupted
Always fulfil legal requirements for securing a
temporarily.
Note
broken down vehicle. In a number of countries
If the hazard warning lights are not working,
● The vehicle battery will discharge and
it is now obligatory, for example, to turn on the
you must use an alternative method of draw-
run down if the hazard warning lights re-
hazard warning lights and use a reflective
ing attention to your vehicle. This method
main on for too long (even with the ignition
safety vest ››› page 70.
must comply with traffic legislation.
turned off).
If your vehicle breaks down:
● In some vehicles, the brake lights will
WARNING
flash when braking abruptly at speeds of
1.
Park the vehicle a safe distance from
approximately 80 km/h (50 mph) to warn
traffic and on suitable ground ›››
A faulty vehicle in traffic represents a risk
vehicles travelling behind. If braking con-
of accident for the driver and for other road
2.
Turn on the hazard warning lights with
tinues, the hazard warning lights system
users.
the button ››› Fig. 111.
will automatically be turned on at a speed
● Stop the vehicle safely as soon as possi-
of less than approximately 10 km/h
3.
Apply the handbrake firmly
ble. Park the vehicle a safe distance from
(6 mph). The brake lights remain lit. Upon
››› page 151.
surrounding traffic to lock all the doors in
accelerating, the hazard warning lights will
4.
Put the gearbox lever in neutral or the
case of an emergency. Turn on the hazard
be automatically turned off.
selector lever in position N ››› page 158.
warning lights to warn other road users.
106

Lights and visibility
Adjusting the headlights
Headlight range control, lighting of
To reset, turn switch ››› Fig. 112:
the instrument panel and controls
In those countries where vehicles drive on the
Value
Vehicle load statusa)
other side of the road to the home country,
All seats occupied, luggage compart-
the asymmetric dipped beam may dazzle
ment empty
drivers of oncoming vehicles.
All seats occupied, luggage compart-
For this reason, stickers may be needed to
ment full.
cover the headlights when driving abroad.
For further information, please refer to a spe-
Driver only, luggage compartment full
cialised workshop. SEAT recommends visiting
a) If the vehicle load does not correspond to those
a technical service.
shown in the table, it is possible to select intermediary
positions.
Note
The use of stickers to cover headlights is
Fig. 112 Next to the steering wheel: Headlight
Instrument and switch lighting
only permitted over a short period. To mod-
range control
When the side lights or dipped beam head-
ify the direction of the headlamps more
Headlamp height adjustment
lights are switched on, the lighting for instru-
permanently, please take the vehicle to a
ments and controls lights up at a constant
specialised workshop. SEAT recommends
The headlight range control ››› Fig. 112 is
brightness.
taking your car in for technical service.
modified according to the value of the head-
light beam and the vehicle load status. This
WARNING
offers the driver optimum visibility and the
headlights do not dazzle oncoming drivers
Heavy objects in the back of vehicle may
cause headlight dazzle and distract other
›››
drivers. This could result in a serious acci-
The headlights can only be adjusted when
dent.
the dipped beam is switched on.
● Adjust the light beam to the vehicle load
status so that it does not blind other driv-
To reset, turn switch ››› Fig. 112:
ers.
Value
Vehicle load statusa)
Two front occupants, luggage compart-
ment empty
107
Operation
Luggage compartment light
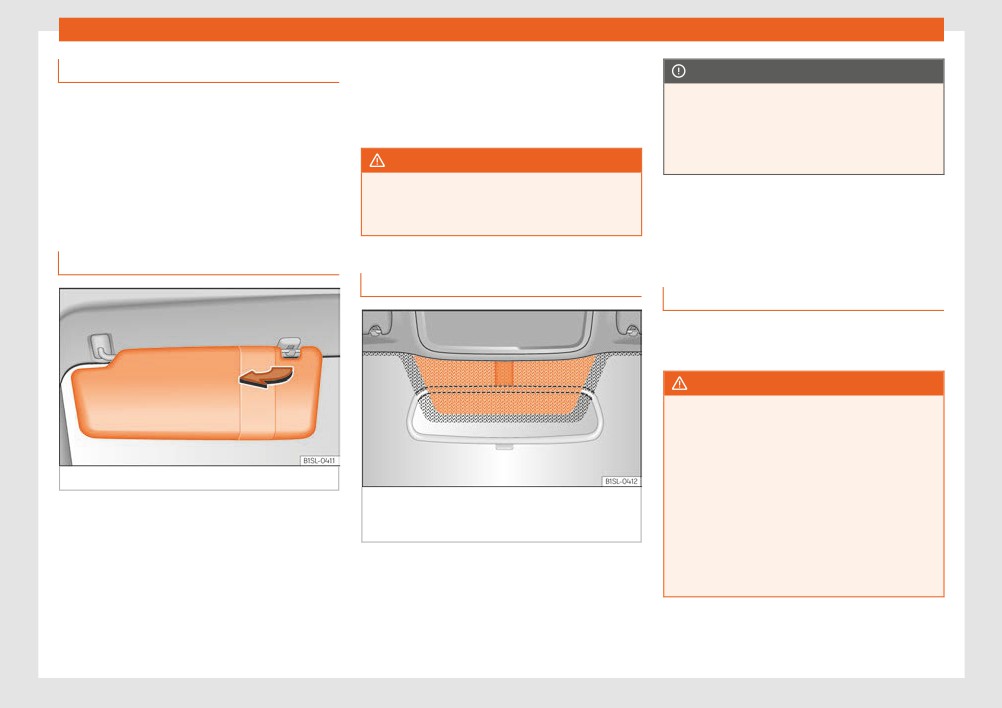
Vanity mirror*
CAUTION
There may be a vanity mirror in the folded sun
When the uncoated surface is covered or
The light is activated when the rear lid is
visor on the passenger side and a cardholder
has a sticker on the interior or exterior, mal-
open, even when the ignition and lights are
in the driver sun visor.
functions in the electronic components
turned off. For this reason, ensure that the
may occur. Never cover the uncoated sur-
rear lid is always closed.
WARNING
face on the interior or exterior.
Folded sun blinds can reduce visibility.
● Always roll or fold sun blinds and visors
Visibility
away when not in use.
Windscreen wiper and win-
Sun visors
dow wiper systems
Heat-insulating glass windscreen
Window wiper lever
Read the additional information carefully
››› page 24
WARNING
Water from the windscreen washer water
bottle may freeze on the windscreen if it
does not contain enough anti-freeze, re-
ducing forward visibility.
Fig. 113 Sun visor
● In winter, ensure the windscreen washer
Fig. 114 Windscreen with reflective infrared
contains enough anti-freeze.
Options for adjusting driver and front pas-
and metal coating and small window (red sur-
● In cold conditions, you should not use the
senger sun visors:
face)
wash/wipe system unless you have
● Lower the sun visor towards the wind-
warmed the windscreen with the ventila-
screen.
The heat-insulating windscreens include a re-
tion system. The antifreeze could freeze on
flective infrared coating. The section above
the windscreen and reduce visibility.
● The sun visor can be pulled out of its
the rear vision mirror has been left uncoated
mounting and turned towards the door.
(communication window) to allow electric
● Swing the sun visor towards the door, longi-
components from the accessories shop to
tudinally backwards.
operate correctly ››› Fig. 114.
108
Lights and visibility
WARNING
Note
Rain and light sensor
Worn or dirty wiper blades reduce visibility
● The windscreen wipers will only work
and increase the risk of accident and seri-
when the ignition is switched on.
ous injury.
● The interval wipe speed varies according
● Always replace damaged or worn blades
to the vehicle speed. The faster the vehicle
or blades which do not clean the wind-
is moving, the more often the windscreen is
screen correctly.
cleaned.
● The rear wiper is automatically switched
CAUTION
on when the windscreen wiper is on and the
car is in reverse gear.
In icy conditions, always check that the
wiper blades are not frozen to the glass be-
fore using the wipers for the first time. In
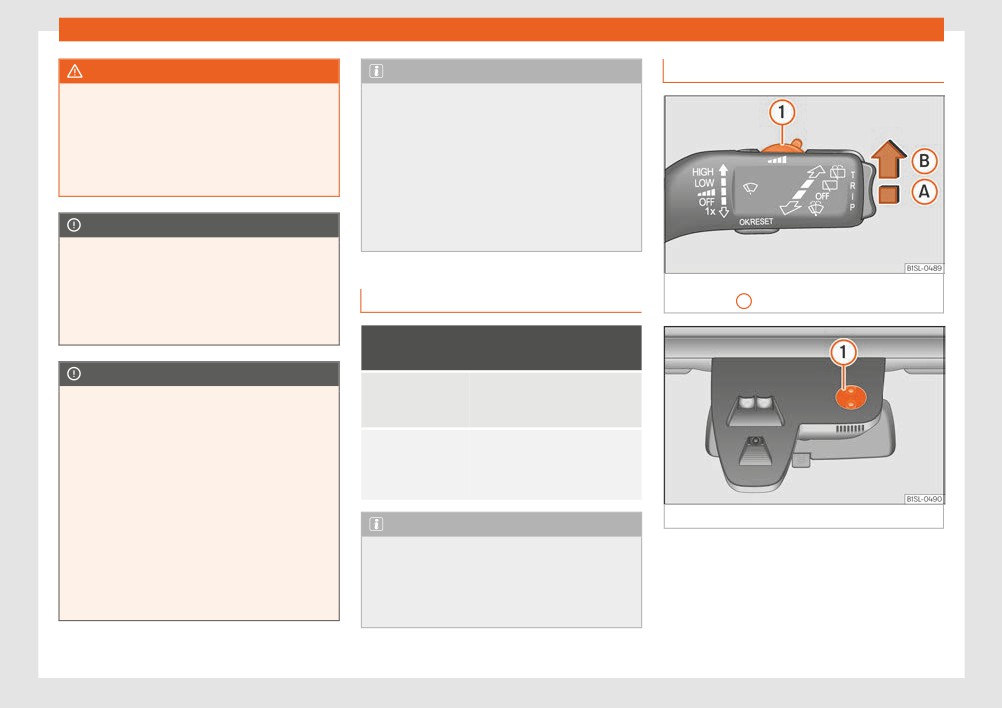
Fig. 115 Windscreen wipers lever: adjust the
cold weather, it may help to leave the vehi-
Windscreen wiper functions
rain sensor
1 .
cle parked with the wipers in service posi-
tion ››› page 46.
Windscreen wipers performance in differ-
ent situations
CAUTION
The activated position provi-
If the vehicle is at a
If the ignition is switched off while the wind-
sionally changes to the previ-
standstill
screen wipers are on, the windscreen wip-
ous position.
ers carry on wiping at the same level when
Intervals between wipes de-
the ignition is switched back on. Ice, snow
For intermittent
pend on the vehicle's speed.
and other obstacles may damage the
wipers
The higher the vehicle speed
windscreen wiper and the respective mo-
the shorter the intervals.
tor.
● If necessary, remove snow and ice from
Fig. 116 Rain sensor reference surface.
Note
the windscreen wipers before starting your
journey.
The wiper will try to wipe away any obsta-
When activated, the rain and light sensor au-
cles that are on the windscreen. The wiper
tomatically controls the windscreen washer
● Carefully lift the frozen windscreen wip-
will stop moving if the obstacle blocks its
intervals depending on the intensity of the
ers from the glass. SEAT recommends a de-
path. Remove the obstacle and switch the
rainfall.
»
icer spray for this operation.
wiper back on again.
109
Operation
When the rain and light sensor is deactivated,
face ››› Fig. 116
1 of the rain and light sen-
CAUTION
the duration of the intervals is adjusted to set
sor:
The rain and light sensor does not always
levels.
● Wiper blades in poor condition: the pres-
detect rainfall with sufficient accuracy so
ence of a film or strips of water caused by
does not always switch on the windscreen
Activating and deactivating the rain and
damaged blades may cause the windscreen
wiper at the right moment.
light sensor
wipers to be slower taking effect, shorten
● If necessary, switch on the windscreen
Move the lever to the required position
wiping intervals or cause wiping to be fast
wipers manually when water on the wind-
››› Fig. 115:
and continuous.
screen obstructs visibility.
● Position A - The rain and light sensor is de-
● Insects: mosquitoes impacting the wind-
activated.
screen can activate the windscreen wiper.
Note
● Position B - The rain and light sensor is ac-
● Traces of salt: in winter, the windscreen
We recommend the use of a glass cleaning
tivated will wipe automatically as needed.
wiper may work for longer than usual due to
product containing alcohol to remove
the presence of traces of salt on the almost
traces of wax or polish.
When the ignition is switched off and then
dry windscreen.
back on again, the rain sensor stays on and
starts operating again when the windscreen
● Dirt: the presence of dry dust, wax, coating
wipers are in position B and the vehicle is
films (Lotus effect) or traces of detergent (car
Mirror
travelling at more than 4 km/h (2 mph).
wash) etc., on the windscreen may cause the
rain and light sensor to be less sensitive, react
more slowly, later or not at all.
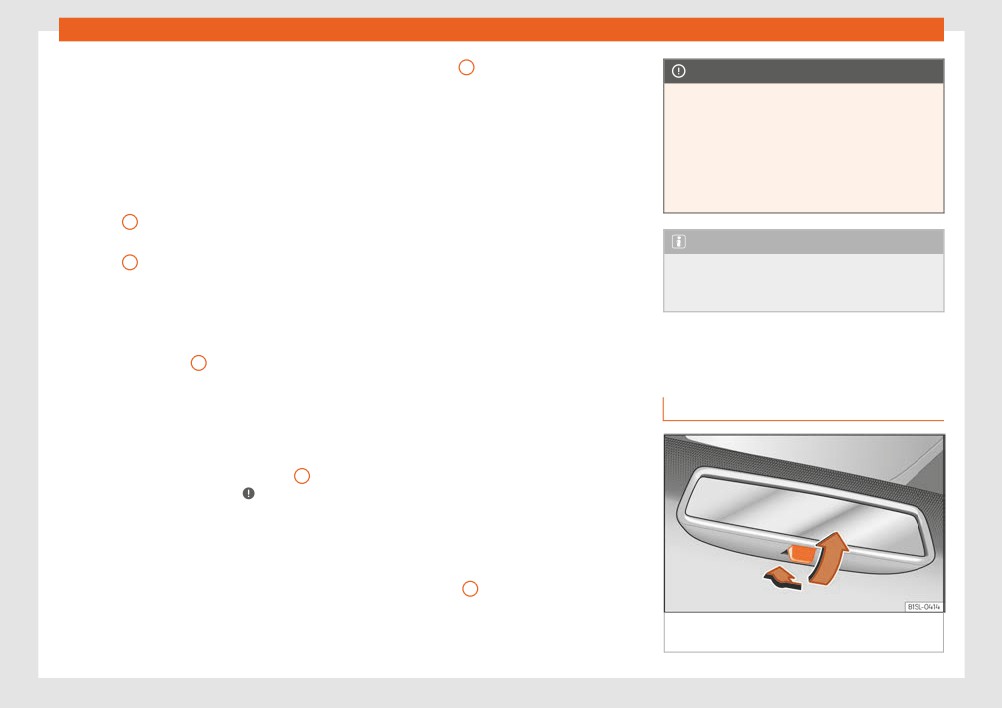
Interior rear vision mirror
Setting the sensitivity level of the rain and
light sensor
● Crack on the windscreen: the impact of a
The sensitivity of the rain and light sensor can
stone will trigger a single wipe cycle if the
rain and light sensor is activated. Subse-
be adjusted manually with the control
1 on
quently, the sensor detects the reduction in
the windscreen wiper lever ›››
the reference surface area and adapts ac-
● Move the control to the right: high sensitivi-
cordingly. The behaviour of the sensor will
ty.
vary with the size of the damage.
● Move the control to the left: low sensitivity.
Clean the reference surface area of the rain
and light sensor
1 regularly and check that
Malfunction of the rain and light sensor
the windscreen wiper blades have not been
Some examples of possible causes of faults
damaged.
Fig. 117 Manual anti-dazzle function for rear
and mistaken readings on the reference sur-
vision mirror
110
Lights and visibility
The driver should always adjust the rear vi-
● When moving the mirror, take care not to
sion mirror to permit adequate visibility
trap fingers between the mirror and the
through the rear window.
mirror bracket.
Manual anti-dazzle function for interior
WARNING
rear vision mirror
Failure to correctly estimate the distance
● Basic position: point the lever at the bottom
of the vehicle behind could lead to serious
of the mirror forwards.
accident.
● Pull the lever to the back to select the anti-
● Rear-view convex or aspheric mirrors in-
dazzle function ››› Fig. 117.
crease the field of vision, however objects
Fig. 119 On the driver door: rotating control for
appear smaller and further away in the mir-
electric windows.
rors.
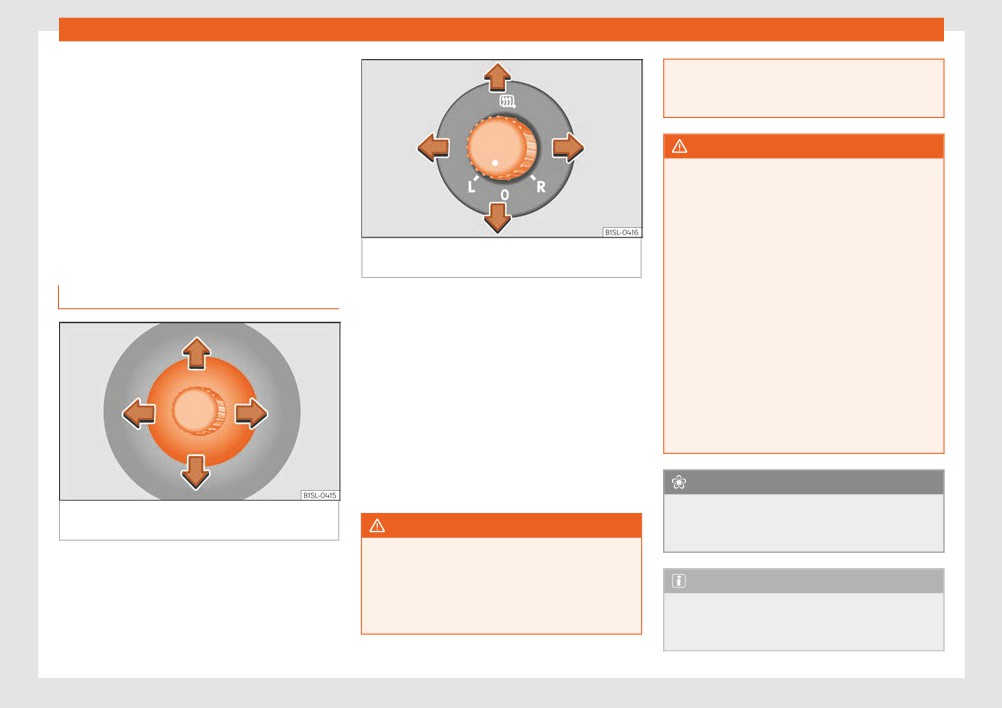
Exterior mirrors
Read the additional information carefully
● The use of these mirrors to estimate the
››› page 15
distance to the next vehicle when changing
lane is imprecise and could result in serious
Adjust the exterior mirrors by pressing the ad-
accident.
just button ››› Fig. 118 or the rotary control*
● If possible, use the rear vision mirror to
››› Fig. 119.
estimate distances to vehicles behind you
Folding in the exterior mirrors and returning
or in other circumstances.
them to their original position is possible
● Make sure that the rear visibility is ade-
through a mechanical system. Carefully fold
quate.
the exterior rear vision mirror casing towards
the side window or pull it away from the win-
For the sake of the environment
dow until it clicks into place.
The exterior mirror heating should be
Fig. 118 On the front doors: button to adjust
the mechanical exterior rear vision mirror
WARNING
switched off when it is no longer needed.
Otherwise, it is an unnecessary fuel waste.
Fold and unfold the exterior mirror, taking
care to avoid injuries.
Note
● Only fold or unfold the exterior mirror
when there is no-one in the way of the mir-
In the event of a fault, the electric exterior
ror.
mirrors can be adjusted manually by press-
ing the edge of the mirror surface.
111
Operation
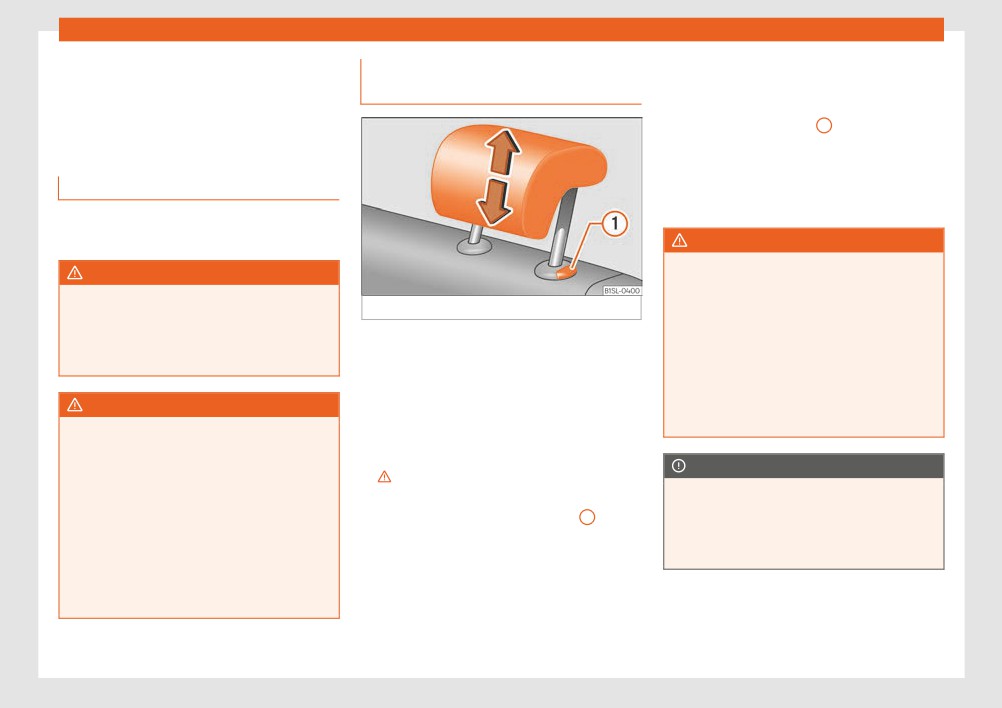
Removing and fitting the rear head
● Insert the head restraint into the guides on
Seats and head restraints
the seat backrest.
restraints
● Push the head restraint down as far as it will
Adjusting the seat and head
go while pressing button
1 .
restraints
● Fold the backrest of the rear seat backward
again until it is engaged.
Manual front seat adjustment
● Adjust the head restraint to the correct po-
sition ››› page 52.
Read the additional information carefully
››› page 14
WARNING
Travelling with the head restraints removed
WARNING
or improperly adjusted increases the risk of
The safe driving chapter contains impor-
severe or fatal injuries in the event of acci-
Fig. 120 Removing the rear head restraint
tant information, tips, suggestions and
dents and sudden braking or manoeuvres.
warnings that you should read and observe
The rear seats are equipped with a head re-
● Always fit and adjust the head restraint
for your own safety and the safety of your
properly whenever a person is occupying a
straint.
passengers ››› page 49.
seat.
Removing the rear head restraint.
● Refit any removed head restraints imme-
WARNING
diately so that passengers are properly
● Unlock the seat backrest and fold it forward
● Adjust the front seats only when the vehi-
protected.
››› page 122.
cle is stationary. Failure to follow this in-
struction could result in an accident.
● Push the head restraint up as far as it will go
CAUTION
›››
● Be careful when adjusting the seat
When removing and fitting the head re-
height. Careless or uncontrolled adjust-
● Pull the head restraint out of the fitting with-
straint, make sure it does not hit the head-
ment can cause injuries.
out releasing the button ››› Fig. 120
1 .
liner of the vehicle or the front seat back-
● The front seat backrests must not be re-
● Fold the backrest of the rear seat backward
rest. Otherwise, the interior roof and other
clined for driving. Otherwise, seat belts and
again until it is engaged.
parts of the vehicle could be damaged.
the airbag system might not protect as
● Safely store the removed head restraints.
they should in case of an accident, increas-
ing risk of injury.
Fitting the rear head restraint
● Unlock the seat backrest and fold it forward
››› page 122.
112
Seats and head restraints
Seat functions
Cases in which the heat seating should
● Do not sit on the seat if your clothes are
not be switched on
damp or wet.
Seat heating*
Do not switch the seat heating on if any of the
● Do not leave wet or damp objects or
following conditions are met:
clothing on the seat.
● Do not spill liquid on the seat.
● The seat is not occupied.
● The seat has a cover.
CAUTION
● A child seat has been installed on the seat.
● To avoid damaging the heating elements,
● The seat cushion is wet or damp.
refrain from kneeling on the seat or apply-
● The outdoor or indoor temperature is great-
ing sharp pressure at a single point to the
er than +25°C (77°F).
seat cushion or backrest.
● If liquids are spilled on the seats, sharp
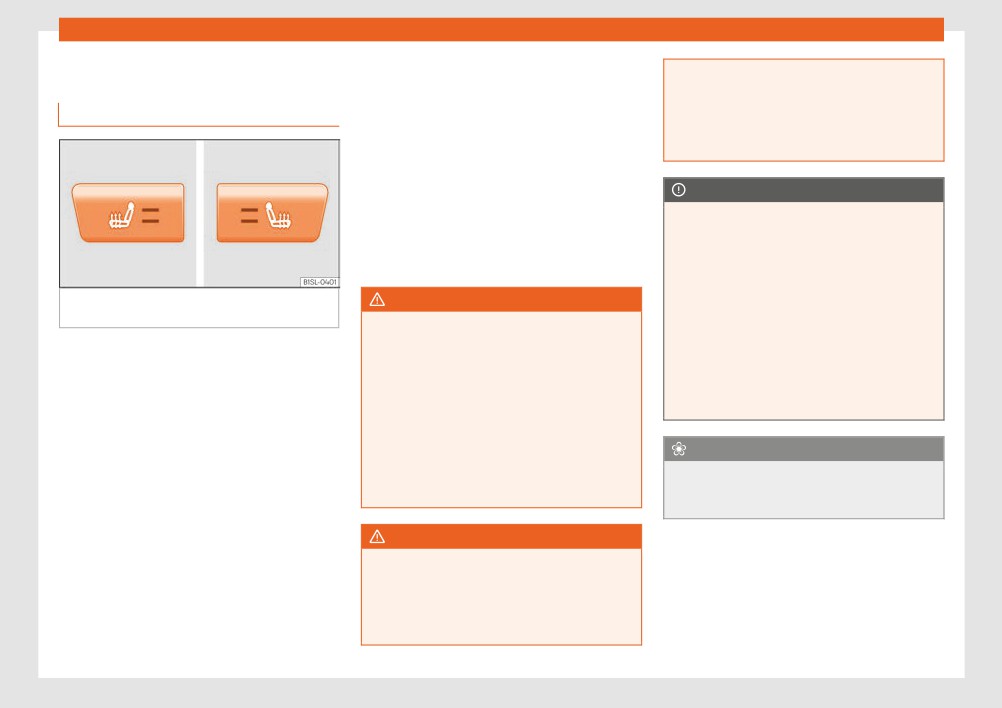
Fig. 121 In the centre console: Front seats
WARNING
objects are left on them or insulating mate-
heating switch
rials are fitted (such as a cover or a child
People whose pain or temperature thresh-
old has been affected by some kind of
seat) on them, the heating could get dam-
With the engine on, the seat cushion and the
aged.
medicine, paralysis or chronic illness (e.g.
seat backrest can be heated electrically.
diabetes) could sustain burns to the back,
● If you notice any odour, switch off the
buttocks or legs. These burns could take a
seat heating immediately and have the unit
● Enable: Press the or button at the top of
long time to heal or never fully heal. Seek
inspected by a specialised workshop.
the centre console. Seat heating operates at
medical advice if you have any doubts re-
full power. All the control lamps light up.
garding your health.
For the sake of the environment
● Adjust: press the or button repeatedly
● People with a limited pain or temperature
to adjust it to the required level.
The seat heating should be switched off
threshold should never use the seat heat-
● Disable: press the or button as many
ing.
when it is no longer needed. Otherwise, it is
an unnecessary fuel waste.
times as necessary until no control lamp re-
mains on.
WARNING
When heat seating is at maximum level, after
If the upholstery gets soaked, the heat
approximately 15 minutes it goes back to the
seating could stop working properly and
first level automatically.
the risk of burns could increase.
● Before using the seat heater, make sure
that the seat cushion is dry.
113
Большое спасибо!
Ваше мнение очень важно для нас.
Нет комментариевНе стесняйтесь поделиться с нами вашим ценным мнением.
Текст