Seat Mii (2019 year). Manual in english — page 6

Operation
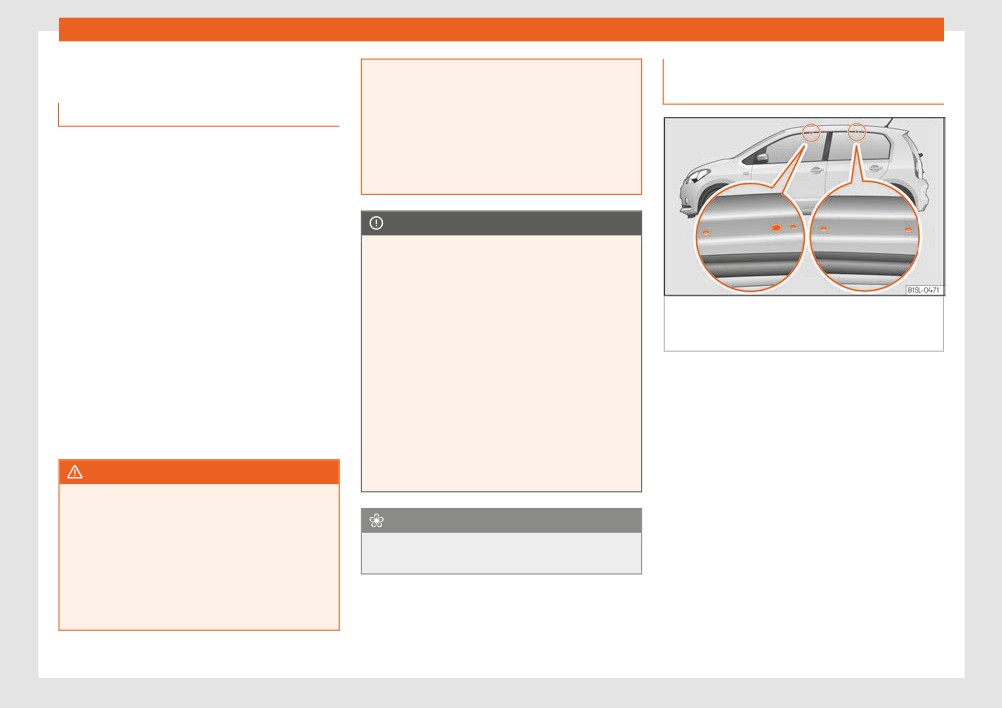
● Always ensure that objects inside the ve-
Transporting the load
Transport and practical
hicle cannot move into the deployment
equipment
area of the bags while driving.
Secure all objects in the vehicle
● While driving, always keep object com-
● Distribute the load throughout the vehicle
partments closed.
and on the roof as uniformly as possible.
Transporting objects
● Remove all objects from the front pas-
● Transport heavy objects as far forward as
senger seat when it is folded down. When
possible in the luggage compartment and
Introduction
the seat backrest is folded down, it presses
lock the seat backs in the vertical position.
on small and light objects and these are
Always transport heavy loads in the luggage
● Check the headlight adjustment
detected by the weight sensor on the seat;
compartment and place the seat backs in a
››› page 103.
this sends false information to the airbag
vertical position. Never overload the vehicle.
control unit.
● Use the suitable tyre pressure according to
Both the carrying capacity as well as the dis-
● While the backrest of the front passenger
the load being transported. Read the tyre in-
tribution of the load in the vehicle affect driv-
seat is folded, the frontal airbag must re-
flation information label ››› page 206.
ing behaviour and braking ability ›››
main disconnected and the PASSENGER
AIRBAG OFF light on.
CAUTION
WARNING
● Objects secured in the vehicle should
Objects on the shelf could chafe against
Unsecured or incorrectly secured objects
never be placed in such a way as to make
the wires of the heating element in the
can cause serious injury in case of a sud-
passengers sit in an incorrect position.
heated rear window and cause damage.
den manoeuvring or breaking or in case of
● If secured objects occupy a seat, this
an accident. This is especially true when
objects are struck by a detonating airbag
seat should not be occupied or used by
Note
anyone.
and fired through the vehicle interior. To re-
Please refer to the notes on loading the
duce the risks, please note the following:
roof carrier ››› page 127.
● Secure all objects in the vehicle. Always
WARNING
keep equipment and heavy objects in the
The driving behaviour and braking ability
luggage compartment.
change when transporting heavy and large
Driving with the rear lid open
● Always secure objects with suitable rope
objects.
or slings so that they cannot enter the de-
● Adjust your speed and driving style to vis-
Driving with the rear lid open creates an addi-
ployment areas around the frontal or side
ibility, road, traffic and weather conditions.
tional risk. Secure all objects and secure the
airbags in case of sudden braking or an ac-
● Accelerate gently and carefully.
rear lid correctly and take all measures pos-
cident.
sible to reduce toxic gases from entering the
● Avoid sudden braking and manoeuvres.
vehicle.
● Brake early.
114

Transport and practical equipment
WARNING
lowing to reduce the entry of toxic gases in-
● Secure loads correctly so they do not
side the vehicle:
move.
Driving with the rear lid unlocked or open
could cause serious injuries.
- Close all windows.
● When transporting heavy objects, use
● Always drive with the rear lid closed.
- Disable air recirculation mode.
suitable ropes or straps.
● Lock the seat backs in vertical position.
● Secure all objects in the vehicle. Loose
- Open all of the air outlets on the instru-
items could fall out of the vehicle and injure
ment panel.
other road users or damage other vehicles.
- Switch on the blower to maximum.
● Drive particularly carefully and think
Practical equipment
ahead.
CAUTION
● Avoid sudden manoeuvres and braking
An open boot hatch changes the length
Introduction
given that this could cause an uncontrolled
and height of the vehicle.
movement of the open rear lid.
Storage compartments must only be used to
● When transporting objects that protrude
store light or small objects.
out of the luggage compartment, indicate
them suitably. Observe legal requirements.
Driving a loaded vehicle
WARNING
● If objects must project out of the luggage
For the best handling when driving a loaded
In the event of sudden braking movements
compartment, the rear lid must never be
vehicle, note the following:
or turns, loose objects may be thrown
used to “secure” or “attach” objects.
around the vehicle interior. This could
● If a baggage rack is fitted on the rear lid,
● Secure all objects ››› page 114.
cause serious injuries to passengers and
it should be removed before travelling with
cause the driver to lose control of the vehi-
● Accelerate gently and carefully.
the rear lid open.
cle.
● Avoid sudden braking and manoeuvres.
● Do not carry animals or store hard, heavy
WARNING
● Brake early.
or sharp objects in the vehicle in: open stor-
● If necessary, read the instructions for driv-
age compartments, instrument panel,
Toxic gases may enter the vehicle interior
ing with a roof carrier system ››› page 127.
items of clothing or bags.
when the rear lid is open. This could cause
loss of consciousness, carbon monoxide
● While driving, always keep object com-
poisoning, serious injury and accidents.
WARNING
partments closed.
● To avoid toxic gases entering the vehicle
A sliding load could considerably affect the
always drive with the rear lid closed.
stability and safety of the vehicle resulting
WARNING
in an accident with serious consequences.
● In exceptional circumstances, if you must
Objects falling into the driver's footwell
drive with the rear lid open, observe the fol-
could prevent use of the pedals. This could
»
115

Operation
lead the driver to lose control of the vehi-
covered so that used air can escape from
Compartment on the centre con-
cle, increasing the risk of a serious acci-
the vehicle.
sole
dent.
● Make sure the pedals can be used at all
times, with no objects rolling underneath
Storage compartment on the driver
them.
side
● The floor mat should always be secured
to the floor.
● Never place other mats or rugs on top of
the original mat supplied by the factory.
● Make sure that no objects can fall into
the driver's footwell while the vehicle is in
motion.
CAUTION
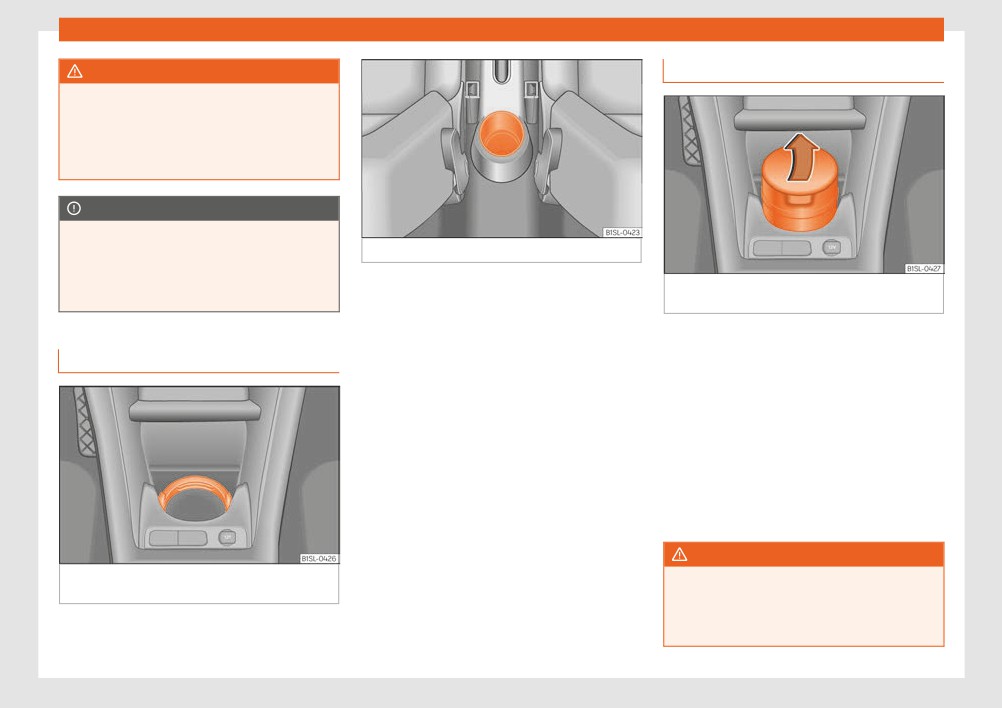
Fig. 123 In the front part of the centre console:
● Objects on the shelf could chafe against
storage compartment.
the wires of the heating element in the
heated rear window and cause damage.
Fig. 122 On the driver side: storage compart-
ment.
The storage compartment ››› Fig. 123 may be
● Do not keep temperature-sensitive ob-
used as a drink holder ››› page 119 or as an
jects, food or medicines inside the vehicle.
There may be a storage compartment on the
ashtray* ››› page 119 or to store small ob-
Heat and cold could damage them or ren-
driver side.
jects.
der them useless.
● Light-transparent objects placed inside
Note
the vehicle, such as lenses, magnifying
A 12 volt electrical socket ››› page 120 can
glasses or transparent suction caps on the
be found in the storage compartment.
windows, may concentrate the sun's rays
and cause damage to the vehicle.
Note
The ventilating slits between the heated
rear window and the rear shelf must not be
116

Transport and practical equipment
Storage compartment with cover
Opening and closing the storage com-
Bag support*
partment cover
on the passenger side*
Pull the lever to open ››› Fig. 124
1 .
To close, press the cover upwards until it
clicks into place.
Sunglasses storage compartment.
Sunglasses can be stored in the passenger
side storage compartment.
The sunglasses storage compartment is in
the upper area of the storage compartment
Fig. 125 Storage on front passenger side: fold-
2 .
ing hook.
Supports
On the opening lever of the glove compart-
ment on the passenger side there is a folding
Next to the eyeglass storage compartment is
hook ››› Fig. 125 for hanging small items of
a notebook holder 3 and in the interior of the
luggage, e.g. bags, etc.
storage compartment there is a pen holder
4 , a map storage area and a coin tray 5 .
CAUTION
● The maximum weight for the hook is 1.5
CAUTION
kg.
For structural reasons, some model ver-
● With the hook folded forward, it automat-
sions will have gaps behind the glove com-
ically draws up when the compartment is
partment into which small objects may fall.
opened.
This could lead to strange noises and dam-
Fig. 124
Storage compartment with cover on
age to the vehicle. Therefore, do not store
● We recommend removing hanging bags
the passenger side
small objects in the glove compartment,
from the hook before opening the glove
apart from those stored in the spaces pro-
compartment.
There may be a storage compartment with
vided.
cover on the passenger side.
117

Operation
Storage compartment in the back
Other storage compartments
● Hang the clothes from the hooks so that
of the centre console
driver's view is not restricted.
● The coat hook is suitable for light items of
clothing. Never place heavy, hard or sharp
objects in the bags.
Drink holders
The drink holders are in the open storage
compartments in the driver and passenger
doors.
Fig. 127 The centre pillars contain garment
Fig. 126 In the rear part of the centre console:
hooks.
WARNING
storage compartment.
Coat hooks
Improper use of the drink holders can
cause injury.
The drink holder at the back of the centre
The centre pillars contain garment hooks
console can be used as a storage compart-
● Do not place containers with hot drinks in
››› Fig. 127 (arrow).
a drink holder. During sudden braking or
ment.
driving manoeuvres, the hot drink could be
Other storage compartments:
spilled and lead to scalding.
● In the front door trims ››› page 86.
● Ensure that no bottles or other object are
● Rear shelf for light items of clothing*.
dropped in the driver footwell, as they
could get under the pedals and obstruct
● Bag hook in the luggage compartment
their working.
››› page 122.
● Never place heavy containers, food or
● In the upper part of the centre console, in-
other heavy objects in the drink holder. In
stead of the radio ››› Fig. 95 10 .
the event of an accident, these heavy ob-
jects could be “thrown around” the vehicle
WARNING
interior and cause serious injuries.
Clothing hung on the coat hooks could re-
strict the driver's view and lead to serious
accidents.
118
Transport and practical equipment
WARNING
Ashtray*
Closed bottles inside the vehicle could ex-
plode or crack due to the heat or the cold.
● Never leave a closed bottle in the vehicle
if the inside temperature is too high or too
low.
CAUTION
Do not leave open drinks containers in the
drink holders when the vehicle is in motion.
Fig. 129 In the rear part of the centre console:
They could spill during braking, for exam-
ple, and cause damage to the vehicle and
There are drink holders in the front and rear
Fig. 130 In the front part of the centre console:
the electrical system.
parts of the centre console.
open the ashtray.
Securing the drink container in the front
Opening and closing the ashtray
Centre console drink holders
drink holder
To open, lift the lid of the ashtray in the direc-
Fold the drink holder ››› Fig. 128 forward.
tion of the arrow ››› Fig. 130.
Place the drink container in the drink holder
To close, push the ashtray lid down.
so that it is securely surrounded.
Emptying the ashtray
● Remove the ashtray from the storage com-
partment lifting it up.
● After emptying the ashtray, insert it into the
drink holder from above.
WARNING
Fig. 128 In the front part of the centre console:
Incorrect use of the ashtray may cause a
drink holder.
fire or burns and other serious injuries.
● Never put paper or other flammable ob-
jects in the ashtray.
119

Operation
Cigarette lighter*
Note
The maximum capacity of the socket must
not be exceeded. The power consumption is
The cigarette lighter can also be used with
indicated on the rating plate of each appli-
the 12 Volt socket.
ance.
Where 2 or more appliances are connected
at the same time, the total rating of all the
Power outlet and USB socket*
connected devices must never exceed 190
Watts ›››
12 volt power socket
The 12 volt socket is found in the storage
compartment at the front of the centre con-
Fig. 131 In the front part of the centre console:
sole ››› Fig. 132 2 and only functions when
lighter.
the ignition is switched on.
● Push the button on the cigarette lighter in-
Using electrical appliances with the engine
ward with the ignition on ››› Fig. 131.
stopped and the ignition switched on will
● Wait for the lighter to pop out slightly.
drain the battery. Therefore, electrical devi-
Fig. 132 Front centre console: 12-volt power
ces connected to the power socket can only
● Pull out the cigarette lighter and light the
outlet on the storage compartment and USB in-
be used when the engine is running.
cigarette on the glowing coil ›››
terface.
● Replace the cigarette lighter in its insert.
To prevent voltage variations from causing
Electrical equipment can be connected to
damage, switch off the electrical device con-
WARNING
the socket in the vehicle.
nected to the 12 Volt power socket before
switching the ignition on or off and before
Undue use of the cigarette lighter may
All connected appliances should be in per-
starting the engine.
cause a fire or burns and other serious inju-
fect working order without any faults.
ries.
USB Interface
● The cigarette lighter must only be used to
Maximum power consumption
light cigarettes or similar.
The factory-fitted USB interface is in the stor-
Power
Maximum power consump-
age compartment of the front part of the
● Never leave children unsupervised in the
socket
tion
centre console
1 .
vehicle. The cigarette lighter can be used
when the ignition is switched on.
12 Volts
120 Watts
120

Transport and practical equipment
WARNING
● Only use accessories with approved
Portable smartphone holder
electromagnetic compatibility according
Improper use of the socket or electrical de-
to current regulations.
vices could lead to a fire and cause serious
injuries.
● To avoid damage due to voltage varia-
tions, switch off all devices connected to
● Never leave children unsupervised in the
the 12 V socket before switching the ignition
vehicle. The socket and equipment con-
on or off and before starting the engine.
nected to it can be used when the ignition is
switched on.
● Never connect an appliance to the 12 volt
power socket that consumes more than the
● Should a connected electrical device
power indicated in watts. Exceeding the
overheat, switch it off and unplug it imme-
maximum power absorption could damage
diately.
the vehicle's electrical system.
Fig. 133 Assembling the universal support and
CAUTION
the holding arm.
For the sake of the environment
● Always follow the operating instructions
Do not leave the engine running when the
for the appliances to be connected!
vehicle is at a standstill.
● Never exceed the maximum power rating
as this could damage the vehicle's general
electrical system.
Note
● 12 volt power socket:
● Using devices with the engine stopped
and the ignition switched on will drain the
- Only use accessories with approved
battery.
electromagnetic compatibility accord-
ing to current regulations.
● Unshielded equipment can cause inter-
ference on the radio equipment and the ve-
- Never power the socket.
hicle's electrical system.
● Interference can occur on the radio's AM
CAUTION
waveband if electrical appliances are used
Fig. 134 On the centre console: close the
● To avoid damage to the vehicle's electri-
near the aerial.
compartment where the infotainment system is
cal system, never connect equipment that
housed.
generates electrical current, such as solar
panels or battery chargers, to the 12 volt
Removing the smartphone
power sockets in order to charge the vehi-
● Grip the smartphone firmly with one hand.
»
cle's battery.
121
Operation
● Press the release button ››› Fig. 134 5 until
Install the housing
CAUTION
the top arm of the universal holder disengag-
● Insert the universal holder ››› Fig. 133 3 in-
At very high or very low temperatures the
es.
to the slots
2 on the holder
1 .
smartphone might not operate properly, or
● Remove the smart phone and, as the case
● Move the universal holder to the side in the
the actual device could get damaged.
may be, unplug any cables.
locking direction 4 until it engages audi-
● Take your smart phone with you when
bly ›››
you get out of the vehicle to protect it from
Inserting a smart phone
very high or very low temperatures, and
● Place the holder arm ›››
Fig. 134
1 in the
● If necessary, install the smartphone hous-
from intense solar radiation.
anchoring plate ››› Fig. 134 3 from above
ing ›››
and press down on it until you hear it en-
● Connect the smartphone.
gage ›››
CAUTION
● Place the smartphone on the bottom
Humidity can damage the electrical con-
WARNING
mountings. To adjust the bottom mountings,
tacts for the smartphone on the instrument
press button ››› Fig. 134 4 .
If a smartphone is not secured or is incor-
panel.
● Press the top arm of the universal holder
rectly secured in the vehicle, it could be
● Do not wet the smartphone’s housing
flung though the interior during a sudden
when cleaning it. Use only a dry cloth.
until the smartphone is securely held in place.
driving or braking manoeuvre or in the
event of an accident, and could cause inju-
Disassembling the housing
Note
ries.
● If necessary, remove the smartphone.
● The infotainment system holder must be
SEAT recommends that you always take
● Grip the universal holder ››› Fig. 133 3 and
properly secured in the corresponding gap
your smart phone with you when you get
press the release button ››› Fig. 133 4 .
in the dash panel.
out of the vehicle to avoid possible thefts.
● Push the universal holder to the right (anti-
● The infotainment system must always be
clockwise) and remove it.
properly secured in its holder or stored
safely in the vehicle.
● Grip the holder arm and ››› Fig. 134
1 and
Luggage compartment
press the release button ››› Fig. 134 4 in the
direction of the arrow.
CAUTION
Introduction
● Remove the holder from the dash panel up-
If tilt and angle of visibility are not properly
adjusted the smart phone could be dam-
Always transport heavy loads in the luggage
wards.
aged.
compartment and place the seat backs in a
● When adjusting the smartphone, move it
vertical position. Never overload the vehicle.
with care and never beyond its limits.
Both the carrying capacity as well as the dis-
tribution of the load in the vehicle have
122
Transport and practical equipment
effects on the driving behaviour and braking
and moving to the airbag deployment area
the heated rear window and cause dam-
ability ›››
in the event of sudden movements or acci-
age.
dents.
WARNING
● While driving, always keep object com-
Note
When the vehicle is not in use or being
partments closed.
The ventilating slits between the heated
watched, always lock the doors and the
● Do not place hard, heavy or sharp ob-
rear window and the rear shelf must not be
rear lid to reduce the risk of serious injury or
jects inside the vehicle interior, in open
covered so that used air can escape from
death.
storage compartments, the rear shelf of
the vehicle.
● Do not leave children unwatched, espe-
the boot or on the dash panel.
cially when the boot is open. Children
● Remove hard, heavy and sharp objects
could climb into the luggage compartment,
from clothes and pockets inside the vehicle
close the rear lid from inside and be unable
Folding and lifting up the rear seat
and store securely.
to escape themselves. This could lead to
bench backrest
serious injury or death.
WARNING
● Never allow children to play in or around
the vehicle.
The transport of heavy object changes ve-
hicle handling and increases braking dis-
● Never transport people in the luggage
tance. Heavy loads that have not been
compartment.
stored or secured correctly could cause
loss of control and result in serious injury.
WARNING
● Vehicle handling changes when trans-
Unsecured or incorrectly secured objects
porting heavy objects due to a change in
can cause serious injury in case of a sud-
the centre of gravity.
den manoeuvring or breaking or in case of
● Distribute the load as uniformly and as
an accident. This is especially true when
low down on the vehicle as possible.
objects are struck by a detonating airbag
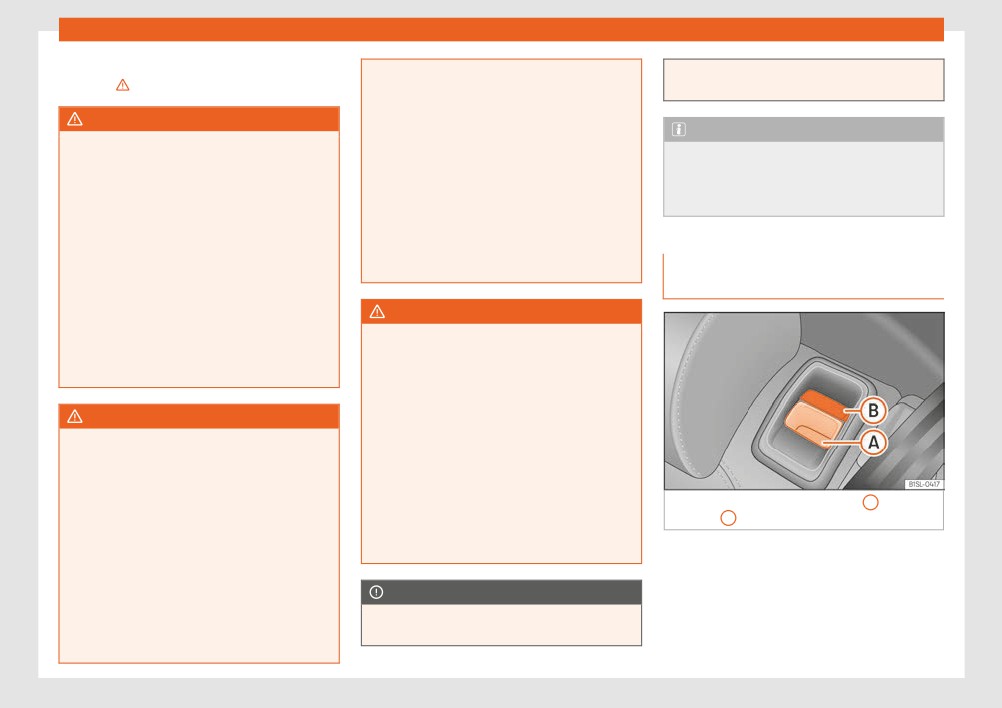
Fig. 135 Back seat: unlock button A ; red
● Store heavy objects in the luggage com-
marking B
and fired through the vehicle interior. To re-
partment as far from the rear axle as possi-
duce the risks, please note the following:
ble.
The rear seat backrest can be folded forward
● Secure all objects in the vehicle. Always
to extend the luggage compartment.
»
place equipment and heavy objects in the
boot.
CAUTION
● Always secure objects to the fastening
Hard objects on the rear shelf could chafe
rings with suitable rope or straps to prevent
against the wires of the heating element in
them from being thrown around the interior
123
Operation
Folding the rear seat backrest forwards
● Never fold or lift the seats while driving.
Luggage compartment shelf*
● Push the head restraint down as far as it will
● Do no trap or damage seat belts when
go or remove it if necessary ››› page 49 and
raising the seat backrest.
store it in a safe place.
● Keep hands, fingers, feet and other limbs
● Pull the unlock switch ››› Fig. 135 A for-
away from the range of the rear seat
wards whilst simultaneously lifting the rear
backrests when folding and lifting them.
seat backrest.
● All seat backrests must engage correctly
● The rear seat backrest is not engaged
for the seat belts on the rear seats to work
when the red marking of the button B is visi-
properly. When the backrest of an occu-
ble.
pied seat is not correctly locked in place,
the passenger can be thrust forward with
● If the rear seat backrest is folded, people
the rear seat backrest in case of sudden
(including children) are not permitted to trav-
braking, sudden manoeuvres or an acci-
Fig. 136 In the boot: removing and installing
el in the rear folded seats.
dent.
the rear shelf.
● A red signal on the button B warns that
Folding up the rear seat backrest
You may put light items of clothing on the rear
the backrest is not engaged. Always check
shelf. Check that the rear view is not limited.
● Lift back the backrest of the rear seat and
to make sure that the red mark is not visible
push it firmly into the lock until it clicks se-
when the backrest of the rear seat is in the
upright position.
Removing the shelf
curely into place ›››
● No seat must be occupied if the backrest
● Unhook the loops ››› Fig. 136 B from hous-
● The red marking on the unlock button B
of the rear seat is folded or not correctly
ings A .
must not be seen.
engaged.
● Extract the shelf from its housing C up-
● Make sure that the backrest of the rear seat
wards and then pull it out.
is securely locked in position so that the seat
CAUTION
belts can provide proper protection in the
WARNING
rear seats.
Before folding the rear seat backrest, ad-
● If necessary, reinstall and readjust the head
just the front seats so that neither the head
Unsecured or incorrectly secured objects
restraint or backrest hit them when folded.
or animals on the rear shelf could cause
restraints ››› page 112.
If necessary, remove the head restraints
serious injuries in case of a sudden ma-
››› page 112 and store them safely.
noeuvre, sudden braking or an accident.
WARNING
● Do not leave hard, heavy or sharp ob-
Folding and lifting the backrests of the rear
jects (loose or in bags) on the rear shelf.
seats carelessly without paying attention
● Never transport animals on the rear shelf.
could cause serious injury.
124

Transport and practical equipment
● Never drive with the rear shelf raised. Al-
Luggage compartment variable
ways lower it or remove it before the jour-
floor
ney.
CAUTION
To prevent the rear shelf from being dam-
aged:
● Always check that the side supports are
firmly engaged.
● Regulate the height of the load in the lug-
gage compartment to ensure the rear shelf
does not press down on the load with the
rear lid closed.
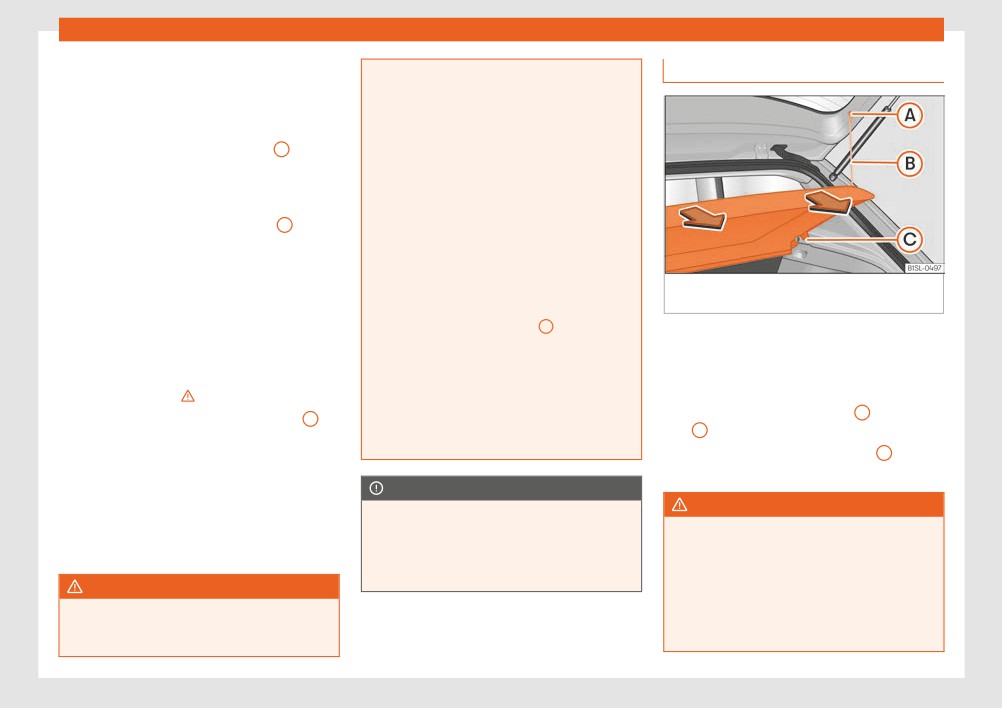
Fig. 138 C: extend the boot downward. D: ex-
tend the boot forward.
Raise and lower the boot floor
Fig. 137 A: open the boot variable floor. B:
raised boot variable floor.
● To raise the floor, raise handle ››› Fig. 137
1
in the direction of the arrow and pull from the
floor all the way up ››› Fig. 137 B.
● To lower it, guide the floor downward.
Extend the boot downward
● Raise the boot floor and push it downward
in the rail ››› Fig. 138 C (arrows)
● Place the variable floor over the floor lining.
● If necessary, fold the backrest of the rear
seat forward ››› page 123.
»
125

Operation
Extending the luggage compartment for-
In order to use the fastening rings, they must
Retaining hooks
ward
be lifted beforehand.
● Disassemble the luggage compartment
WARNING
tray ››› page 124.
● Disassemble the rear headrests
If unsuitable or damaged belts or retaining
straps are used, they may break in the
››› page 49.
event of braking or an accident. Objects
● Fold the backrest of the rear seat forward
could then be launched across the passen-
››› page 123.
ger compartment and cause serious or fa-
● If necessary, expand the boot downward.
tal injuries.
● It is important to always use belts or re-
CAUTION
taining straps that are suitable and in a
Do not let the luggage compartment floor
good condition.
Fig. 139 In the boot: retaining hooks.
fall when closing it. Always carefully guide
● Belts and retaining straps should be se-
it downward in a controlled manner. Other-
curely fastened to the fastening rings.
There may be hooks in the upper left and
wise, the lining and the floor of the boot
right part of the luggage compartment.
● Objects in the luggage compartment
could be damaged.
that are unsecured could move suddenly
and modify the handling of the vehicle.
WARNING
● Small light objects should also be fixed in
Never use these hooks to secure objects. In
Class N1 (commercial) vehicles
place.
case of sudden braking or an accident,
they could rupture.
● A child seat should never be secured with
For safe vehicle operation, the electrical sys-
the fastening rings.
tem must work perfectly. Special attention
CAUTION
should be paid so it is not damaged during
Note
The hooks can support a maximum of 2.5 kg
adjustment, loading and unloading of trans-
each.
ported objects.
● The maximum tensile load that the fas-
tening rings can support is 3.5 kN.
● Belts and securing systems for the ap-
Fastening rings*
propriate load can be obtained from speci-
alised dealerships. SEAT recommends visit-
In the front part of the luggage compartment,
ing a SEAT dealership for this.
there may be fastening rings to secure the
luggage.
126
Transport and practical equipment
Roof carrier
● Large, heavy, wide and flat loads nega-
Fastening the base supports and
tively affect the vehicle aerodynamics,
the roof carrier system
centre of gravity and handling.
Introduction
● Avoid brusque manoeuvres and sudden
The vehicle roof has been designed to opti-
braking.
mise aerodynamics. For this reason, conven-
● Adjust your speed and driving style to vis-
tional roof carrier systems cannot be secured
ibility, road, traffic and weather conditions.
to the water drains.
Given that the water drains have been incor-
CAUTION
porated into the roof for aerodynamic rea-
● Always remove the roof carrier system
sons, only the SEAT approved basic supports
from the roof before entering a car wash.
and roof carrier systems can be used.
● The height of your vehicle is changed by
the installation of the roof carrier and the
Fig. 140 Attachment points for the basic sup-
When the roof carrier system should be re-
load secured on it. Compare the vehicle
ports and the roof carrier system in four-door
moved:
height with the passage height, for exam-
vehicles.
● When they are not used.
ple in underground car parks or for garage
doors.
The mounts are the basis of a complete roof
● When the vehicle is being washed in a car
● The roof antenna and the range of the
carrier system. Special fixtures must be add-
wash.
rear lid should not be affected by the roof
ed in order to safely transport luggage, bicy-
● When the vehicle height exceeds the maxi-
carrier system or the load being transpor-
cles, skis, surf boards or boats on the roof.
mum height, for example, in some garages.
ted.
The suitable accessories can be acquired at
● Take extra care not to let the hatch strike
SEAT dealerships.
WARNING
the roof load when opening.
The risk of an accident is increased by
Securing the base supports and roof carri-
transporting heavy or bulky loads on the
er system
For the sake of the environment
roof, which affects the car's handling by
The roof carrier system must always be in-
shifting the centre of gravity and increasing
The vehicle uses more fuel when the roof
stalled exactly according to the instructions
susceptibility to cross winds.
carrier system is fitted.
provided.
● Always secure loads correctly with suita-
ble and undamaged attachment rope or
The holes or marks indicating the fitting
straps.
points for base supports are in the lower half
of the roof struts and can only be seen with
the door open ››› Fig. 140.
»
127

Operation
The base support should only be fitted to the
Loading the roof carrier
WARNING
points indicated in the diagram.
Exceeding the maximum authorised roof
Loads can only be correctly secured when
load can result in accidents and/or vehicle
WARNING
the roof carrier system is correctly fitted
damage.
If the base supports and the roof carrier
›››
● Never surpass the maximum authorised
system are incorrectly fitted or used in an
weight for the roof, the maximum author-
unsuitable manner, the entire system could
Maximum authorised roof load
ised weight on the axles and the total maxi-
break free causing accident and injury.
The maximum authorised roof load is 50 kg.
mum authorised weight of the vehicle.
● Always take the manufacturer assembly
The roof load includes the weight of the base
● Never exceed the capacity of the roof
instructions into account.
support, the roof carrier system and the load
carrier system even if this is less than the
● Only use base supports and roof carrier
being transported ›››
maximum authorised roof load.
systems that are not damaged and are cor-
Always check the weight of the base support,
● Secure heavy items as far forward as
rectly fitted.
the roof carrier system and the weight of the
possible and distribute the vehicle load
● The base support should only be fitted to
load to be transported and, if necessary,
uniformly.
the points indicated in the diagram
weigh them. Never exceed the maximum au-
››› Fig. 140.
thorised roof load.
WARNING
● Secure the base supports and roof carri-
If you are using a roof carrier with a lower
Loose and incorrectly secured loads can
er system correctly.
weight rating, you cannot transport the maxi-
fall from the roof carrier system causing
● Check the screws and attachments be-
mum roof load. Do not exceed the maximum
accidents and injury.
fore driving and after a short distance. Dur-
weight limit for the roof carrier given in the fit-
● Always use suitable ropes and straps in
ing each long journey, check the attach-
ting instructions.
good condition.
ments during every break.
● Always fit the roof carrier system correct-
● Always secure loads correctly.
Distributing a load
ly for wheels, skis and surfboards, etc.
Uniformly distribute loads and secure them
● Never modify or repair the basic supports
correctly ›››
or roof carrier system.
Check attachments
Note
After fitting the base supports and the roof
Read and take into account the instructions
carrier system, always check the attach-
included with the roof carrier system fitted
ments after a short trip and at regular inter-
and keep them in the vehicle.
vals.
128

Air conditioning
In the case of the Climatronic, the control
since no exterior air enters the interior dur-
Air conditioning
panel screen shows the functions that are
ing that time.
currently activated.
Heating, ventilation and air
CAUTION
WARNING
conditioning
If the air conditioning is not working, switch
When visibility through the window display
it off immediately, together with the de-
is poor, the risk of collisions and accidents
Introduction
frost/demist function (in the case of man-
which may cause serious injury increases.
ual air conditioning) and have a special-
● To guarantee good visibility, keep all win-
Read the additional information carefully
ised workshop check it out. This may help
dows free of ice and snow and properly
››› page 29
to avoid other possible damage.
demisted.
One of the following systems can be installed
● Adjust the heating, air conditioning and
in the vehicle:
CAUTION
the heated rear window so that the win-
dows do not mist up.
To avoid damaging the heated rear win-
● Heating and fresh air system
dow, never affix adhesives to the electric
● Drive off only when you have good visibil-
● Manual air conditioning
filaments on the inside of it.
ity through the windows.
● Climatronic
● Do not use the air recirculation for long
periods of time. When the cooling is switch-
The heating and fresh air system heats and
ed off and the air recirculation is on, the
Air recirculation
ventilates the interior. The heating and fresh
windows can mist over very quickly and se-
air system cannot cool.
riously impair visibility.
In air recirculation mode, no fresh air enters
The manual air conditioning and the Cli-
● Switch the air recirculation off when you
the vehicle interior.
matronic cool and dehumidify the air. They
do not need it.
To switch on the air recirculation, turn the ad-
operate most effectively with the windows
juster to the right or press the button.
and the sunroof closed. If a great deal of heat
WARNING
accumulates in the interior, ventilating it can
To switch off the air recirculation, turn the ad-
accelerate the cooling process.
Used air can quickly cause driver tiredness
juster to the left or press the button
and reduce their attention span, which
again ›››
Display of active functions
could lead to collisions, accidents and seri-
ous injury.
WARNING
The LEDs that light up on the rotary controls
● Never switch off the fan for a long time or
Used air can quickly cause driver tiredness
on the buttons indicate that the function in
leave the air recirculation on for too long,
and reduce their attention span, which
»
question is activated.
129
Operation
could lead to collisions, accidents and seri-
CAUTION
recirculation on briefly to cool down the in-
ous injury.
terior faster.
In vehicles with an air conditioner, do not
● Never use the air recirculation for too
smoke when air recirculation is switched
long, since no exterior air enters the interior
on. The smoke taken in could impregnate
during that time.
the cooling vaporiser and the activated
● When the cooling is switched off and the
charcoal cartridge of the dust and pollen
air recirculation is on, the windows can mist
filter, leading to permanent unpleasant
over very quickly and seriously impair visi-
odours.
bility.
● Switch the air recirculation off when you
Note
do not need it.
● Climatronic: When reverse gear is en-
gaged, the air recirculation switches on
briefly to prevent exhaust gas from enter-
ing the interior.
● When the outside temperature is very
high, it is recommendable to switch the air
Air vents
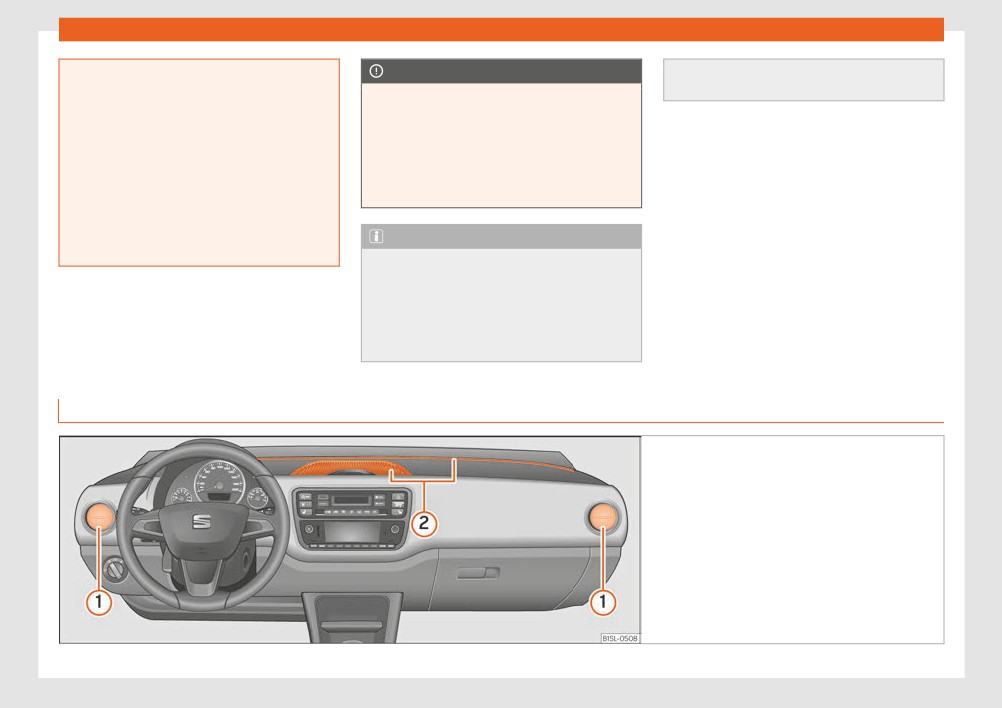
Fig. 141 On the dash panel air vents.
130

Air conditioning
To achieve sufficient heating power, cooling
the windows as best as possible, open the
CAUTION
and ventilation in the interior, the vents should
corresponding vent and turn it to the de-
Never place food, medicines or other tem-
be left open.
frost/demist position, where it will en-
perature-sensitive objects close to the air
gage.
Key to the Fig. 141:
vents. Food, medicines and other objects
2
Non-adjustable air vents
sensitive to heat or cold may be damaged
1
Adjustable air vents: the vent slats can be
or made unsuitable for use by the air com-
used to open and close the vents and to
There are more vents in the footwell areas
ing from the vents.
adjust air direction. For the air to reach
and at the back of the interior.
Tips and instructions for use
Fig. 142 In the centre console, top section: Clima-
tronic control panel.
The following tips and instructions for use will
● The outside temperature is lower than
How to optimise visibility
help you to use the systems properly.
around +3°C (+38°F).
● To improve heating or cooling performance
● The cooling system compressor has been
and to prevent the windows from misting over,
Reasons why the cooling switches off au-
temporarily switched off because the engine
keep the air intake slots in front of the wind-
tomatically or will not switch on
coolant temperature is too high.
screen free of snow, ice and leaves.
● The engine is not running.
● Another fault in the vehicle. Have the air
● To allow the air to move freely through the
● The fan is switched off.
conditioner checked by a specialised work-
interior from the front to the rear, keep the
shop.
ventilation slits located at the back of the lug-
● The air conditioner fuse has blown.
gage compartment free.
»
131
Operation
● The highest possible heating power will on-
the
1 or
2 ››› Fig. 142 button repeatedly.
ly be reached and ice removed from the win-
The temperature is not regulated.
dows as quickly as possible when the coolant
is at its operating temperature.
● Maximum cooling potency: set the temper-
ature below +16°C (+60°F). The display then
shows LO.
Recommended settings for the heating
and fresh air system and the manual air
● Maximum heating potency: set the temper-
conditioning
ature above +29°C (+84°F). The display then
shows HI.
● Switch off the air recirculation.
● Set fan speed or .
Dust and pollen filter
● Turn the temperature control to the inter-
The dust and pollen filter should be changed
mediate position.
regularly in order to maintain air conditioner
● Open and direct all the air outlets in the
performance.
dash panel.
If the vehicle is used frequently in areas
● Turn the air distribution control to the re-
where the outside air is highly polluted, it may
quired position.
be necessary to change the filter before the
● Manual air conditioning: press the but-
next scheduled service.
ton in the control panel to switch on the cool-
ing. The air is dehumidified in cooling mode.
Water under the vehicle
If the humidity and temperature outside the
Recommended Climatronic settings
vehicle are high, condensation can drip off
● Press the button in the control panel.
the evaporator in the cooling system and
form a small pool underneath the vehicle.
● Set the temperature to +22°C (+72°F).
This is normal and does not indicate a leak!
● Open and direct the air outlets in the dash
panel.
Maximum cooling power or heating power
in the case of Climatronic
When driving, the maximum cooling power or
heating power can be adjusted by pressing
132

Introduction
WARNING
● Have CD players repaired only by quali-
Infotainment System
fied workshops.
Connecting, inserting or removing a data
medium while driving can distract your at-
Introduction
tention from the traffic and cause an acci-
CAUTION
dent.
The system can be damaged by the incor-
Safety warnings
rect insertion of a data storage device or
WARNING
the insertion of an incompatible data stor-
age device.
Safety warnings regarding the Info-
Connecting leads for external devices may
obstruct the driver.
● When inserting and removing CDs, al-
tainment system
ways hold them at right angles to the front
● Arrange the connecting leads so that
of the CD drive without tilting so as not to
WARNING
they do not obstruct the driver.
scratch them.
Distracting the driver in any way can lead
● If a CD or DVD is inserted while another is
to an accident and cause injuries. Operat-
WARNING
already in the unit or being ejected, the
ing the radio system while driving can dis-
External devices that are loose or not prop-
DVD drive may be irreparably damaged.
tract your attention from the traffic.
erly secured could move around the pas-
Always wait until the data medium is com-
● Always drive as carefully and responsibly
senger compartment during a sudden driv-
pletely ejected.
as possible.
ing or braking manoeuvre or an accident
and cause damage or injury.
● Select volume settings that allow you to
CAUTION
easily hear signals from outside the vehicle
● Never place external devices on the
Any foreign objects stuck to a data storage
at all times (e.g. emergency services sirens
doors, the windscreen, on or close to the
device and non-round media may damage
and horns).
zone marked with the “AIRBAG” word of the
the CD player.
steering wheel, the instrument panel or the
● Hearing may be impaired if using too high
backrests, or between these zones and the
● Only use clean, standard 12-cm CDs.
a volume setting, even if only for short peri-
passengers. External devices can cause
- Do not affix stickers or other items to
ods of time.
serious injury in an accident, especially
the data medium. Stickers may peel off
when the airbags inflate.
and damage the drive.
WARNING
- Do not use printable data media. Prin-
The volume level may suddenly change
WARNING
ted labels and coverings may peel off
when you switch audio source or connect a
and damage the CD drive.
Opening a CD player's housing can lead to
new audio source.
injuries from invisible laser radiation.
- Do not insert 8-cm single CDs or irreg-
● Lower the base volume before connect-
ularly shaped or non-round CDs.
»
ing or switching the audio source.
133
Infotainment System
- Do not insert DVD-Plus discs, Dual
Discs or Flip Discs, as these are thicker
than normal CDs.
CAUTION
The vehicle loudspeakers may be dam-
aged if the volume is too high or the sound
is distorted.
134
Большое спасибо!
Ваше мнение очень важно для нас.
Нет комментариевНе стесняйтесь поделиться с нами вашим ценным мнением.
Текст