Isuzu D-Max / Isuzu Rodeo (TFR/TFS). Manual — part 547

6A – 26 ENGINE MECHANICAL
FUEL SYSTEM
Fuel Filter
Replacement Procedure
1. Place the end of the vinyl hose (beneath the drain
plug) in a container.
2. Open the drain plug.
3. Operate the priming pump several times to drain water
from the fuel filter.
4. Close the drain plug.
5. Operate the priming pump and check for fuel leakage.
6. Check that the water level warning light is off.
Fuel Filter Replacement Procedure
1. Remove the fuel filter by turning it counterclockwise
with a filter wrench.
Filter Wrench: 5-8840-0253-0 (J-22700)
2. Remove the level sensor from the filter by turning it
counterclockwise with a wrench.
3. Install the level sensor to the water separator body
with wrench.
Level Sensor Torque
kg·m (lb.in/N·m)
1.3 (113/13)
4. Clean the water separator cover fitting faces.
This will allow the new fuel filter to seat properly.
5. Apply a light coat of engine oil to the O-ring.
6. Turn in the fuel filter until the sealing face comes in
contact with the O-ring.
7. Turn in the fuel filter an additional 2/3 of a turn with a
filter wrench.
Filter Wrench : 5-8840-0253-0 (J-22700)

ENGINE MECHANICAL 6A – 27
8. Loosen the bleeder plug
Q
on the priming pump body.
9. Operate the priming pump until fuel begins to flow
from the fuel filter.
10. Retighten the bleeder plug
Q.
11. Operate the priming pump several times and check for
fuel leakage.
Note:
The use of an ISUZU genuine fuel filter is strongly
recommended.
Draining Procedure
The indicator light will come on when the water level in the
water separator exceeds the specified level.
Drain the water and foreign material from the water
separator with the following procedure.
1. Place the end of the vinyl hose (beneath the drain
plug) in a container.
2. Loosen the drain plug
Q
.
3. Operate the priming pump
R
several times to drain
the water.
4. After draining the water, tighten the drain plug
Q
.
5. Operate the priming pump several times and check for
fuel leakage.
6. Check the water separator indicator light. It should be
off.
Air Bleeding
1. Loosen the bleeder screw on the injection pump
overflow valve.
2. Operate the priming pump until fuel mixed with foam
flows from the bleeder screw.
3. Tighten the bleeder screw.
4. Operate the priming pump several times and check for
fuel leakage.
Injection Pump Air Bleeding (4JA1TC, 4JH1TC)
Injection pump air bleeding is required to start the engine
when −
• The fuel supply has been exhausted (running out of
gas).
• The fuel filter has been replaced.
• The injection pump has been replaced.

6A – 28 ENGINE MECHANICAL
CAUTION:
If the injection pump has been replaced, the air
bleeding procedure will require more time and effort
(this is because there is no fuel in the pump).
1. Loosen the air bleed nut on the priming pump plunger
(at the top of the fuel filter).
2. Move the priming pump plunger up-and-down until
strong resistance is felt (about 15 cycles).
3. Stop pumping and tighten the air bleed nut.
4. Wait for 1 minute.
5. Loosen the air bleed nut on the priming pump plunger
again.
6. Move the priming pump plunger up-and-down until
strong resistance if felt (about 10 cycles).
7. Stop pumping and tighten the air bleed nut.
8. Wait for 1 minute.
9. Loosen the air bleed nut on the priming pump plunger
again.
10. Move the priming pump plunger up-and-down until
strong resistance is felt (about 5 cycles).
11. Stop pumping and tighten the air bleed nut.
12. Press the accelerator and clutch pedals all the way to
the floor and hold them down. Turn the ignition switch
to the ON position. Wait until the glow indicator lamp
turns on and off.
CAUTION:
If the engine is cold, the glow indicator light will stay
on for 4∼
∼
∼
∼7 seconds before turning off.
However, if the engine is hot, the lamp will not turn
on.
13. Turn the ignition switch to the START position and
crank the engine until it starts (do not crank the engine
for more than 10 seconds).
If the engine does not start, repeat Steps 9∼13.
14. Allow the engine to idle for 5 minutes.
COOLING SYSTEM
Coolant Level
Check the coolant level and replenish the radiator reserve
tank as necessary.
If the coolant level falls below the “MIN” line, carefully
check the cooling system for leakage. Then add enough
coolant to bring the level up to the “MAX” line.
ENGINE MECHANICAL 6A – 29
Engine coolant Filling up procedure
1. Make sure that the engine is cool
Warning:
When the coolant is heated to a high temperature, be
sure not to loosen or remove the rediator cap.
Otherwise you might get scalded by hot vapor or
boiling water.
To open the radiator cap, put a piece of thick cloth on
the cap and loosen the cap slowly to reduce the
pressure when the coolant has become cooler.
2. Open rediator cap pour coolant up to filler neck
3. Pour coolant into reservoir tank up to “MAX” line
4. Tighten radiator cap and start the engine. After idling
for 2 to 3 minutes, stop the engine and reopen radiator
cap. If the water level is lower, replenish.
5. After replenish the coolant tighten radiator cap, warm
up the engine at about 2000 rpm. Set heater
adjustment to the highest temperature position, and let
the coolant circulate also intoheater water system.
6. Chech to see the thermometer, continuously idling 5
minutes and stop the engine.
7. When the engine has been cooled, check filler neck
for water level and replenish if required. Should
extreme shortage of coolant is found, check the
coolant system and reservoir tank hosefor leakage.
8. Pour coolant into the reservoir tank up to “MAX” line.
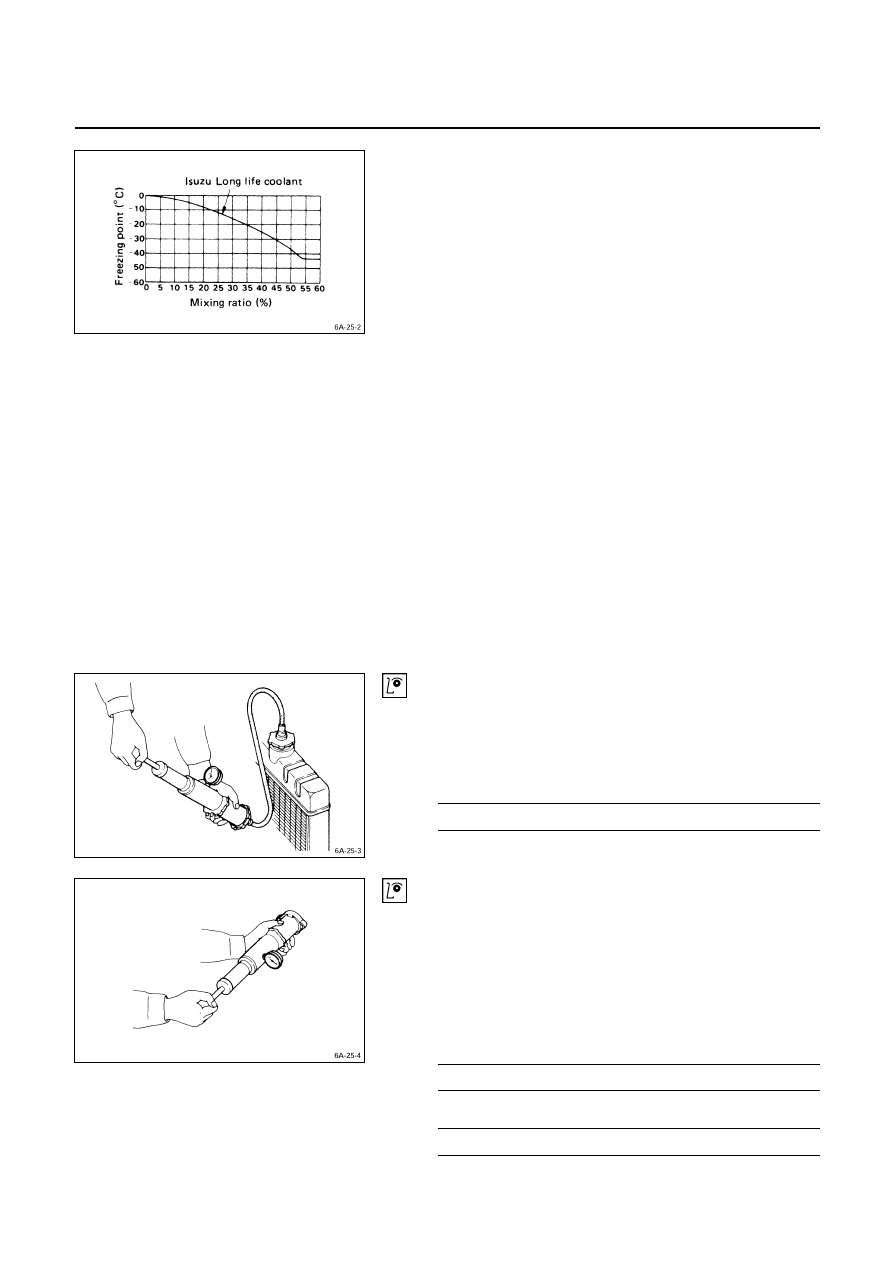
Cooling System Inspection
Install a radiator filler cap tester to the radiator. Apply
testing pressure to the cooling system to check for
leakage. The testing pressure must not exceed the
specified pressure.
Testing Pressure
kg/cm
2
(psi/kPa)
2 (28/200)
Radiator Cap Inspection
The radiator filler cap is designed to maintain coolant
pressure in the cooling system at 1.05 kg/cm
2
(15 psi/103
kPa).
Check the radiator filler cap with a radiator filler cap tester.
The radiator filler cap must be replaced if it fails to hold the
specified pressure during the test procedure.
Radiator Filler Cap Pressure
Pressure Valve
kg/cm
2
(psi/kPa)
0.9 – 1.2 (13 – 17/90 – 120)
Negative Valve (Reference)
kg/cm
2
(psi/kPa)
0.01 – 0.04 (0.14 – 0.57/0.98 – 3.92)
Нет комментариевНе стесняйтесь поделиться с нами вашим ценным мнением.
Текст