Isuzu D-Max / Isuzu Rodeo (TFR/TFS). Manual — part 1909

7A4-68 UNIT REPAIR (JR405E)
6. Bearing
Outside
diameter
Bearing
–
53 mm (2.087 in)
06BRG07
7. Bearing and bearing race
Outside
diameter
Bearing
–
78 mm (3.071 in)
Bearing race
–
76 mm (2.992 in)
07BRG08
8. Bearing and bearing race
Outside
diameter
Bearing
–
53.4 mm (2.102 in)
Bearing race
–
51 mm (2.008 in)
08BRG09
9. Bearing (with bearing race)
Outside
diameter
Bearing
–
64 mm (2.520 in)
09BRG18
Bearing race (black color) installation direction – Facing the
rear of the transmission.
10.Bearing (with bearing race)
Outside
diameter
Bearing
–
64 mm (2.520 in)
10BRG17
Bearing race (black color) installation direction – Facing the
front of the transmission.
UNIT REPAIR (JR405E) 7A4-69
AUTOMATIC TRANSMISSION
REASSEMBLY
Assembly cautions
•
Use your bare hands or vinyl gloves to reassemble the
transmission. Do not use ordinary work gloves (loosen
threads from the gloves may fall into the transmission
and cause problems).
•
Before installing the drive plates, immerse them in the
recommended automatic transmission fluid (BESCO
ATF II or ATF III). If the drive plate is new, it must be
immersed for at least two hours to ensure oil penetration
and saturation of the facing.
•
Apply ATF to all sliding and contact surfaces before
assembly. Also apply ATF to seal rings and O-rings.
Assemble the parts carefully to avoid damaging them.
•
Replace any snap ring that appears worn, bent out of
shape, or otherwise damaged.
•
If any part contacting the transmission case is damaged,
it must be replaced with a new part.
•
Be careful not to damage the plates during reassembly
(oil leakage from the plate will result).
•
If you are reusing a seal, remove the old adhesive agent
and clean the surface with cleaning oil before applying
the new adhesive agent.
•
Wait at least two hours after installing the oil seals
before installing the plates.
•
Do not replace O-rings, snap rings, bearings, and/or
bearing races with inferior substitutes.
7A4-70 UNIT REPAIR (JR405E)
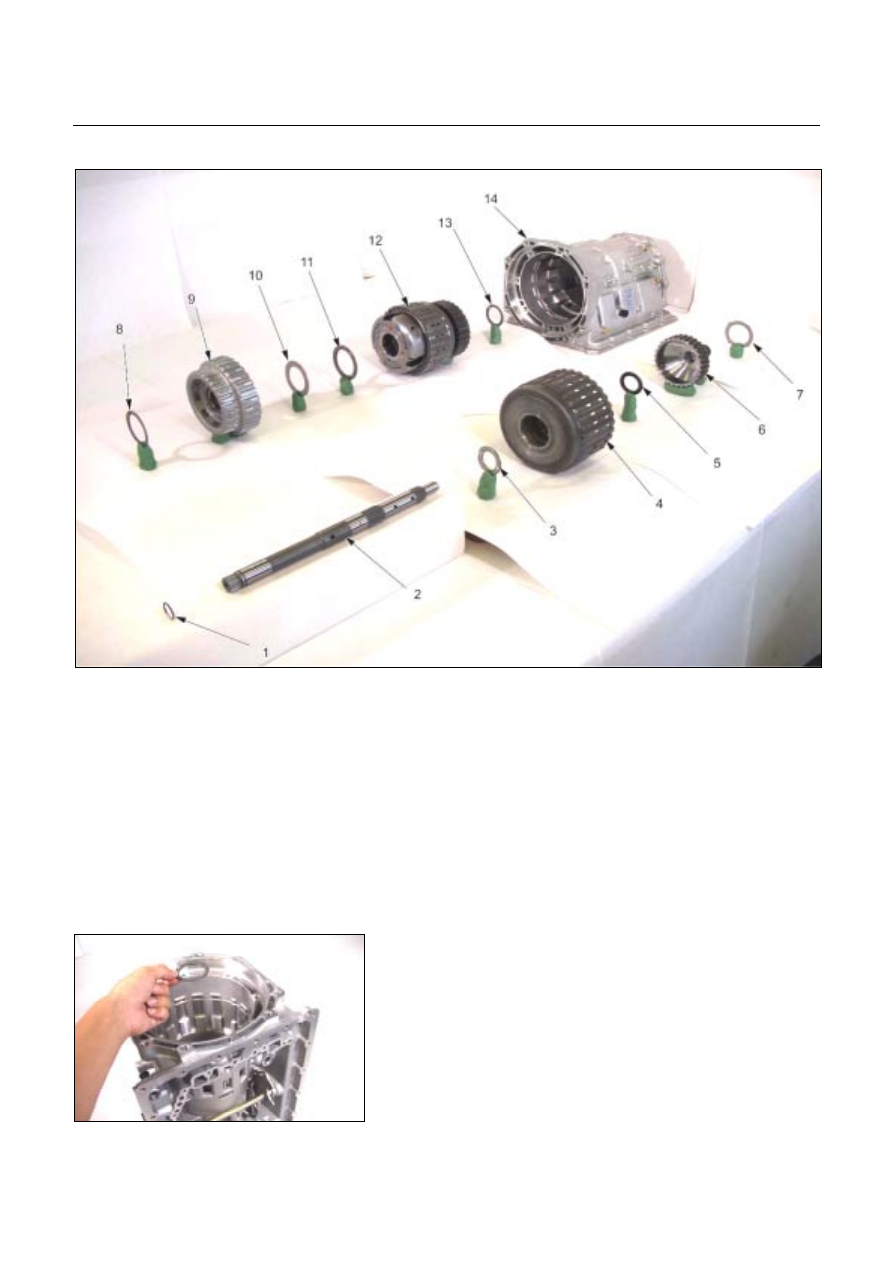
Power train
01HUB-H04
Legend
1.
O-ring
2.
Input
shaft
3.
Bearing
4. Reverse and high clutch assembly
5.
Bearing
6. High clutch hub
7. Bearing race
8.
Bearing
9. Front sun gear
10.
Bearing
race
11.
Bearing
12. Carrier and low clutch assembly
13.
Bearing
14. Transmission case
Reassembly steps
1. Transmission case
Rotate the transmission case so that the converter housing
installation surfaces are facing up.
02ASSY012
2. Bearing
Install the bearing to the low and one-way clutch inner race.
Refer to the item “Transmission Case” for more detailed
information.
NOTE:
Apply Vaseline to the bearing to prevent them from failing
during the installation procedure.
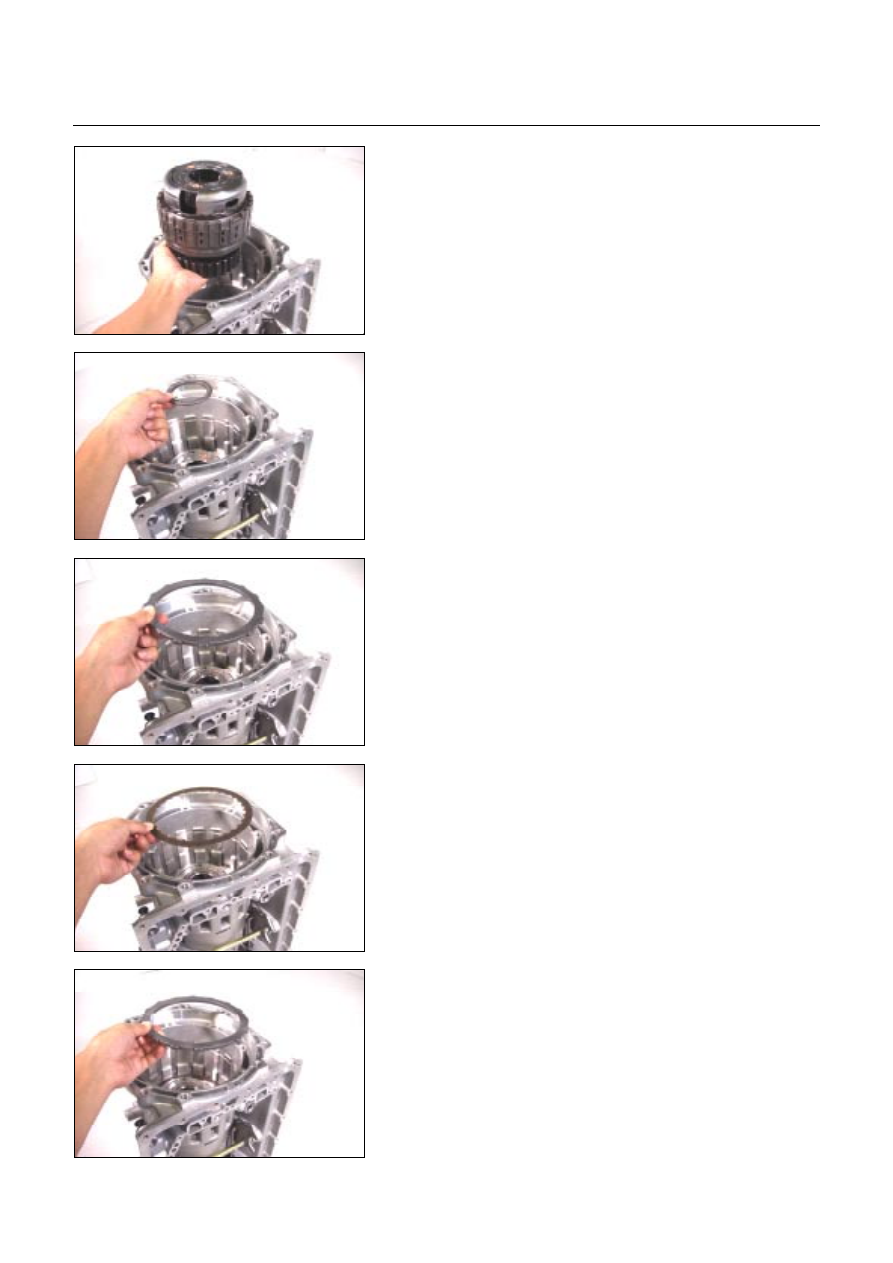
UNIT REPAIR (JR405E) 7A4-71
03ASSY013
3. Carrier and low clutch assembly
Install the carrier and low clutch assembly to the
transmission case.
NOTE:
Do not allow the low clutch drum end to protrude beyond
the 2-4 brake plate contact surface (transmission case).
04ASSY014
4. Bearing
Install the bearing to the carrier and low clutch assembly.
05ASSY015
5. Driven plate, drive plate, retaining plate, and dish plate
(2 – 4 brake)
Install the 2-4 brake 5 driven plate (1), 5 drive plates (2),
retaining plate (3), and dish plate (4) in that order.
NOTE:
••••
The thickest driven plate (5.6 mm) must be installed
at the bottom (transmission case plate surface).
••••
Dish plate side with the identification mark must
face the retaining plate.
06ASSY016
07ASSY017
Нет комментариевНе стесняйтесь поделиться с нами вашим ценным мнением.
Текст