Isuzu D-Max / Isuzu Rodeo (TFR/TFS). Manual — part 553
6A – 50 ENGINE MECHANICAL
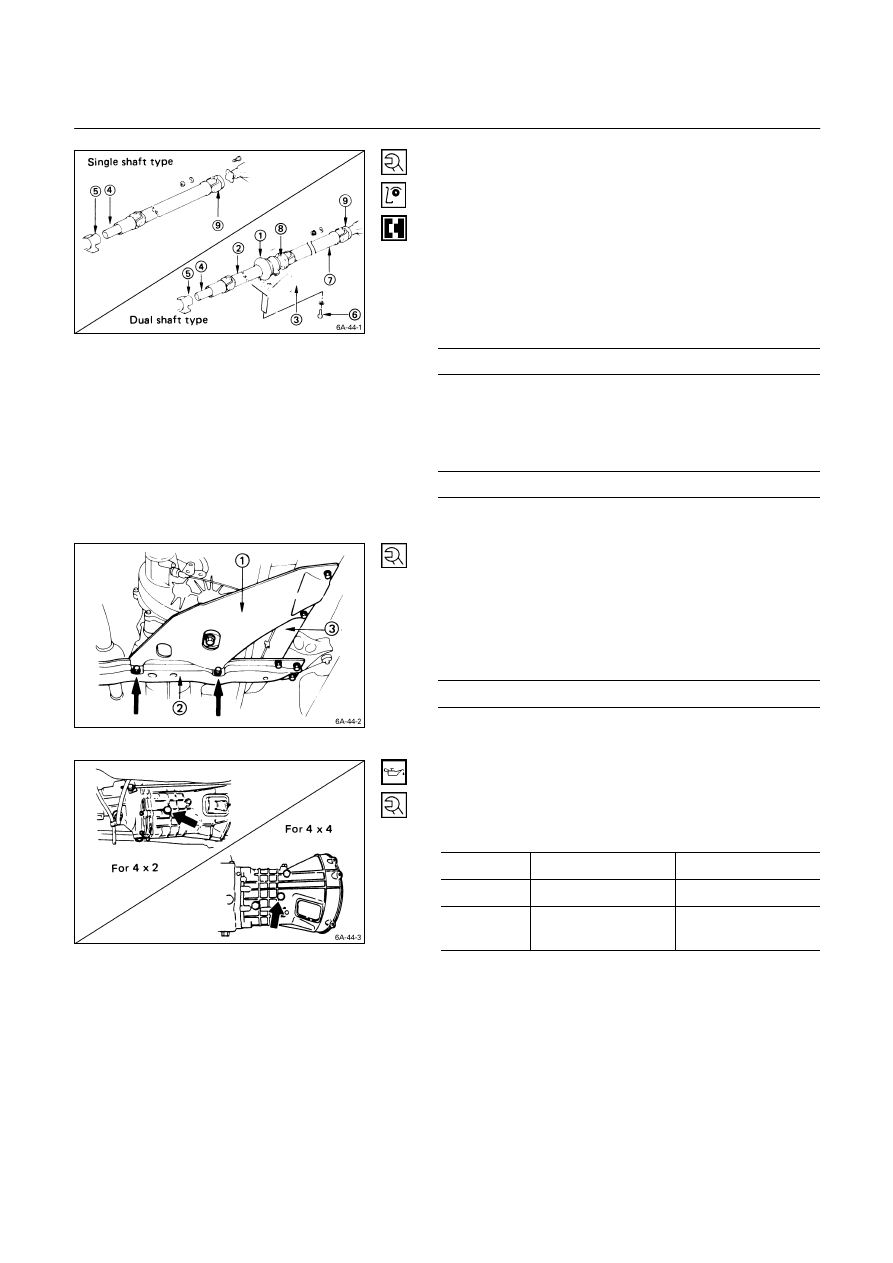
Rear Propeller Shaft
1. Place the center bearing and retainer
Q
together with
the 1st propeller shaft
R
on the No. 4 crossmember
S
.
2. Insert the splined yoke
T
into the transmission main
shaft spline
U
.
3. Tighten the center bearing retainer bolts
V
to the
specified torque.
Center Bearing Retainer Bolt Torque
kg·m (lb.ft/N·m)
6.2
± 0.2 (44.8 ± 1.5/60.8 ± 2.0)
4. Connect the 2nd propeller shaft
W
center coupling
side
X
and drive pinion side
Y
.
Propeller Shaft Flange Yoke Bolt
Torque kg·m
(lb.ft/N·m)
3.6
± 0.3 (26.0 ± 2.2/35.3 ± 2.9)
Transfer Case Protector (For 4
×××× 4)
1. Install the transfer case protector
Q
to the mounting
member
R
and the sidemembers
S
.
2. Tighten the transfer case protector bolts to the
specified torque.
Transfer Case Protector Bolt Torque
kg·m (lb.ft/N·m)
3.7
± 1.0 (26.8 ± 7.2/36.3 ± 9.8)
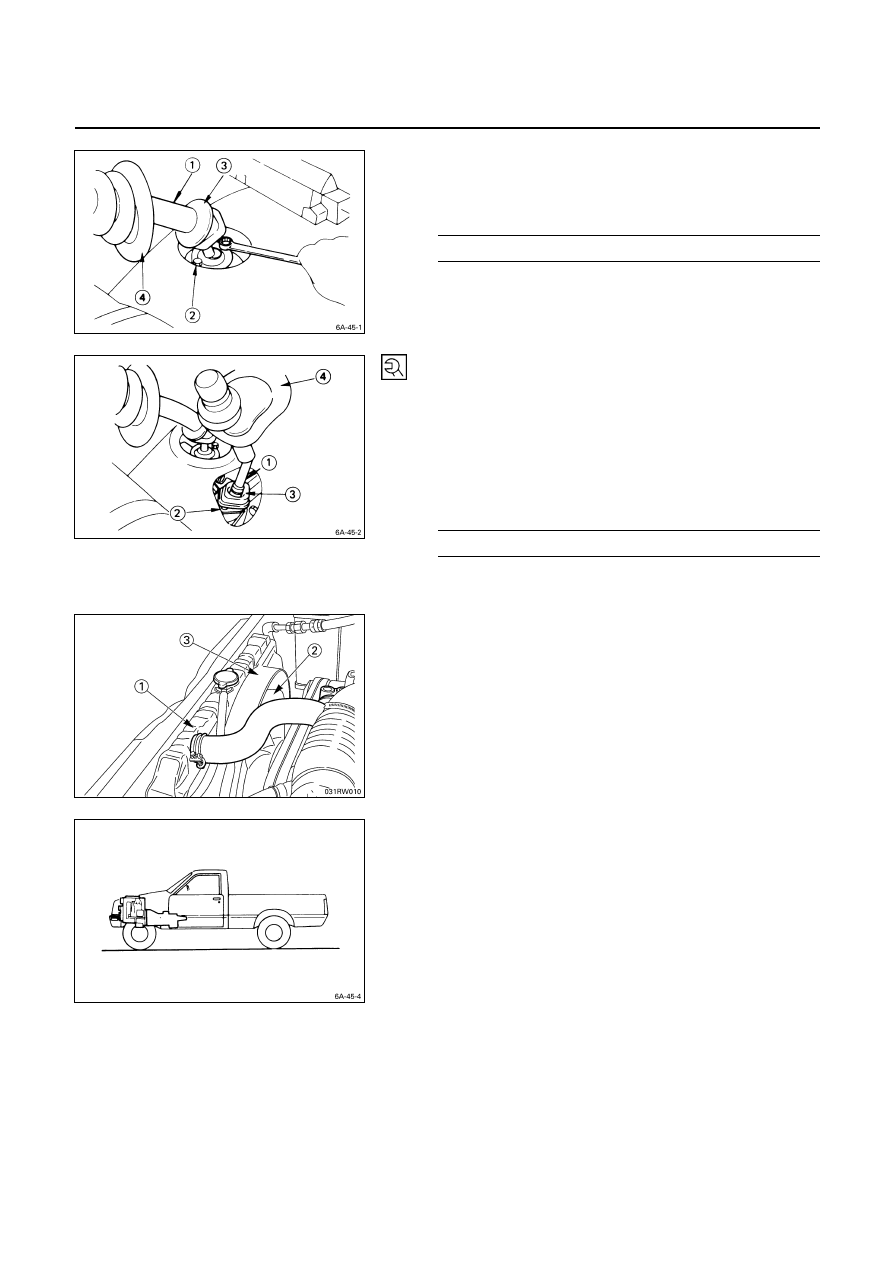
Gear Shift Lever
1. Replenish the transmission case and the transfer case
with the specified engine oil.
Transmission and Transfer Case Oil
lit (US/UK gal)
4
× 2
4
× 4
MSG
1.55 (0.41/0.34)
4.40 (1.16/0.97)
MUA 2.95
(0.65/0.54)
2.95 (T/M)
1.45 (Transter)
2. Install the quadrant box to the transmission rear cover.
ENGINE MECHANICAL 6A – 51
3. Install the gear shift lever
Q
to the transmission case.
4. Tighten the gear shift lever cover
R
bolts to the
specified torque.
Shift Lever Cover Bolt Torque
kg·m (lb.ft/N·m)
2.0
± 0.2 (14.5 ± 1.5/19.6 ± 2.0)
5. Install the dust cover
S
and the grommet
T
.
Transfer Change Lever (For 4
×××× 4)
1. Insert the transfer change lever
Q
into the transfer
side case.
2. Install the ball seat cover along with the change lever
retainer
R
.
3. Tighten the change lever retainer bolts to the specified
torque.
Change Lever Retainer Bolt Torque
kg·m (lb.ft/N·m)
2.0
± 0.2 (14.5 ± 1.5/19.6 ± 2.0)
4. Install the dust cover
S
and the grommet
T
.
Radiator
1. Install
the
radiator
Q
.
Be careful not to damage the radiator core.
2. Install the cooling fan
R
and the fan shroud
S
.
3. Connect the radiator upper and lower hoses.
4. Install the radiator undercover to the chassis frame.
5. Install the radiator grill to the deflector panel.
Lowering the Vehicle
1. Install the wheels to the vehicle.
2. Place a jack beneath the vehicle.
3. Raise the jack to remove the chassis stands.
4. Lower the vehicle to the ground.
6A – 52 ENGINE MECHANICAL
Coolant Replenishment
Replenish the cooling system with coolant.
When radiator is emptied (for coolant change, etc.):
After filling with coolant up to the inlet port level, put the
radiator cap on and idle the engine for 5 to 6 consecutive
minute. Then remove the radiator cap and check and see
the coolant level. If the coolant is short, add to the radiator
as well as to the reserve tank.
If the reserve tank coolant level is lower than MIN,
replenish coolant to the reserve tank only.
In case there is no coolant in the reserve tank, make sure
of a drop in coolant temperature and add coolant through
the radiator inlet port. Then remove the cap and check the
coolant level after idling the engine for 5 to 6 consecutive
minutes.
Then add coolant into reserve tank fill up to full level.
Coolant Capacity
lit (US/UK gal)
4JA1, 4JA1T
7.0 (1.8/1.5)
4JB1 with turbo engine
9.5 (2.5/2.1)
4JG2T 8.6
(2.3/1.9)
4JA1-TC, 4JH1TC
8.4 (2.2/1.8)
Engine Oil Replenishment
1. Fill the engine through the filler port with new engine
oil of the specified grade.
Engine Oil Capacity and Grade
lit (US/UK gal)
4
× 2
4JA1, 4JA1T, 4JB1T
4
× 4
6.5 (1.7/1.4)
4
× 2
6.5 (1.7/1.4)
Capacity
4JG2T, 4JA1TC,
4JH1TC
4
× 4
7.3 (1.9/1.6)
For 4JA1
CC or CD
Grade
For 4JB1T, 4JG2T, 4JA1T,
4JA1TC, 4JH1TC
CD
2. Start the engine and allow it to idle for several
minutes.
3. Stop the engine and wait five minutes for the oil to
settle.
4. Recheck the oil level and replenish if necessary.

ENGINE MECHANICAL 6A – 53
Engine Hood
Align the setting marks (applied at removal) on the engine
hood
Q
and the engine hood hinges
R
to install the
engine hood.
Battery
1. Check the battery fluid level and the specific gravity.
2. Secure the battery with the battery clamp.
Do not overtighten the battery clamp.
3. Connect the battery cable
R
and the ground cable
S
to the battery.
4. Connect the battery cable to the starter motor and the
ground cable to the cylinder body.
5. Apply grease to the battery terminals.
6. Install the battery clamp
Q.
Take care not to accidentally short the battery with the
spanner or some other tool.
Engine Warm-Up
After completing the required maintenance procedures,
start the engine and allow it to idle until it is warm.
Check the following:
1. Engine idling speed
Refer to “SERVICING” for the idle speed adjustment
procedure.
2. Engine noise level.
3. Engine lubricating system and cooling system
Carefully check for oil and coolant leakage.
4. Engine control cable operation
5. Clutch
engagement
6. Indicator warning light operation
Нет комментариевНе стесняйтесь поделиться с нами вашим ценным мнением.
Текст