Isuzu KB P190. Manual — part 200

TROUBLESHOOTING 6 – 15
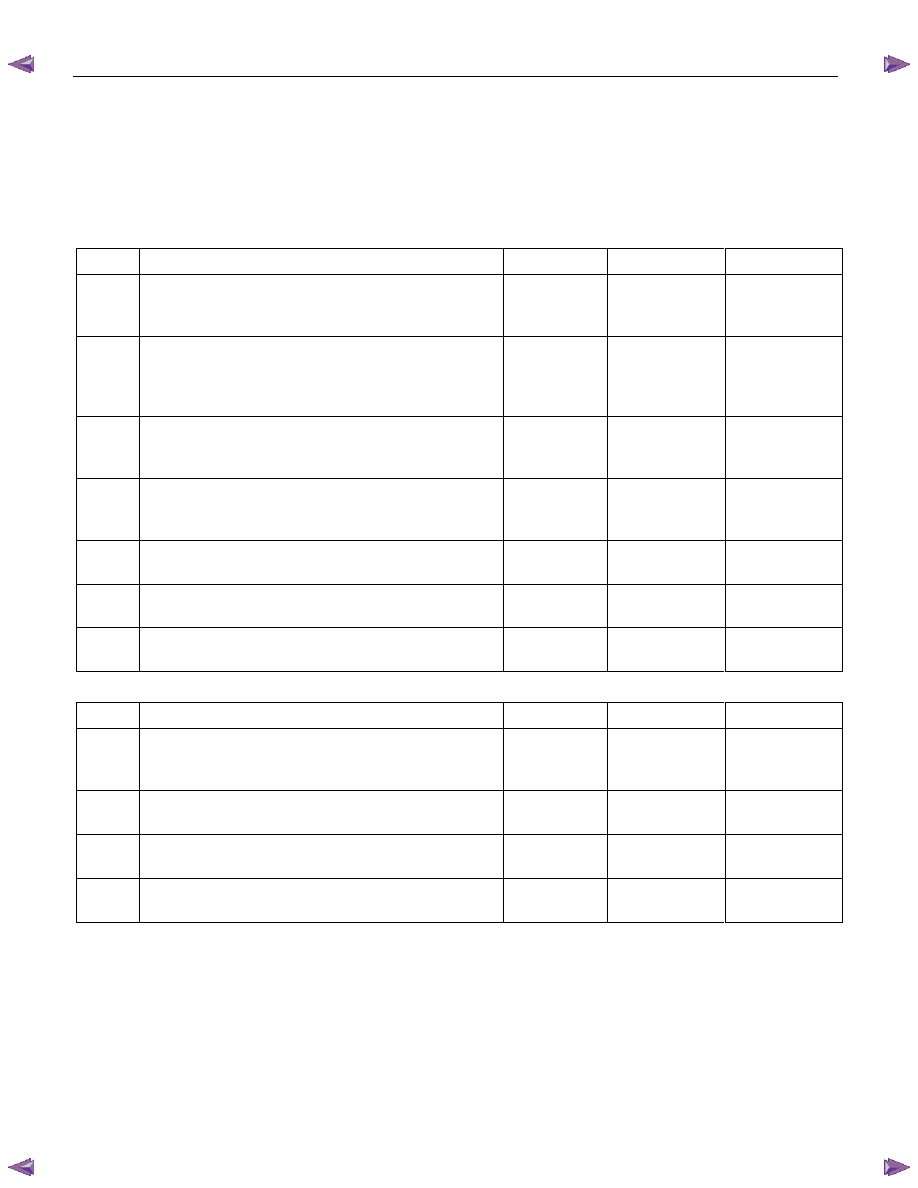
12. Oil Leakage from Turbocharger
Step Action Value(s)
Yes
No
1
Inspect the oil leakage area.
Was the oil feed pipe eye bolt loose or the gasket
broken?
—
Tighten the eye
bolt or replace
the gasket.
Go to Step 2
2
Were the V band fixing faces tight?
—
Tighten band or
replace the
turbocharger Go
to
Step 3
3
Was there oil leakage from the flange of the turbine
housing?
—
Replace
the
turbocharger Go
to
Step 4
4
Was there oil leakage from the flange of compressor
housing?
—
Tighten the bolt
and/or hose
clamp. Go
to
Step 5
5
Are any DTC stored?
—
Go
to
indicated
DTC Solved
13. Insufficient Acceleration and/or Lack of Power due to turbocharger
Step Action Value(s)
Yes
No
1
Inspect the air or exhaust route.
Was the air and/or exhaust gas piping loose?
—
Tighten
flange
bolts or hose
clamp. Go
to
Step 2
2
Inspect the work of waste gate valve control.
Was there rust on the linkage rod or pin of the waste
gate valve?
—
Replace the
turbocharger Go
to
Step 3
3
Was air leakage found from the actuator piping?
—
Repair
or
replace the
actuator pipe or
hose/ Go
to
Step 4
4
Inspect the inside of the turbocharger.
Was the turbine shaft end nut loose?
—
Replace
the
turbocharger Go
to
Step 5
5
Were the turbine blades bent?
—
Replace
the
turbocharger Go
to
Step 6
6
Was the turbine wheel rubbing against housing?
—
Replace
the
turbocharger Go
to
Step 7
7
Are any DTC stored?
—
Go
to
indicated
DTC Solved
6 – 16 TROUBLESHOOTING
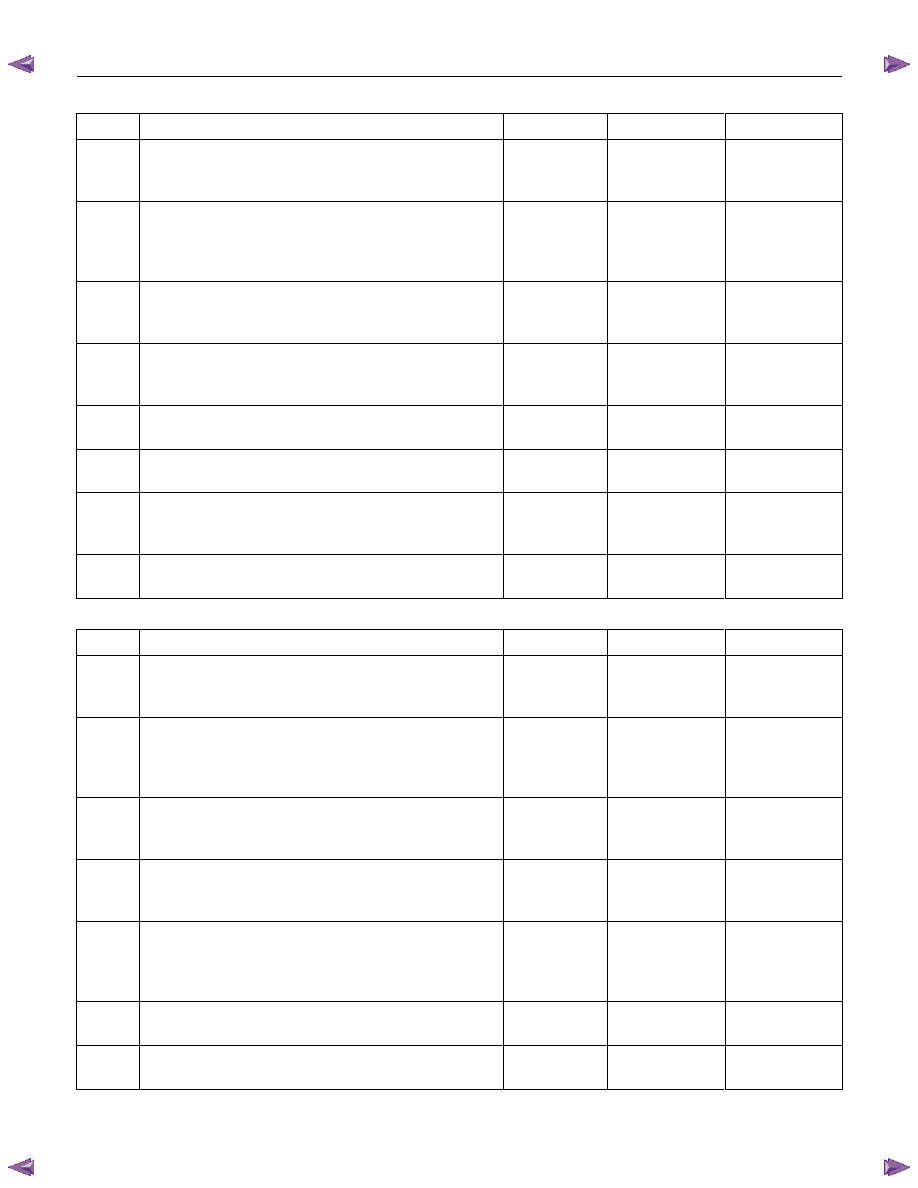
14. Battery Charging and Noise Problem
Visual/physical check the following items before diagnosis.
The drive belt tension.
The battery terminals connection condition.
The ground connection condition.
The generator and the battery fastener condition.
The battery fluid level and specific gravity.
14-1 Battery No Charging
Step Action Value(s)
Yes
No
1 Was
“
Visual/Physical Check" performed.
—
Go to Step 2
Go to
visual/physical
check
2
Inspect the brush contact condition on the generator.
Was there poor contact between the brush and the
slip ring?
—
Repair
or
replace the
brush and/or
the slip ring.
Go to Step 3
3
Inspect the stator coil on the generator.
Was there an open circuit or the scorching on the
stator coil?
—
Replace the
stator coil.
Go to Step 4
4
Inspect the rotor coil on the generator.
Was there an open circuit or the scorching on the
rotor coil?
—
Replace the
rotor coil.
Go to Step 5
5
Inspect the rectifier on the generator.
Was the rectifier defective?
—
Replace
the
rectifier Go
to
Step 6
6
Inspect the IC regulator.
Was the IC regulator defective?
—
Replace the IC
regulator. Go
to
Step 7
7
Are any DTC stored?
—
Go
to
indicated
DTC. Solved
14-2 Battery Overcharging
Step Action Value(s)
Yes
No
1 Was
“
Visual/Physical Check" performed.
—
Go to Step 2
Go to
visual/physical
check
2
Inspect the terminal circuit.
Were the B and F terminals shorted?
—
Repair
the
short circuit.
Go to Step 3
3
Check the regulating voltage.
Was the IC regulator voltage excessive?
—
Replace the IC
regulator. Go
to
Step 4
4
Are any DTC stored?
—
Go
to
indicated
DTC. Solved
TROUBLESHOOTING 6 – 17
14-3 Battery Under Charging
Step Action Value(s)
Yes
No
1 Was
“
Visual/Physical Check" performed.
—
Go to Step 2
Go to
visual/physical
check
2
Inspect the brush contact condition on the generator.
Was there intermittent contact between the brush
and the slip ring?
—
Repair
or
replace the
brush holder
assembly. Go
to
Step 3
3
Inspect the rotor coil on the generator.
Was there a short circuit in the rotor coil?
—
Repair
or
replace the
rotor coil.
Go to Step 4
4
Inspect the stator coil on the generator.
Was there an open circuit or the short circuit on the
stator coil?
—
Repair
or
replace the
stator coil.
Go to Step 5
5
Inspect the rectifier on the generator.
Was the rectifier defective?
—
Replace
the
rectifier Go
to
Step 6
6
Inspect the IC regulator on the generator.
Was the IC regulator defective?
—
Replace the IC
regulator. Go
to
Step 7
7
Was the electrical load excessive?
—
Replace
more
higher capacity
generator. Go
to
Step 8
8
Are any DTC stored?
—
Go
to
indicated
DTC. Solved
14-4 Battery Unstable Charging Current
Step Action Value(s)
Yes
No
1 Was
“
Visual/Physical Check" performed.
—
Go to Step 2
Go to
visual/physical
check
2
Inspect the brush contact condition on the generator.
Was there poor contact between the brush and the
slip ring?
—
Repair
or
replace the
brush and/or
the slip ring.
Go to Step 3
3
Inspect the rotor coil on the generator.
Was there the short circuit or an open circuit in the
rotor coil?
—
Repair
or
replace the
rotor coil.
Go to Step 4
4
Inspect the stator coil on the generator.
Was there an open circuit or the short circuit in the
stator coil?
—
Repair
or
replace the
stator coil.
Go to Step 5
5
Inspect the connection between the rectifier and
stator coil on the generator.
Was there a loose connection between the rectifier
and stator coil ?
—
Repair the
loose
connection. Go
to
Step 6
6
Inspect the IC regulator on the generator.
Was the IC regulator defective?
—
Replace the IC
regulator. Go
to
Step 7
7
Are any DTC stored?
—
Go
to
indicated
DTC. Solved

6 – 18 TROUBLESHOOTING
14-5 Charging System Noise
Step Action Value(s)
Yes
No
1 Was
“
Visual/Physical Check" performed.
—
Go to Step 2
Go to
visual/physical
check
2
Was there intermittent noise or continuous noise and
that could be identified clearly by increasing and
decreasing engine speed?
—
Replace the
bearing. Go
to
Step 3
3
Was there a growling sound and does this sound
stop when the connector was disconnected?
—
Replace
the
stator coil.
Go to Step 4
4
Was intermittent sound heard when the generator
was running?
—
Replace
the
brush and/or
slip ring.
Go to Step 5
5
Was frictional sound heard when generator was
running?
—
Clean the slip
ring or replace
the brush.
Go to Step 6
6
Are any DTC stored?
—
Go
to
indicated
DTC. Solved
Нет комментариевНе стесняйтесь поделиться с нами вашим ценным мнением.
Текст