Isuzu KB P190. Manual — part 931

Powertrain Interface Module – V6
Page 6E1–63
PRND32L Display Diagnostic Table
Step Action
Yes
No
1
Has the Diagnostic System Check been performed?
Go to Step 2
Refer to
Diagnostic
System Check
in this section
2
1
Turn the ignition to the ON position.
2
Move the gear select lever through each gear position and
check the instrument cluster PRND32L display.
Does each indicator display an off to on condition?
Refer to Additional
Information in this
section
Go to Step 3
3
Are any of the indicators permanently illuminated?
Go to Step 5
Go to Step 4
4
1
Using Tech 2 select,
Body / PIM / Miscellaneous Tests / Status Indicators /
PRNDL Lamps.
2
Using the Tech 2 soft keys step through the sequence of
illuminating each PRND32L indicator in turn.
Does each indicator display an off to on condition?
Go to Step 8
Go to Step 10
5
Disconnect the TCM harness connector. Refer to 7C4 Automatic
Transmission – 4L60E – On-vehicle Servicing.
Is the indicator in Step 3 still permanently illuminated?
Go to Step 6
Go to Step 8
6
Disconnect the PIM harness connector. Refer to 11.2 Powertrain
Interface Module in this Section.
Is the indicator in Step 3 still permanently illuminated?
Go to Step 7
Go to Step 14
7
Turn the ignition to the ON position, test for a short to voltage of the
relevant circuits from the PIM to the instrument cluster. Refer to 6
Wiring Diagram and Connector Chart.
Was any fault found and rectified?
Go to step 15
Go to step 12
8
Check the neutral start and back-up lamp switch and automatic
transmission for correct operation. Refer to 7C2 Automatic
Transmission – 4L60E – Electrical Diagnosis.
Was any fault found and rectified?
Go to Step 15
Go to 9
9
Replace the TCM. Refer to 7C4 Automatic Transmission – 4L60E –
On-vehicle Servicing.
Has the repair been completed?
Go to Step 15
—
10 1
Disconnect the instrument cluster harness connector.
2
Turn the ignition to the ON position.
3
While sequencing each PRND32L indicator, back probe the
relevant connector pins at the rear of the instrument cluster.
Refer to 6 Wiring Diagram and Connector Chart.
Does the multimeter display a change from 0 to 10 Volts as each
PRND32L indicator position is selected?
Go to Step 12
Go to 11
11 Test for high resistance, open circuit, a short to ground of the relevant
circuits from the PIM to the instrument cluster. Refer to 6
Wiring
Diagram and Connector Chart.
Was any fault found and rectified?
Go to Step 15
Go to Step 14

Powertrain Interface Module – V6
Page 6E1–64
Step Action
Yes
No
12 Test the following instrument cluster circuits for a high resistance,
open circuit or short to ground fault condition:
•
all 12 V battery supply circuits
•
all instrument cluster ground connections
Was any fault found and rectified?
Go to Step 15
Go to Step 13
13 Replace the instrument cluster.
Has the repair been completed?
Go to Step 15
—
14 Replace the PIM.
Has the repair been completed?
Go to step 15
—
15 1
Turn the ignition to the ON position.
2
Move the gear select lever through each gear position and
check the PRND32L display.
Does each indicator display an off to on condition?
System OK
Go to step 2
When all diagnosis and repairs are completed, clear all DTCs and check the system for correct operation.
10.2 Warning Signal and Status Indicators
Diagnostics
Circuit Description
The powertrain interface module (PIM) is connected to the instrument cluster by a series of hard wired connections to
illuminate the appropriate warnings and indicators within the instrument cluster. Some of these components do not set a
DTC, in the event of a component failure. The following diagnostic procedures are devised to assist in these cases.
Additional Information
•
Refer to 7.2 Diagnostic System Check to monitor DTC’s.
•
Refer to 8A Electrical Body and Chassis for the following information:
•
Automatic transmission PRND32L switch and wiring,
•
TCM wiring diagram.
•
Refer to 6 Wiring Diagram and Connector Chart for the following information:
•
PIM connector illustration and terminal assignment, and
•
PIM wiring diagram.
•
For intermittent faults, refer to Intermittent Fault Conditions.
•
Check for an intermittent fault in the wiring harness or connectors, if a fault cannot be found the system is
serviceable.
Test Description
The following numbers refer to the step numbers in the diagnostic table:
1
This step tests for DTC’s in the overall system.
2
This step manually tests the warning indicators.
5
This step uses Tech 2 to drive each status indicator on.
6
This step uses Tech 2 to drive each warning indicator on.
9
This step tests the wiring harness between the PIM and the Instrument Cluster.
Powertrain Interface Module – V6
Page 6E1–65
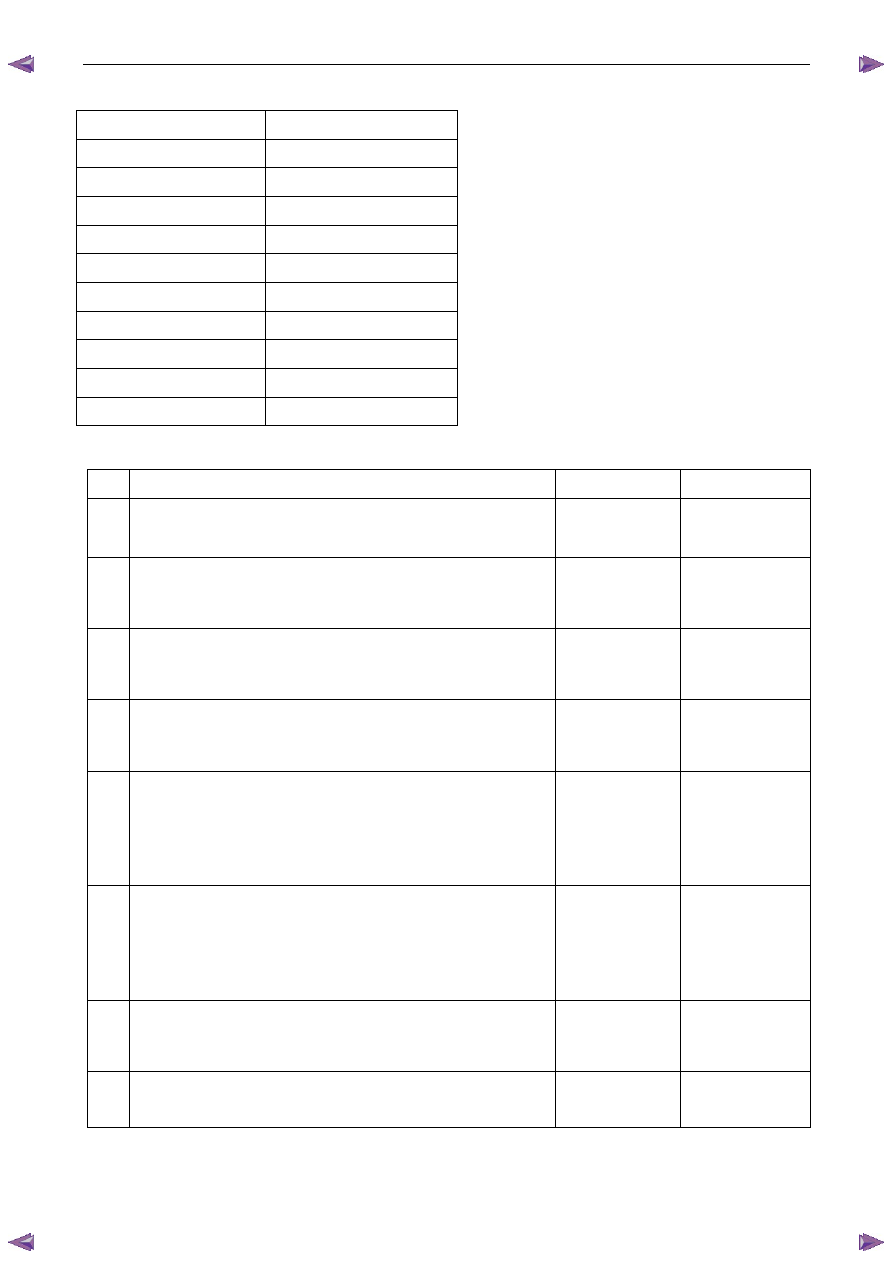
Hard-wired Warning Signals
Display Indicator
CHECK TRANS
Lamp
3
rd
START
Lamp
POWER Lamp
A/T OIL TEMP
Lamp
CRUISE SET
Lamp
OIL Lamp
THERMO Gauge
SVS Lamp
CHARGE Lamp
TACHO Gauge
Warning Signal and Status Indicator Diagnostic Table
Step Action
Yes
No
1
Has the Diagnostic System Check been performed?
Go to Step 2
Refer to
Additional
Information
2
Turn the Ignition to the ON position, observe if all warning and status
indicators illuminate during the Instrument Cluster start up sequence.
Do all indicators illuminate?
Go to Step 3
Go to step 4
3
1
Start the vehicles engine.
2
Are any of the warning or status indicators permanently
illuminated?
Go to Step 7
Go to Step 4
4
Using Tech 2.
Are any DTC’s set which may cause incorrect operation of the warning
or status indicators?
Refer to the
relevant DTC’s
section
Go to Step 5
5
1
Using Tech 2 select,
Body / PIM / Miscellaneous Tests / Status Indicators.
2
Select and activate in turn Cruise Control ON Lamp / Cruise
Control Set Lamp / Power Drive Lamp.
Does each indicator illuminate?
Go to Step 6
Go to Step 8
6
1
Using Tech 2 select,
Body / PIM / Miscellaneous Tests / Warnings.
2
Select and activate in turn, ALT / Oil Pressure / Service Soon /
A/T Oil Temp / Check Trans.
Does each warning illuminate?
Go to Step 15
Go to Step 8
7
Disconnect the PIM harness connector. Refer to 11.2 Powertrain
Interface Module in this section.
Is the indicator/warning in Step 3 still permanently illuminated?
Go to Step 9
Go to Step 12
8
Remove and test the lamp from the malfunctioning warning.
Was the lamp found to be faulty and replaced?
Go to Step 15
Go to Step 14

Powertrain Interface Module – V6
Page 6E1–66
Step Action
Yes
No
9
Test for high resistance, open circuit, a short to ground of the relevant
circuits from the PIM to the instrument cluster. Refer to 6
Wiring
Diagram and Connector Chart.
Was any fault found and rectified?
Go to Step 16
Go to step 10
10 Turn the ignition to the ON position, test for a short to voltage of the
relevant circuits from the PIM to the instrument cluster. Refer to 6
Wiring Diagram and Connector Chart.
Was any fault found and rectified?
Go to Step 16
Go to Step 11
11 Disconnect the PIM.
Test for a short to voltage of the relevant circuits from the PIM to the
instrument cluster.
Was any fault found and rectified?
Go to Step 13
Go to Step 12
12 Disconnect the instrument cluster.
Test for a short to voltage of the relevant circuits from the PIM to the
instrument cluster.
Was any fault found and rectified?
Go to Step 16
Go to Step 14
13 Replace the PIM.
Has the repair been completed?
Go to Step 16
—
14 Test the following instrument cluster circuits for a high resistance,
open circuit or short to ground fault condition:
•
all 12 V battery supply circuits
•
all instrument cluster ground connections
Was any fault found and rectified?
Go to Step 16
Go to Step 15
15 Replace the instrument cluster.
Has the repair been completed?
Go to Step 16
—
16 Turn the Ignition to the ON position, observe if all warning indicators
illuminate during the Instrument Cluster start up sequence.
Do all indicators function correctly?
System serviceable
Go to step 3
When all diagnosis and repairs are completed, clear all DTCs and check the system for correct operation.
Нет комментариевНе стесняйтесь поделиться с нами вашим ценным мнением.
Текст