Isuzu KB P190. Manual — part 320

6E-246 Engine Control System (4JH1)
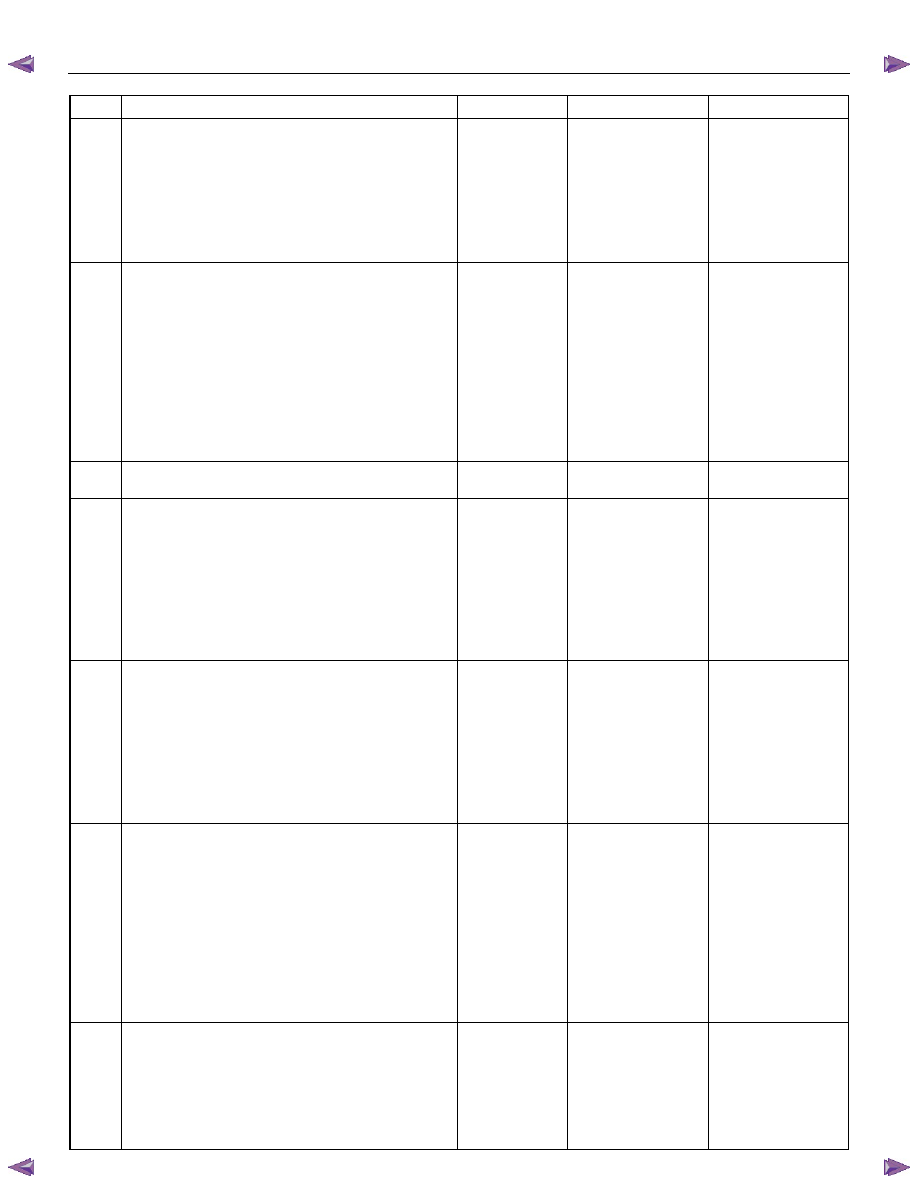
Step Action
Value(s)
Yes
No
11
1. Turn OFF the ignition.
2. Remove the thermo relay from the engine room
relay block.
3. Connect a test lamp between the voltage feed
circuit (pins 1 and 3 of X-15 connector) and a
known good ground.
4. Turn ON the ignition, with the engine OFF.
Does the test lamp illuminate on both circuits?
Go to Step 12
Go to Step 20
12
1. Turn OFF the ignition.
2. Reinstall the thermo relay.
3. Remove the radiator grille in order to access the
pressure switch.
4.
Disconnect the pressure switch harness
connector (C-24).
5. Connect a 3-amp fused jumper wire between the
pressure switch harness (pin 1 of C-24
connector) and a known good ground.
6. Turn ON the ignition, with the engine OFF.
Does the thermo relay click (engage)?
Go to Step 13
Go to Step 15
13
Does the A/C Request Signal Request parameter
indicate ON?
Go to Step 16
Go to Step 14
14
1. Turn OFF the ignition.
2. Keep the 3-amp fused wire with connected.
3. Disconnect the ECM C-56 harness connector.
4. Connect a test lamp between the thermo relay
input circuit (pin 33 of C-56 connector) and a
known good ground.
5. Turn ON the ignition, with the engine OFF. DO
NOT START the engine.
Does the test lamp illuminate?
Go to Step 32
Go to Step 21
15
1. Turn OFF the ignition.
2. Keep the 3-amp fused wire with connected.
3. Replace the thermo relay with the horn relay or
replace with a known good relay.
4. Connect a 3-amp fused jumper wire between the
pressure switch harness (pin 1 of C-24
connector) and a known good ground.
5. Turn ON the ignition, with the engine OFF.
Does the thermo relay click (engage)?
Go to Step 27
Go to Step 22
16
1. Turn OFF the ignition.
2. Connect the pressure switch harness connector.
3. Remove the grove box in order to access
electronic thermostat.
4. Disconnect the electronic thermostat harness
connector (C-55).
5. Connect a 3-amp fused jumper wire between the
electronic thermostat voltage feed circuit (pin 2 of
C-55 connector) and a known good ground.
6. Turn ON the ignition, with the engine OFF.
Does the thermo relay click (engage)?
Go to Step 17
Go to Step 23
17
1. Turn OFF the ignition.
2. Connect a test lamp between the electronic
thermostat terminal (pin 1 of C-55 connector) and
battery voltage.
3. Turn ON the blower motor switch.
4. Turn ON the A/C switch.
Does the test lamp illuminate?
Go to Step 18
Go to Step 19

Engine Control System (4JH1) 6E-247
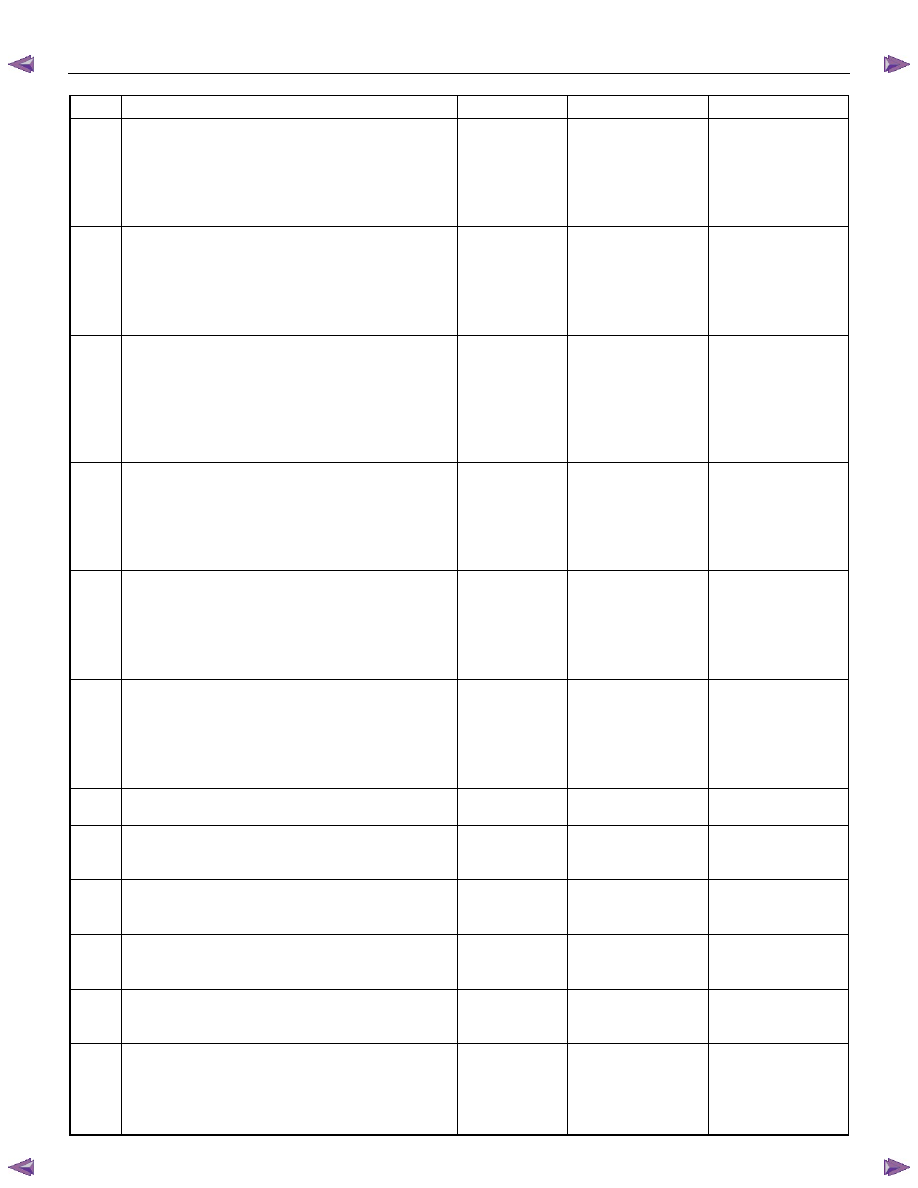
Step Action
Value(s)
Yes
No
18
1. Turn OFF the ignition.
2. Connect a test lamp between the electronic
thermostat voltage feed circuit (pin 3 of C-55
connector) and a known good ground.
3. Turn ON the ignition, with the engine OFF.
Does the test lamp illuminate?
Go to Step 29
Go to Step 25
19
1. Turn OFF the ignition.
2. Remove the center cluster bezel in order to
remove HVAC control lever.
3. Disconnect the A/C switch harness connector (B-
57).
4. Connect a test lamp between the A/C switch
ground harness (pin 1 of B-57 connector) and
battery voltage.
5. Turn ON the blower motor switch.
Does the test lamp illuminate?
Go to Step 24
Go to Step 26
20
Repair the open circuit or high resistance on the
thermo relay voltage feed circuits between the
thermo relay (pin 2 of X-15 connector) and ECM
(10A) fuse (EB-4), then thermo relay (pin 3 of X-15
connector) and A/C (10A) fuse (EB-13).
Did you complete the repair?
Go to Step 39
21
Repair the open circuit or high resistance on thermo
relay input circuit between the ECM (pin 33 of C-56
connector) and the thermo relay (pin 1 of X-15
connector).
Did you complete the repair?
Go to Step 39
22
Repair the open circuit or high resistance on the
pressure switch voltage feed circuit between the
thermo relay (pin 4 of X-15 connector) and pressure
switch (pin 1 of C-24) connector.
Did you complete the repair?
Go to Step 39
23 1. Test the voltage feed circuit between the
pressure switch (pin 2 of C-24 harness
connector) and electronic thermostat (pin 2 of C-
55 connector) for an open or high resistance.
2. Repair the circuit as necessary.
Did you find and correct the condition?
Go to Step 39
Go to Step 28
24
1. Test the electronic thermostat switching circuit
between the electronic thermostat (pin 1 of C-55
connector) and the A/C switch (pin 5 of B-57
connector) for an open or high resistance.
2. Repair the circuit as necessary.
Did you find and correct the condition?
Go to Step 39
Go to Step 30
25
Repair the open or high resistance on the voltage
feed circuit on the electronic thermostat between the
A/C (10A) fuse (EB-13) and the electronic
thermostat (pin 3 of C-55 connector).
Did you complete the repair?
Go to Step 39
26
1. Test the A/C switch ground circuit between the
A/C switch (pin 1 of B-57 connector) and blower
motor switch (pin 1 of B-13 connector) for an
open or high resistance.
2. Repair the circuit as necessary.
Did you find and correct the condition?
Go to Step 39
Go to Step 31

6E-248 Engine Control System (4JH1)
Step Action
Value(s)
Yes
No
27
1. Turn OFF the ignition.
2. Inspect for an intermittent and for poor
connections at the thermo relay terminals (pins
1, 2, 3 and 4 of X-15 connector).
3. Repair the connection(s) as necessary.
Did you find and correct the condition?
Go to Step 39
Go to Step 33
28
1. Turn OFF the ignition.
2. Inspect for an intermittent and for poor
connections at the harness connector of the
pressure switch (pins 1 and 2 of C-24 connector).
3. Repair the connection(s) as necessary.
Did you find and correct the condition?
Go to Step 39
Go to Step 34
29
1. Turn OFF the ignition.
2. Inspect for an intermittent and for poor
connections at the harness connector of the
electronic thermostat (pins 1, 2 and 3 of C-55
connector).
3. Repair the connection(s) as necessary.
Did you find and correct the condition?
Go to Step 39
Go to Step 35
30
1. Turn OFF the ignition.
2. Inspect for an intermittent and for poor
connections at the harness connector of the A/C
switch (pins 1 and 5 of B-57 connector).
3. Repair the connection(s) as necessary.
Did you find and correct the condition?
Go to Step 39
Go to Step 36
31
1. Turn OFF the ignition.
2. Inspect for an intermittent and for a poor
connection at the harness connector of the
blower motor switch (pin 1 of B-13 connector).
3. Repair the connection(s) as necessary.
Did you find and correct the condition?
Go to Step 39
Go to Step 37
32
1. Turn OFF the ignition.
2. Inspect for an intermittent and for a poor
connection at the harness connector of the ECM
(pin 33 of C-56 connector).
3. Repair the connection(s) as necessary.
Did you find and correct the condition?
Go to Step 39
Go to Step 38
33
Replace the thermo relay.
Did you complete the replacement?
Go to Step 39
34
Replace the pressure switch. Refer to Heating and
Air Conditioning section.
Did you complete the replacement?
Go to Step 39
35
Replace the electronic thermostat. Refer to Heating
and Air Conditioning section.
Did you complete the replacement?
Go to Step 39
36
Replace the A/C switch. Refer to Heating and Air
Conditioning section.
Did you complete the replacement?
Go to Step 39
37
Replace the blower motor switch. Refer to Heating
and Air Conditioning section.
Did you complete the replacement?
Go to Step 39
38
Important: Replacement ECM must be
programmed.
Replace the ECM. Refer to Engine Control Module
(ECM) Replacement in this section.
Did you complete the replacement?
Go to Step 39

Engine Control System (4JH1) 6E-249
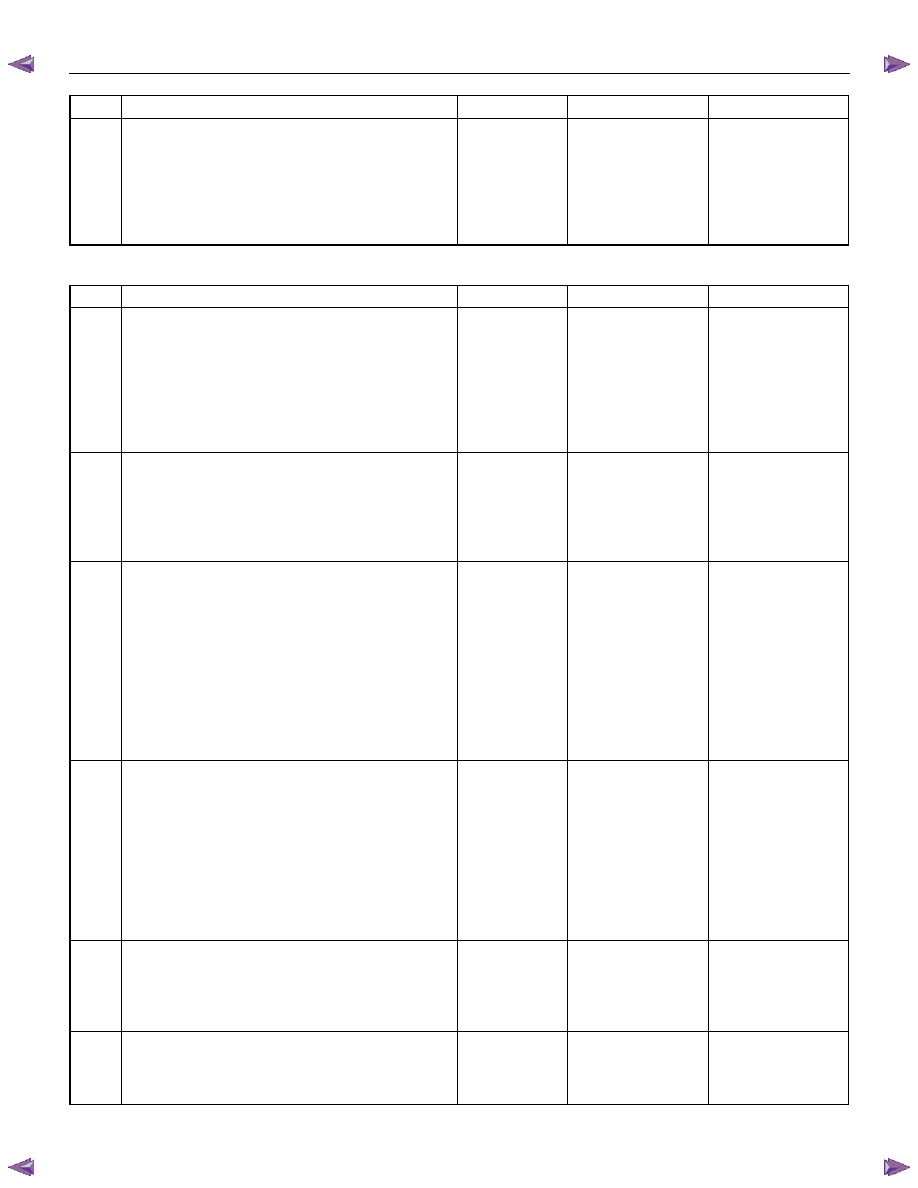
Step Action
Value(s)
Yes
No
39 1. Reconnect all previously disconnected fuse,
relay or harness connector(s).
2. Turn OFF the ignition for 30 seconds.
3. Turn ON the ignition, with the engine OFF.
4. Turn ON the blower motor switch.
Does the blower motor turn ON and operate
correctly?
Go to Char 1 of 2
Step 4
Refer to Applicable
Diagnostic Chart in
Heating & Air
Conditioning
Section
Chart 2 of 2 without heater
Step Action
Value(s)
Yes
No
1
1. Turn OFF the ignition.
2. Replace the thermo relay with the horn relay or
replace with a known good relay.
3. Turn OFF the blower motor switch.
4. Turn OFF the A/C switch.
5. Turn ON the ignition, with the engine OFF.
Does the A/C Request Signal parameter indicate
OFF?
Go to Step 37
Go to Step 2
2
1. Turn OFF the ignition.
2. Remove the thermo relay from the engine room
relay block.
3. Turn ON the ignition, with the engine OFF.
Does the A/C Request Signal parameter indicate
OFF?
Go to Step 3
Go to Step 5
3
1. Turn OFF the ignition.
2. Reinstall the thermo relay.
3. Remove the radiator grille in order to access the
pressure switch.
4.
Disconnect the pressure switch harness
connector (C-24).
5. Turn OFF the blower motor switch.
6. Turn OFF the A/C switch.
7. Turn ON the ignition, with the engine OFF.
Does the A/C Request Signal parameter indicate
OFF?
Go to Step 7
Go to Step 6
4
1. Turn OFF the ignition.
2. Remove the glove box in order to access the
electronic thermostat.
3. Back probe a test lamp between the electronic
thermostat harness (pin 2 of C-55 connector) and
battery voltage.
4. Turn ON the blower motor switch.
5. Turn OFF the A/C switch.
6. Keep the ignition OFF.
Does the test lamp illuminate?
Go to Step 8
Go to Step 9
5
Repair the short to battery or ignition voltage on the
thermo relay signal input circuit between the thermo
relay (pin 1 of X-15 connector) and the engine
control module (ECM) (pin 33 of C-56 connector).
Did you complete the repair?
Go to Step 43
6
Repair the short to ground between the thermo relay
(pin 5 of X-15 connector) and pressure switch (pin 1
of C-24 connector).
Did you complete the repair?
Go to Step 43

Нет комментариевНе стесняйтесь поделиться с нами вашим ценным мнением.
Текст