Isuzu KB P190. Manual — part 939

Exhaust System – V6
Page 6F – 8
N O T E :
• Support the exhaust system at all times.
• Clean the threads of the attaching bolts, nuts,
studs and flanges with a suitable cleaning
solvent.
• Apply a high temperature anti-seize
compound to the manifold front pipe flange
joint studs, then align the flange over the
studs.
Reinstallation
1. Install any removed O2 sensors, Refer to 6C1 – 1 Engine Management General Info.
2. Position the centre exhaust pipe into location under the vehicle.
3. Install the two rear exhaust flange nuts and bolts (9).
4. Position the front exhaust pipes into location under the vehicle.
5. Install the centre exhaust pipes into the rubber mounts (6).
6. Install the exhaust flange fixing nuts (1), three each bank.
7. Install the rear exhaust pipe flange nuts (7), two each bank.
8. Reconnect the O2 sensor harness connectors (4), two each bank.
9. Install the two front torsion bar springs, Refer to 3C Suspension.
10. Install the suspension cross member, Refer to 7B1 Manual transmission.
11. Reconnect the battery ground cable.
O2 Sensor
tightening torque. . . . . . . . . . . . . .50 Nm
Front Exhaust Flange Nuts
tightening torque. . . . . . . . . ...40.0 – 60.0 Nm
Centre Exhaust Flange Nuts
tightening torque. . . . . . . . . . . . . .43 Nm
Rear Exhaust Flange Nuts
tightening torque. . . . . . . . . . . . . .43 Nm
Exhaust System – V6
Page 6F – 9
3
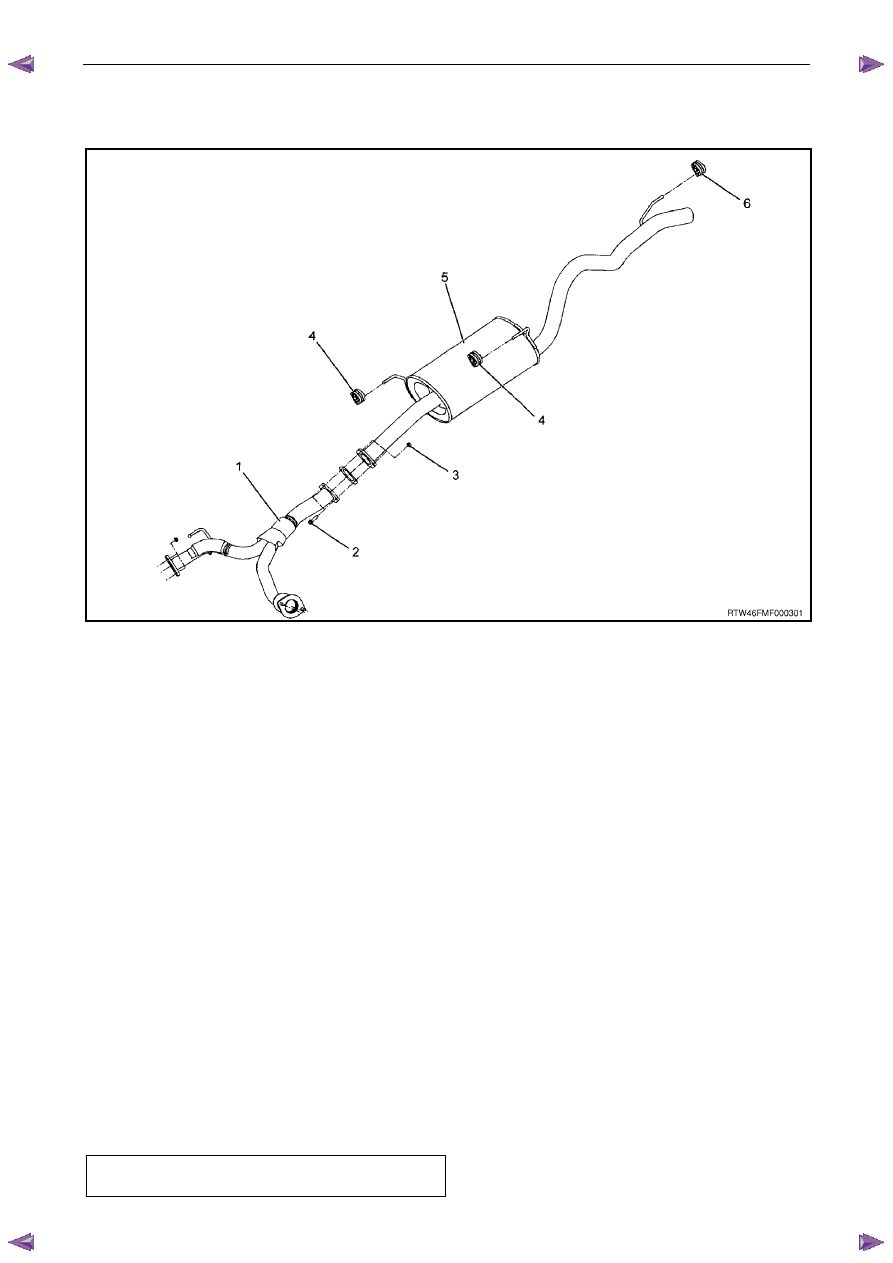
Silencer and Rear Exhaust Pipe
Figure 6F– 5
1
Centre Exhaust Pipe
2
Exhaust Flange Bolts
3
Exhaust Flange Nuts
4
Exhaust Silencer Mounting Rubber
5
Exhaust Silencer and Tail Pipe
6
Rear Exhaust Pipe Mounting Rubber
Removal
1. Disconnect the battery ground cable.
2. Remove the exhaust flange bolts (2) and nuts (3).
3. Remove the silencer and rear exhaust pipe mounting rubbers (4 and 6).
4. Remove the silencer and exhaust pipe from the vehicle.
N O T E :
• Support the exhaust system at all times.
• Clean the threads of the attaching bolts, nuts,
studs and flanges with a suitable cleaning
solvent.
Reinstallation
1. Position the silencer and exhaust pipe into the vehicle.
2. Install the silencer and rear exhaust pipe mounting rubbers (4 and 6).
3. Install the exhaust pipe flange bolts (2) and nuts (3).
4. Reconnect the battery ground cable.
Rear Exhaust Flange Nuts
tightening torque. . . . . . . . . . . . . .43 Nm
Exhaust System – V6
Page 6F – 10
4
Torque Wrench Specifications
. . . . . . . . . . . . . . . . . . . . . . . . . . . . . . Nm
Front Exhaust Flange Nuts. . . . . . . . . . . . . . . ...40.0 – 60.0
Centre Exhaust Flange Nuts . . . . . . . . . . . . . . . . . ...43.0
Rear Exhaust Flange Nuts . . . . . . . . . . . . . . . . . . ..43.0
O2 Sensor . . . . . . . . . . . . . . . . . . . . . . . . ...50.0
SECTION 7
TRANSMISSION
TABLE OF CONTENTS
TRANSMISSION 7
MANUAL TRANSMISSION MSG MUA MUX MODELS
ISUZU KB P190 2007
Нет комментариевНе стесняйтесь поделиться с нами вашим ценным мнением.
Текст