Isuzu KB P190. Manual — part 601

6E–234
ENGINE DRIVEABILITY AND EMISSIONS
12
Visually/physically inspect the secondary ignition
wires. Check for the following conditions:
• Verify that all ignition wire resistance are less than
the specified value.
• Verify that ignition wires are correctly routed to
eliminate cross-fitting.
• Verify that ignition wires are not arcing to ground.
Spraying the secondary ignition wires with a light
mist of water may help locate an intermittent
problem.
Was a problem found?
#1 cyl. 4.4k
Ω
#2 cyl. 3.6k
Ω
#3 cyl. 3.1k
Ω
#4 cyl. 2.8k
Ω
Verify repair
Go to Step 13
13
1. Disconnect the spark plug high tension cable from
No.1 spark plug.
2. Install a spark tester at the end of the
disconnected ignition coil.
3. Clip the spark tester to a good ground.
4. Observe the spark tester while the engine is
cranking.
Was a crisp blue spark observed? (Only one or two
sparks followed by no result is considered the same
as “No Spark”.)
—
Go to Step 21
Go to Step 14
14
1. Disconnect the ignition coil harness connector.
2. Check for an open or short circuit between the
ignition coil and the ECM.
Was a problem found?
—
Verify repair
Go to Step 15
15
1. Ignition “On”.
2. Using a Digital Voltmeter (DVM) check the ignition
wire coil at the ignition coil harness connector.
Was the voltage equal to the specified value?
Battery
voltage
Go to Step 16
Verify repair
16
1. Ignition “Off”.
2. With DVM, check for an open in the ground wire at
the ignition coil harness connector.
Was the ground wire OK?
—
Go to Step 17
Verify repair
17
Replace the ignition coil, verify the repair.
Attempt to start the engine.
Is there still a problem?
—
Go to Step 18
Verify repair
18
Use an ohmmeter to check the ignition coil primary
winding resistance.
Was the primary winding resistance approximately
equal to the specified value?
0.8-18k
Ω
Go to Step 19
Go to Step 20
19
Use an ohmmeter to check the ignition coil secondary
winding resistance.
Was the primary winding resistance hear around the
to the specified value?
2.5k
Ω
Go to Step 21
Go to Step 20
20
Replace the ignition coil.
—
Verify repair
—
21
1. Remove the spark plugs from all cylinders.
2. Visually inspect the spark plug electrodes.
3. Replace any spark plugs with loose or missing
electrodes or cracked insulators.
Did your inspection reveal any spark plugs exhibiting
excessive fouling?
—
Correct the
fouling
condition
Go to Step 22
Step
Action
Value(s)
Yes
No

ENGINE DRIVEABILITY AND EMISSIONS
6E–235
22
Perform the procedure in Fuel System Pressure Test
(Refer to 6E-108 “Fuel System Diagnosis”) to
determine if there is a problem with fuel delivery.
Was a problem found?
—
Verify repair
Go to Step 23
23
Refer to 6E-108 page “Fuel System Diagnosis”
to
determine if there is a problem with fuel delivery.
Was a problem found?
—
Verify repair
Go to Step 24
24
Check for the following engine mechanical problems
(refer to Engine Mechanical):
• Low compression
• Leaking cylinder head gaskets
• Worn camshaft
• Camshaft drive belt slipped or stripped
Was a problem found?
—
Verify repair
Go to Step 25
25
1. Review all diagnostic procedures within this table.
2. If all procedures have been completed and no
malfunctions have been found, review/inspect the
following:
• Visual/physical inspection
• Tech 2 data
• All electrical connections within a suspected
circuit and/or system
Was a problem found?
—
Verify repair
Go to Step 26
26
Is the ECM programmed with the latest software
release?
If not, download the latest software to the ECM using
the “SPS (Service Programming System)”.
Was the problem solved?
—
Verify repair
Go to Step 27
27
Replace the ECM.
Is the action complete?
IMPORTANT: The replacement ECM must be
programmed. Refer to section of the Service
Programming System (SPS) in this manual.
Following ECM programming, the immobilizer system
(if equipped) must be linked to the ECM. Refer to
section 11 “Immobilizer System-ECM replacement” for
the ECM/Immobilizer linking procedure.
—
Verify Repair
—
Step
Action
Value(s)
Yes
No

6E–236
ENGINE DRIVEABILITY AND EMISSIONS
HARD START SYMPTOM
DEFINITIONS: Engine cranks, but does not start for a long time. Does eventually start, of may start and then
immediately stall.
Step
Action
Value(s)
Yes
No
1
Was the “On-Board Diagnostic (OBD) System Check”
performed?
—
Go to Step 2
Go to OBD
System Check
2
1. Perform a bulletin search.
2. If a bulletin that addresses the symptom is found,
correct the condition as instructed in the bulletin.
Was a bulletin found that addresses the symptom?
—
Verify repair
Go to Step 3
3
Was a visually/physical check performed?
—
Go to Step 4
Go to Visual /
physical Check.
4
1. Visually/physically inspect for the following
conditions:
• Restriction of air intake system. Check for a
restricted air filter element, or foreign objects
blocking the air intake system
• Check for objects blocking the IAC passage or
throttle bore, excessive deposits in the throttle
bore and on the throttle plate
• Check for a condition that causes a large
vacuum leak, such as an incorrectly installed or
faulty crankcase ventilation hose/brake booster
hose.
Was a problem found?
—
Verify repair
Go to Step 5
5
1. Using a Tech 2, display the IAC value.
2. Check for a faulty, plugged, or sticking IAC
operation.
Was the problem found?
—
Verify repair
Go to Step 6
6
Check engine coolant temperature (ECT) sensor for
shift in value.
1. After 8 hours with hood up and the engine not
running, connect the Tech 2.
2. Ignition On, engine not running.
3. Using Tech 2, compare Engine Coolant
Temperature to Intake Air Temperature.
Are ECT and IAT within the specified value of each
other?
±5°C
Go to Step 8
Go to Step 7
ENGINE DRIVEABILITY AND EMISSIONS
6E–237
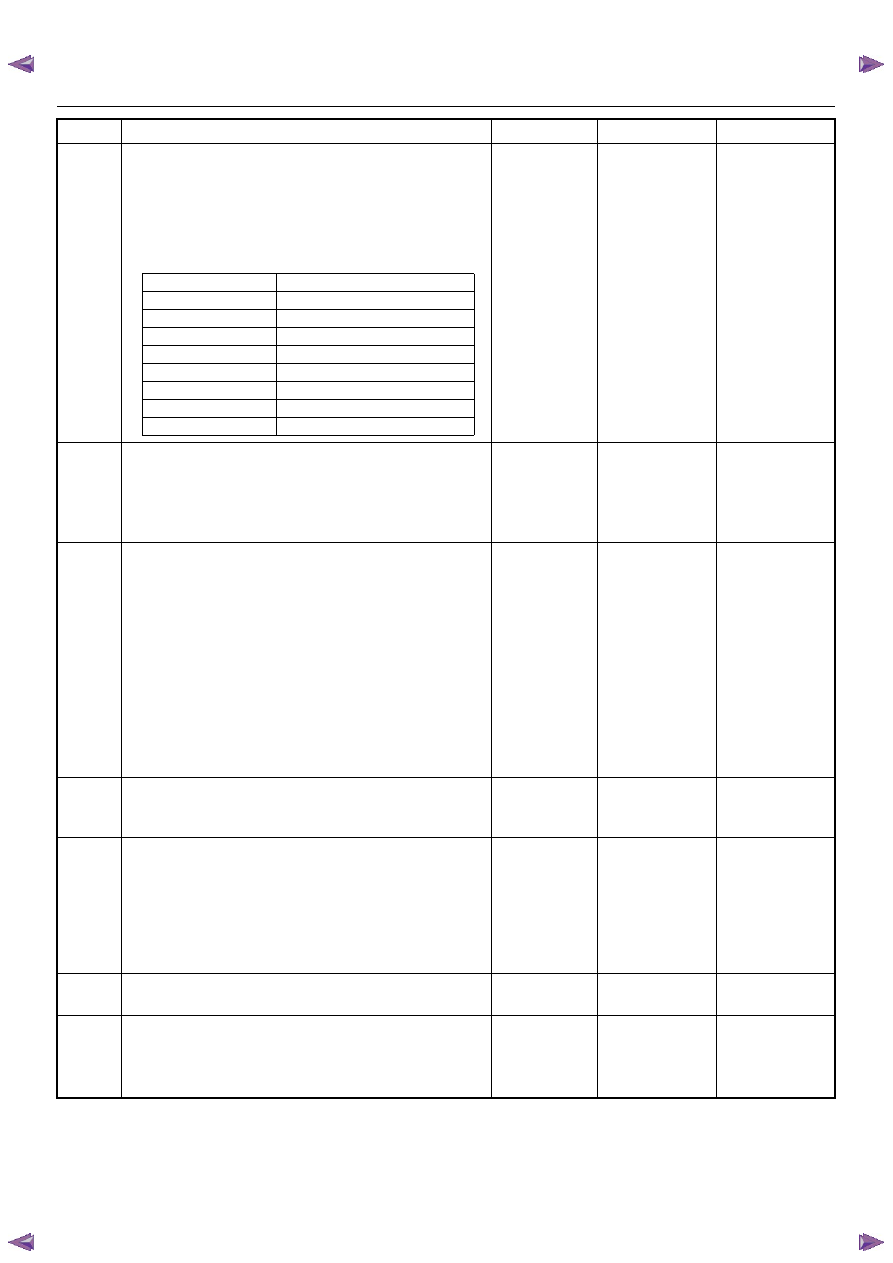
7
1. Using a Tech 2, display the engine coolant
temperature and note the value.
2. Check the resistance of the engine coolant
temperature sensor.
Is the actual resistance near the resistance value in
the chart for the temperature that was noted?
—
Go to Step 8
Replace the
ECT sensor.
Verify repair
8
1. Using a Tech 2, display the MAP sensor value in
comparison with atmosphere temperature.
2. Check for a faulty, plugged, or incorrectly installed
MAP sensor.
Was the problem found?
—
Verify repair
Go to Step 9
9
Visually/physically inspect all spark plug high-tension
cables. Check for the following conditions:
• Verify that the resistance of all spark plug high-
tension cables are less than the specified value.
• Verify that the all spark plug high-tension cables are
correctly fitted to eliminate cross-fitting.
• Verify that the all spark plug high-tension cables are
not arcing to ground.
Spraying the spark plug high-tension cables with a
light mist of water may help locate an intermittent
problem.
Was a problem found?
#1 cyl. 4.4k
Ω
#2 cyl. 3.6k
Ω
#3 cyl. 3.1k
Ω
#4 cyl. 2.8k
Ω
Verify repair
Go to Step 10
10
Check for proper ignition voltage output with a spark
tester.
Was the problem found?
—
Verify repair
Go to Step 11
11
1. Remove the spark plugs and check for gas or oil
fouling cracks, wear, improper gap, burned
electrodes, heavy deposits, or improper heat
range.
2. If spark plugs are fouled, the cause of fouling must
be determined before replacing the spark plugs.
Was a problem found?
—
Verify repair
Go to Step 12
12
Check for a loose ignition control module ground.
Was a problem found?
—
Verify repair
Go to Step 13
13
1. Check the ignition coil secondary resistance.
2. Replace the coil if it is greater than the specified
resistance.
Did the coil require replacement?
2.5k
Ω
Verify repair
Go to Step 14
Step
Action
Value(s)
Yes
No
Temperature (°C)
Resistance (
Ω) (Approximately)
-20
26740
0
9120
20
3500
40
1464
60
664
80
333
100
175
120
102
Нет комментариевНе стесняйтесь поделиться с нами вашим ценным мнением.
Текст