Suzuki Grand Vitara JB627. Manual — part 74
1B-2 Aux. Emission Control Devices:
Diagnostic Information and Procedures
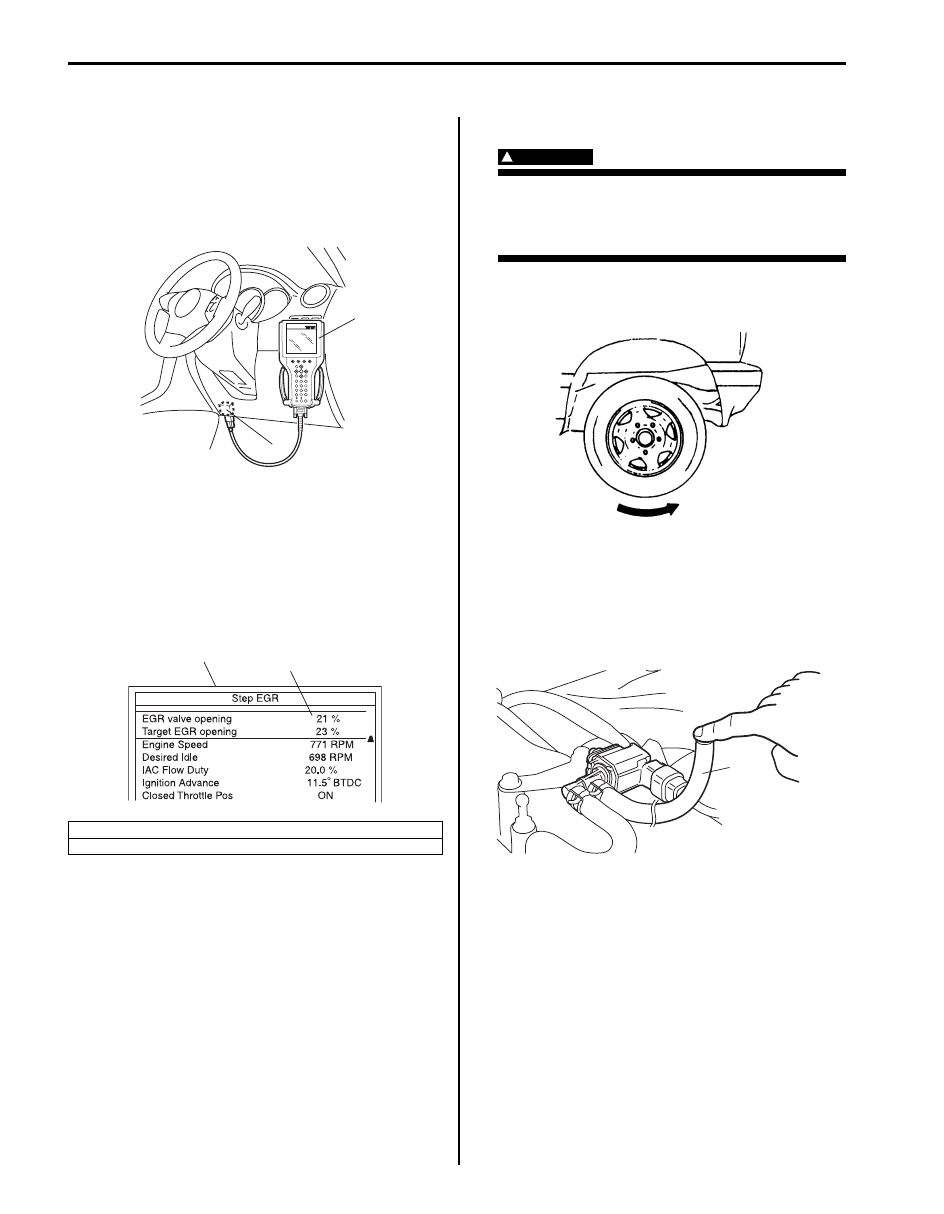
EGR System Inspection (If Equipped)
S6JB0B1204001
1) Connect SUZUKI scan tool to DLC (1) with ignition
switch turned OFF.
Special tool
(A): SUZUKI scan tool
2) Start engine and warm it up to normal operating
temperature.
3) With engine idling (without depressing accelerator
pedal), open EGR valve by using “MISC. TEST”
mode. In this state, according as EGR valve opening
increases engine idle speed drops. If not, possible
cause is clogged EGR gas passage, stuck or faulty
EGR valve.
EVAP Canister Purge System Inspection
S6JB0B1204002
WARNING
!
The front wheels rotates when servicing the
vehicle with the 4WD system. Therefore, do
not service near the front wheels. Or, there is
a possibility of the severe injury.
1) Warm up engine to normal operating temperature.
2) Hoist vehicle so that all wheels rotate freely.
3) Set M/T in “Neutral” or A/T in “P” position and
parking brake.
4) Disconnect purge hose (1) from purge pipe.
5) Place finger against the end of disconnected hose
(1) and check that vacuum is not felt there when
engine is running at idle speed.
6) Release parking brake lever, set M/T in “1st” or A/T
in “L”.
7) Also check that vacuum is felt when engine speed is
increased to higher than about 1,500 r/min. and keep
it for 3 min. or more. If check result is not described
in Steps 5) and 7), check EVAP canister purge valve,
wire harness and vacuum passage.
1. SUZUKI scan tool display
2. EGR valve opening (0: Close, 100: Full Open)
(A)
1
I5JB0C120001-02
1
2
I6JB01120022-01
IYSQ01124001-01
1
I6JB01120010-01
Aux. Emission Control Devices: 1B-3
Repair Instructions
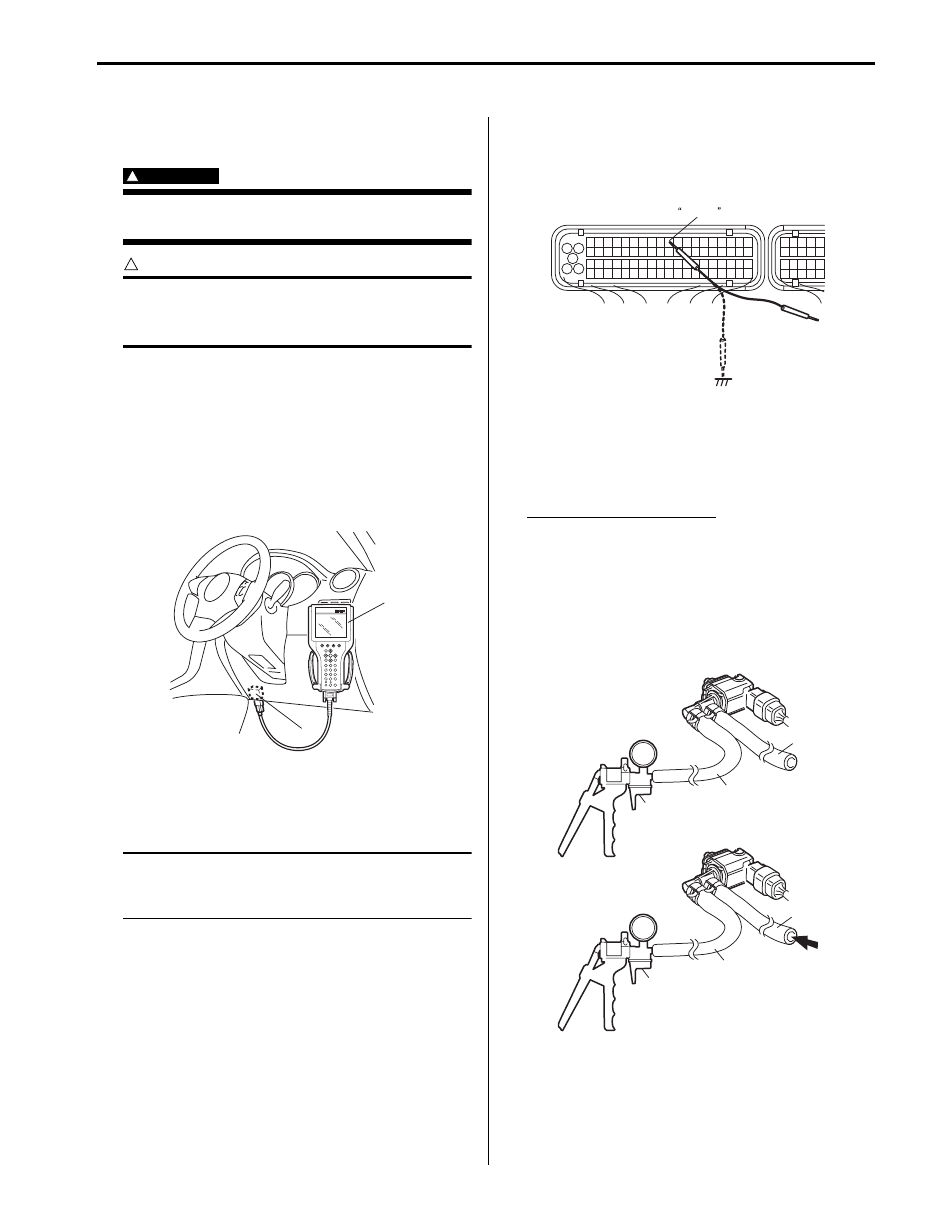
EVAP Canister Purge Valve and Its Circuit
Inspection
S6JB0B1206001
WARNING
!
Do not apply vacuum by mouth; otherwise
harmful fuel vapor can be breathed in.
CAUTION
!
Do not apply vacuum more than –86 kPa (–
12.47 psi); otherwise EVAP canister purge
valve could be damaged.
1) Prepare to operate EVAP canister purge valve as
follows.
When using SUZUKI scan tool:
a) Connect SUZUKI scan tool to DLC with ignition
switch OFF and disconnect vacuum hoses from
each pipe.
Special tool
(A): SUZUKI scan tool
b) Turn ignition switch ON, clear DTC and select
“MISC TEST” mode on SUZUKI scan tool.
When not using SUZUKI scan tool:
NOTE
Before performed this check, be sure to read
the “Precautions of ECM Circuit Inspection in
Section 1A”.
a) Disconnect purge valve vacuum hoses from
intake manifold and purge pipe.
b) Remove ECM cover.
c) Connect special tool between ECM and ECM
connector referring to “Inspection of ECM and Its
Circuits in Section 1A”
d) Turn ON ignition switch.
Using service wire, ground “C37-10” terminal
circuit of special tool (valve ON: “B”) and
unground it (valve OFF: “A”).
2) Check purge valve for operation and vacuum
passage for clog when valve is switched ON and
OFF by using SUZUKI scan tool or service wire.
If check result is not described, check vacuum
hoses, purge valve, wire harness and connections.
EVAP canister purge valve
Valve OFF [A]: When vacuum (–53 kPa (–7.69 psi)
to –67 kPa (–9.72 psi)) is applied to hose (1),
vacuum is maintained.
Valve ON [B]: When vacuum is applied to hose
(1), air goes into hose (2).
Special tool
(A): 09917–47011
(A)
1
I5JB0C120001-02
C37-10
“A”
“B”
I5JB0C120002-02
2
2
1
1
(A)
(A)
[A]
[B]
I6JB01120011-01
1B-4 Aux. Emission Control Devices:
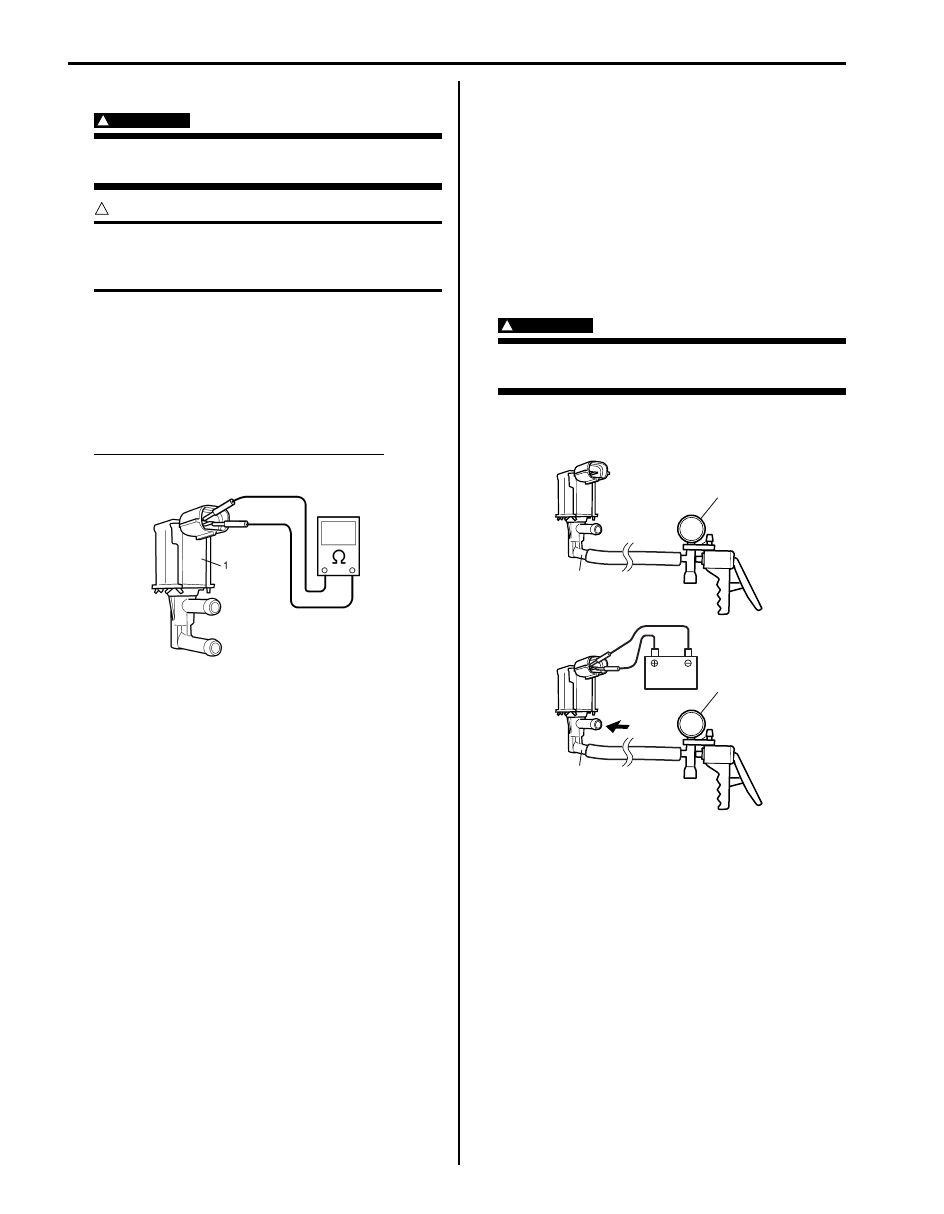
EVAP Canister Purge Valve Inspection
S6JB0B1206002
WARNING
!
Do not apply vacuum by mouth; otherwise
harmful fuel vapor can be breathed in.
CAUTION
!
Do not apply vacuum more than 86 kPa
(12.47 Psi); otherwise EVAP canister purge
valve could be damaged.
1) With ignition switch OFF, disconnect coupler from
canister purge valve.
2) Check resistance between two terminals of EVAP
canister purge valve (1).
If resistance is as specified, proceed to next
operation check. If not, replace EVAP canister purge
valve.
Resistance of EVAP canister purge valve
28 – 35
Ω at 20 °C (68 °F)
3) Remove EVAP canister purge valve from intake
manifold.
4) With coupler disconnected, apply vacuum (–53 kPa
(–7.69 psi) to –67 kPa (–9.72 psi)) to pipe (1) using a
special tool. Check that vacuum is manifold. If
vacuum can not be maintained, replace EVAP
canister purge valve.
5) In this state, connect 12 V-battery to EVAP canister
purge valve terminals.
If vacuum can not be maintained, EVAP canister
purge valve is in good condition.
If maintained, replace EVAP canister purge valve.
WARNING
!
Do not suck the through valve. Fuel vapor
inside valve is harmful.
Special tool
(A): 09917–47011
6) Connect vacuum hoses.
7) Connect EVAP canister purge valve coupler
securely.
I6JB01120012-01
1
1
(A)
(A)
I3RB0A120007-01
Aux. Emission Control Devices: 1B-5
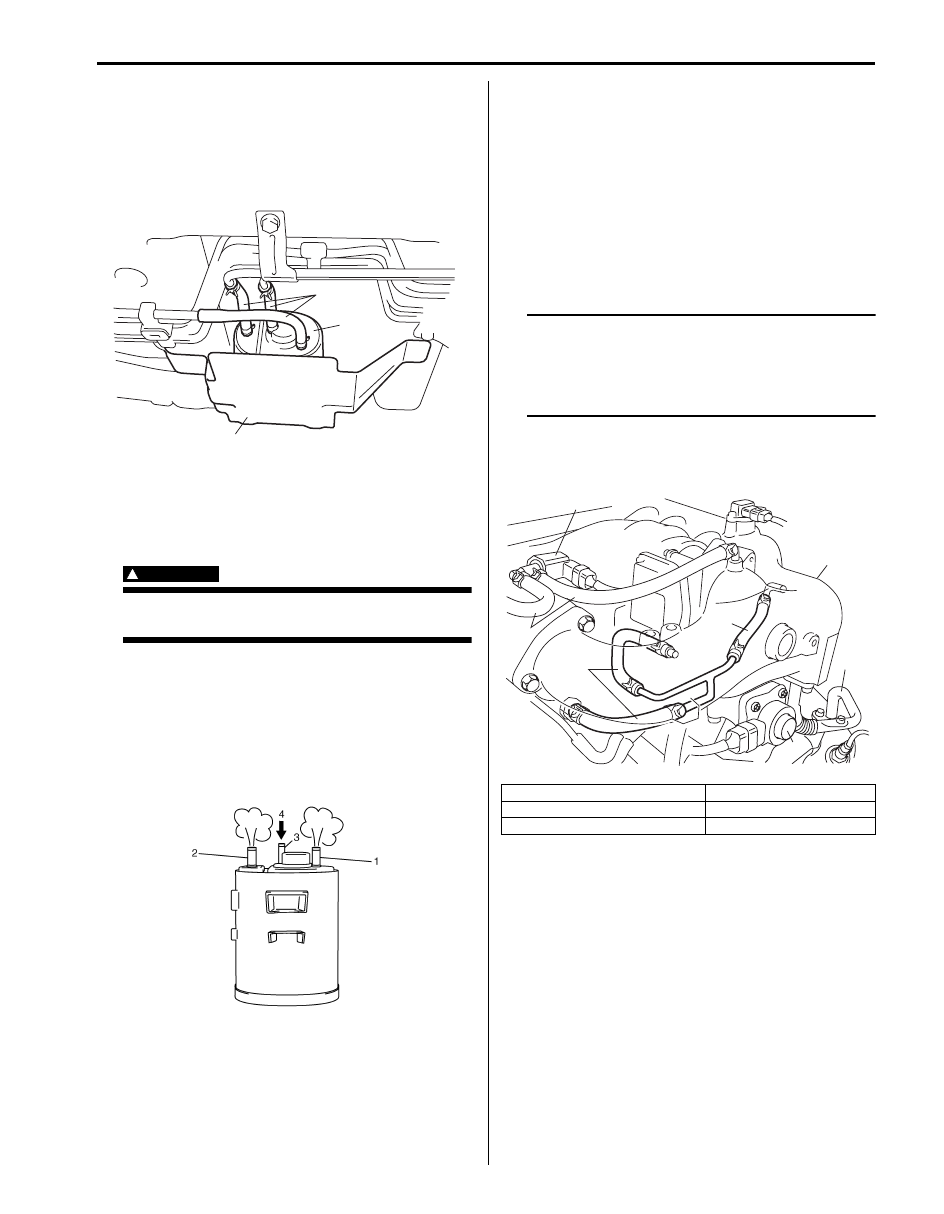
EVAP Canister Removal and Installation
S6JB0B1206003
Removal
1) Hoist vehicle.
2) Disconnect hoses (1) from EVAP canister (2).
3) Remove EVAP canister with its bracket (3).
4) Remove EVAP canister from its bracket.
5) Disconnect hoses from EVAP canister.
EVAP Canister Inspection
S6JB0B1206004
WARNING
!
Do not suck nozzles on EVAP canister.
Fuel vapor inside EVAP canister is harmful.
1) Check outside of EVAP canister visually.
2) Disconnect vacuum hoses from EVAP canister.
3) Check that there is no restriction of flow through
purge pipe (1) and air pipe (2) when air is blown (4)
into tank pipe (3).
If any faulty condition is found in this inspection,
replace EVAP canister.
Vacuum Passage Inspection
S6JB0B1206005
1) Start engine and run it at idle speed.
2) Disconnect vacuum hose from EVAP canister purge
valve.
3) With finger placed on the hole of disconnected hose,
check if vacuum is applied.
If it is not applied, clean vacuum passage by blowing
compressed air.
PCV Hose Inspection
S6JB0B1206006
NOTE
Be sure to check that there is no obstruction
in PCV valve or its hoses before checking
engine idle speed / IAC duty for obstructed
PCV valve or hose hampers its accurate
checking.
Check hoses for connection, leakage, clog, and
deterioration.
Replace as necessary.
1
2
3
I5JB0C120003-01
I2RH0B120001-01
1. EVAP canister purge valve
4. EGR pipe (if equipped)
2. EVAP canister purge valve hose
5. EGR valve (if equipped)
3. Intake collector
6. PCV hose
1
2
3
6
6
4
5
I6JB01120020-01
Нет комментариевНе стесняйтесь поделиться с нами вашим ценным мнением.
Текст