Suzuki: Engine K6A-YH6. Manual — part 14

7-10
REPAIR
7
7.4 Cooling System
Water Pump
Removal and Installation
Figure 7-25
1.
Remove cap screws (2) and water pump (1).
Figure 7-26
2.
Rotate the water pump pulley and check for noisy
operation, excessive resistance, or play in the pulley
shaft. If any abnormal condition is found, replace the
water pump.
Installation Notes
Always use new O-rings, gaskets, and seals.
Install the water pump with new O-ring, by reversing the
order of removal.
Thermostat
Removal and Installation
Figure 7-27
1.
Remove cap screws (1).
2.
Remove filler neck (2).
Figure 7-28
3.
Remove thermostat (3).
4.
Inspect and test thermostat. Replace as needed.
(See “Thermostat Test” on page 5-3.)
Installation Notes
Clean thermostat housing and filler neck mounting
surfaces of debris before installation.
Install thermostat by reversing order of removal.
TN0726
1
2
TN0432
TN0701
2
1
TN0705
3

REPAIR
7-11
7
Water Temperature Sensor
Removal and Installation
Figure 7-29
1.
Remove water temperature sensor (1) and
O-ring (2).
2.
Inspect water temperature sensor. Replace as
needed.
Installation Notes
Always use new O-rings, gaskets, and seals.
Install water temperature sensor by reversing the order of
removal.
Thermostat Housing
Removal and Installation
Figure 7-30
1.
Remove thermostat. (See “Thermostat” on
page 7-10.)
2.
Remove cap screw (1) and bracket (3).
3.
Remove nuts (4) and thermostat housing (2).
Figure 7-31
4.
Remove thermostat housing gasket (5).
5.
Inspect thermostat housing for damage. Replace as
needed.
Installation Notes
Clean cylinder head and thermostat housing mating
surfaces before installation.
Always use new O-rings, gaskets, and seals.
Install thermostat housing by reversing the order of
removal.
Install thermostat. (See “Thermostat” on page 7-10.)
TN0701
1
2
TN0707
1
2
3
4
TN0708
5

7-12
REPAIR
7
7.5 Front Cover, Timing Chain,
and Tensioner
Cam Angle Sensor
Removal and Installation
Figure 7-32
1.
Remove cap screw (1).
2.
Remove cam angle sensor (2) and O-ring (3).
3.
Inspect cam angle sensor. Replace as needed.
Installation Note
Always use new O-rings, gaskets, and seals.
Install cam angle sensor by reversing the order of
removal.
Front Cover
Removal
1.
Remove ignition coils. (See “Ignition Coils” on
page 7-8.)
2.
Remove spark plugs. (See “Spark Plugs” on
page 7-8.)
3.
Remove PCV valve. (See “PCV Valve” on page 7-4.)
4.
Remove cam cover. (See “Cam Cover” on
page 7-17.)
5.
Remove crankshaft pulley. (See “Crankshaft Pulley”
on page 7-37.)
6.
Remove idler pulley. (See “Idler Pulley” on
page 7-38.)
7.
Remove oil pan. (See “Oil Pan” on page 7-30.)
8.
Remove oil pump pickup. (See “Oil Pump Pickup” on
page 7-31.)
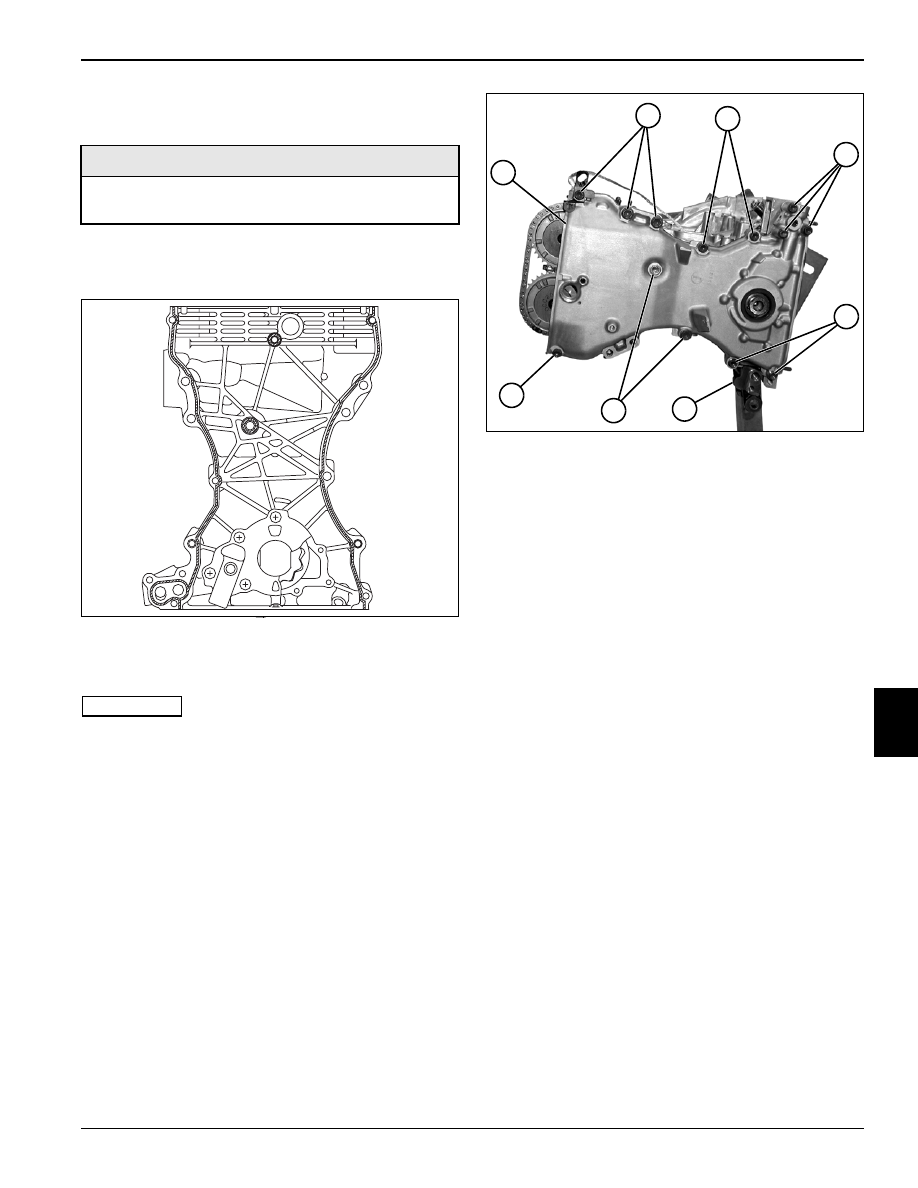
Figure 7-33
9.
Remove idler pulley/alternator bracket (4).
NOTE
Front cover is located on cylinder block with dowel pins.
Cover must be removed straight away from engine.
10. Remove cap screws (2 and 3) and front cover (1).
TN0709
1
2
3
TN0745
2
1
2
3
2
4
2
2
REPAIR
7-13
7
Installation
1.
Clean cylinder head, cylinder block, and front cover
mating surfaces.
Figure 7-34
2.
Apply Three Bond™ 1215 sealant to the front cover
at shaded areas shown.
IMPORTANT
Be sure oil pump inner rotor flats properly engage
with those of the crankshaft timing sprocket.
Figure 7-35
3.
Align dowel pins, oil pump rotor flats, and crankshaft
timing gear. Then install front cover (1).
4.
Install cap screws (2 and 3). Tighten to specification.
Front Cover Torque: 97 lb-in. (11 N•m)
5.
Install oil pump pickup. (See “Oil Pump Pickup” on
page 7-31.)
6.
Install oil pan. (See “Oil Pan” on page 7-30.)
7.
Install idler pulley/alternator bracket (4).
8.
Install idler pulley. (See “Idler Pulley” on page 7-38.)
9.
Install crankshaft pulley. (See “Crankshaft Pulley” on
page 7-37.)
10. Install cam cover. (See “Cam Cover” on page 7-17.)
11. Install PCV valve. (See “PCV Valve” on page 7-4.)
12. Install spark plugs. (See “Spark Plugs” on page 7-8.)
13. Install ignition coils. (See “Ignition Coils” on
Required Materials
Three Bond™ 1215 (Suzuki PN 99000-1080-15A) or
equivalent
TN0386
TN0745
2
1
2
3
2
4
2
2
Нет комментариевНе стесняйтесь поделиться с нами вашим ценным мнением.
Текст