Hummer H1 (2002+). Manual — part 145

________________________________________
Axles, Suspension, and Frame 9-41
®
05745159
7.
Clean part with solvent.
8.
Inspect shaft, slip yokes and U-joints for wear or damage.
9.
Replace worn U-joints. Refer to procedure in this section.
10. Install shield on shaft.
11. Start new center bearing on shaft.
Figure 9-108: Center Bearing Removal/Installation
12. Install retainer on center bearing.
13. Press center bearing on front propeller shaft until seated
against shoulder. Ensure flange on center bearing faces up.
14. Install dust caps on yokes.
15. Coat shaft splines with chassis grease.
NOTE:
Be sure grease fittings on dust caps are aligned with
wide splines in slip yokes.
16. Align and assemble shaft, slip yokes, and dust caps.
17. Lubricate U-joints and slip yokes with chassis grease.
Front Propshaft Installation
1.
Position front shaft on engine mount, axle yoke and trans-
fer case yoke.
2.
Connect transfer case shift rod to transfer case range lever.
3.
Connect front shaft to transfer case yoke with U-bolts and
nuts. Tighten nuts to 13-18 lb-ft (18-24 N•m).
4.
Connect front shaft to front axle yoke with strap and bolts.
Tighten bolts to 13-18 lb-ft (18-24 N•m).
5.
Secure center bearing to engine mount with bolts,
washers, and locknuts. Tighten bolts to 60 lb-ft (81 N•m).
6.
Lubricate propeller shaft U-joints and slip yokes with
chassis grease.
REAR PROPELLER SHAFT SERVICE
Removal
1.
Remove U-bolts, attaching rear shaft to rear axle yoke
(Figure 9-109).
2.
Slide shaft slip yoke out of transfer case extension housing
and remove shaft from vehicle.
Figure 9-109: Rear Propeller Shaft Attachment
3.
Inspect condition of U-joint cross and bearings at each end
of shaft (Figure 9-110). Replace either U-joint if worn,
loose, seized. Refer to U-joint replacement in this section.
Figure 9-110: U-joint Components (Typical)
Installation
1.
Slide propeller shaft slip yoke into extension housing.
2.
Connect shaft to axle yoke with U-bolts, lockwashers and
nuts. Tighten U-bolt nuts to 13-18 lb-ft (18-24 N•m)
3.
Lubricate propeller shaft U-joints.
FRONT
PROPELLER
SHAFT
SHIELD
SHOULDER
CENTER
BEARING
RETAINER
STANDARD
BEARING
PULLER
TRANSFER CASE
EXTENSION
HOUSING
FRONT YOKE
AND U-JOINT
REAR
U-JOINT REAR AXLE
YOKE
REAR PROPELLER
U-BOLT
WASHER
NUT
SHAFT
SNAP RING
REAR SHAFT
YOKE
BEARING
SNAP RING
CROSS
BEARING
GREASE FITTING
CROSS
9-42
Axles, Suspension, and Frame
_________________________________________
®
U-JOINT REPLACEMENT
1.
Remove propeller shaft.
2.
Remove grease fitting from cross (Figure 9-111).
3.
Remove two bearing cups from cross (rear shaft only).
4.
Remove snap rings from bearings in yoke.
5.
Position propeller shaft in vise with 1-1/8 socket between
vise jaw and bearing being removed. Be sure open end of
socket is facing bearing cup (Figure 9-111).
Figure 9-111: U-Joint Cross and Bearing Installation
6.
Place 11/16 socket between opposite bearing and vise jaw.
Be sure open end of socket is facing vise jaw.
7.
Tighten vise to press bearing cup out of yoke. Then
remove bearings from cross.
8.
Reverse position of sockets and press remaining bearing
out of yoke.
9.
Remove cross from yoke.
10. Pack bearing grease into bearings to hold needle rollers in
place.
CAUTION: Be sure grease fitting on cross faces yoke. Dam-
age to fitting will result if improperly installed.
11. Position cross in yoke.
12. Install first bearing in yoke. Verify bearing cup is aligned
with yoke before pressing in with vise. Damage to cross
and bearing will result if misaligned.
13. Place yoke in vise with 11/16 socket between vise jaw and
bearing cup. Then press bearing cup into yoke far enough
to install snap ring.
14. Install remaining bearing in yoke.
15. Place yoke in vise with 11/16 socket between bearing cup
and vise jaw.
16. Press bearing cup into yoke far enough to install snap ring.
17. Press remaining two bearings in slip yoke and install snap rings.
18. Install two additional bearing cups on cross (rear shaft
only).
19. Install grease fitting in cross.
20. Lube joints and yokes as required.
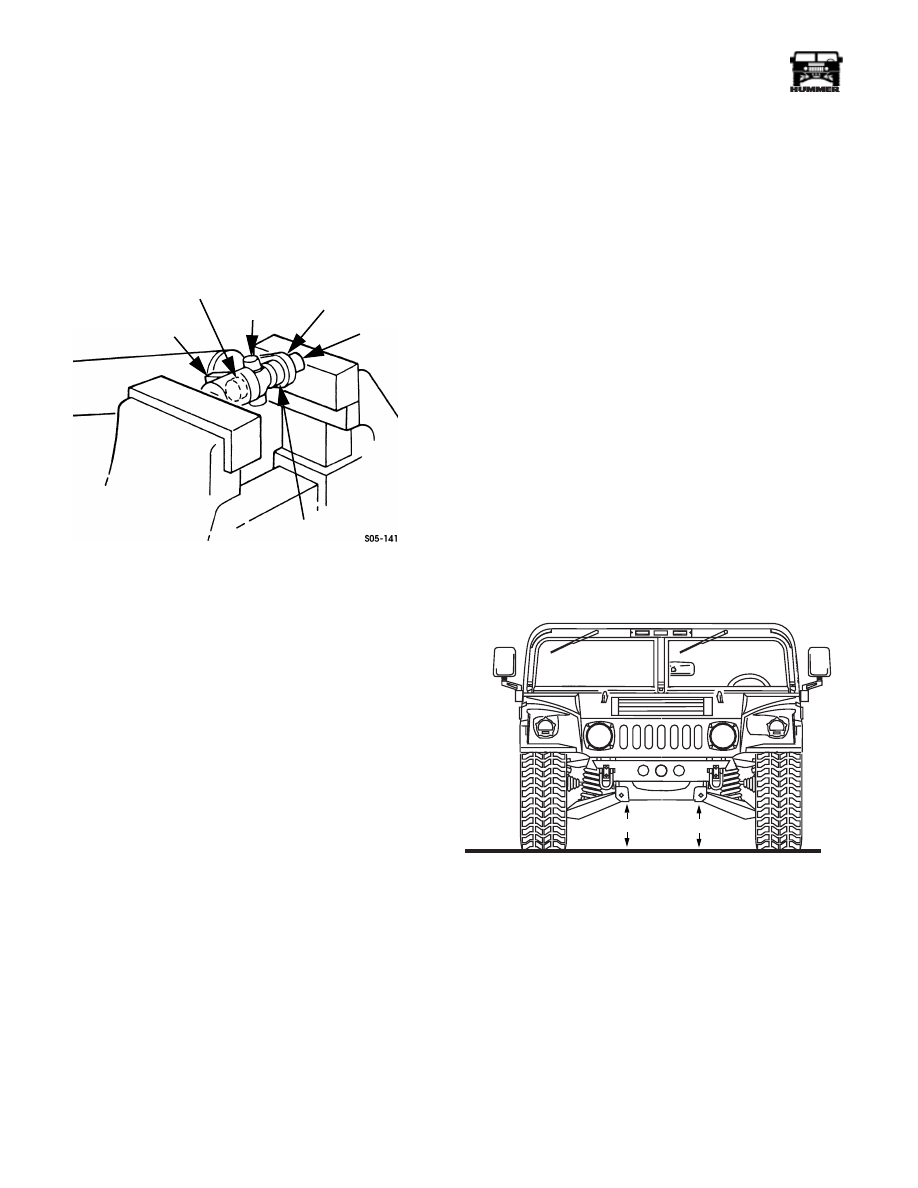
SUSPENSION HEIGHT MEASUREMENT
NOTE:
Before checking suspension height, check the follow-
ing items:
a.
Broken spring coil or shock absorber.
b.
Winch plus other aftermarket accessories installed on
the front end of the vehicle.
c.
Worn out control arm bushings.
d.
Worn out ball joints.
e.
Damaged frame or suspension components.
1.
Check tire pressure, front tires should be at 26 psi and rear
tires at 28 psi, curb weight.
2.
Ensure that tires and rims are original equipment as
supplied by AM General.
3.
Position vehicle on level surface.
4.
Remove any load from vehicle interior or roof rack. Tools,
luggage, recreational equipment, or similar items may
produce faulty measurements if left in the vehicle.
5.
Jounce vehicle front and rear 2-3 times and allow
suspension to settle.
6.
Check suspension height by measuring distance between
bottom edge of each lower control arm front crossmember
bracket and shop floor as indicated by dimension “X”
(Figure 9-112).
Figure 9-112: Suspension Height Measurement
a.
Suspension height is acceptable if height measured at
each side is 16 inches (40.6 cm) or greater and left
right measurements do not differ more than 3/4"
(19mm).
b.
Replace springs only if height measured is less than
16 inches (40.6 cm) at either side, or if right-left
variation exceeds 3/4" (19mm).
LARGE
SOCKET
BEARING
CROSS
SHAFT
YOKE
SMALL
SOCKET
BEARING
X
X

________________________________________
Axles, Suspension, and Frame 9-43
®
05745159
COIL SPRING REPLACEMENT
NOTE:
The procedure for removing and installing all four coil
springs is basically the same. This procedure covers the left
front coil spring.
NOTE:
Various load capacity springs are used in the Hummer
based on powertrain and option packages. Refer to the parts
catalog to select the proper replacement spring for the specific
application.
Removal
1.
Remove wheel (Section 6).
2.
Remove bolt, two washers, and bar link from lower
control arm.
3.
Remove four locknuts, washers, bolts, washers, lower ball
joint, and geared hub from lower control arm (Figure 9-113).
4.
Place jack under lower control arm and raise lower control
arm slightly to relieve tension on shock pin.
5.
Remove locknut, shock pin, washer, and shock absorber
from spring seat and collapse shock absorber.
NOTE:
It may be necessary to loosen lower control arm bolts
to allow lower control arm to be lowered.
6.
Pull geared hub and lower ball joint away from lower
control arm and remove coil spring from lower control
arm and shock absorber.
Installation
NOTE:
Index coil spring in spring pocket for a slight gap 1/16
- 1/8 in. (1.59 - 3.18 mm) when spring is in position.
1.
Install coil spring over shock absorber and onto lower con-
trol arm ensuring end of coil spring fits in spring pocket of
lower control arm (Figure 9-113).
2.
Ensure coil spring is aligned with spring seat flange, and
raise lower control arm.
3.
Extend shock absorber into spring seat and install with
washer, shock pin, and locknut. Tighten locknut to 300 lb-
ft (407 N•m).
4.
Install lower ball joint and geared hub on lower control
arm ensuring lower ball joint is placed below lower
control arm. Secure lower ball joint to lower control arm
with four washers, bolts, washers, and locknuts. Tighten
front locknuts to 37 lb-ft (50 N•m) and rear locknuts to 60
lb-ft. (80 N•m).
5.
Apply thread-locking compound to threads of bolt. Install
bar link on lower control arm with two washers and bolt.
Tighten bolt to 70 lb-ft (95 N•m).
6.
Install wheel (Section 6).
Figure 9-113: Coil Spring Replacement
COIL SPRING
SHOCK PIN
SPRING SEAT
GEARED HUB
LOWER
CONTROL
ARM
BAR LINK
LOWER BALL JOINT
SHOCK ABSORBER
SPRING POCKET
LOWER CONTROL ARM

9-44
Axles, Suspension, and Frame
_________________________________________
®
SHOCK ABSORBER REPLACEMENT
NOTE:
The procedure for removing and installing all shock
absorbers is the same, except rear lower shock pins must be in-
stalled with head of pin facing rearward. This procedure covers
the left front shock absorber.
Removal
1.
Remove two bolts, lockwashers, washers, shock absorber,
and bracket from lower control arm (Figure 9-114).
2.
Remove locknut, shock pin, washer, and shock absorber
from spring seat. Note position of pin for installation.
3.
Compress shock absorber and remove shock absorber and
bracket.
NOTE:
Note alignment of shock absorber and bracket for in-
stallation reference.
4.
Position shock absorber in vise and remove locknut, pin,
washer, and bracket from shock absorber.
Installation
NOTE:
It may be necessary to spread spring seat to allow in-
stallation of shock absorber.
1.
Position shock absorber in vise, and install bracket on
shock absorber with washer, pin, and locknut. Tighten
locknut to 300 lb-ft (407 N•m) (Figure 9-114).
CAUTION: Do not pry or use sharp tools on shock absorber
piston rod. A damaged rod will cause shock failure.
2.
Install shock absorber and bracket through lower control
arm.
3.
Extend shock absorber and secure piston rod end of shock
absorber to spring seat with washer, shock pin, and
locknut. Tighten locknut to 300 lb-ft (407 N•m).
4.
Install bracket on lower control arm with two washers,
lockwashers, and bolts. Tighten bolts to 178 lb-ft (241
N•m).
Figure 9-114: Shock Absorber Replacement
SPRING SEAT
LOWER CONTROL ARM
BRACKET
SHOCK
SHOCK PIN
PIN
ABSORBER
Нет комментариевНе стесняйтесь поделиться с нами вашим ценным мнением.
Текст