Hummer H1 (2002+). Manual — part 175
_____________________________________________________________________
Body 10-71
®
05745159
SOFT TOP SUPPORT ASSEMBLY
Removal
1.
Remove soft top.
2.
Remove interior grab handles.
3.
Remove vinyl wrap and padding from roll cage assembly.
4.
Remove inner door seals.
5.
Drill rivets on front corner filler plates located at top front
of front door openings.
6.
Remove H rails, B- and C-pillar covers.
7.
Remove hardware and door striker from B-pillar.
8.
Remove fasteners securing the windshield frame to
support structure, and rear supports to the body.
9.
Using an overhead hoist, remove the support structure as a
complete assembly.
10. Repair or replace individual pieces as necessary, leaving
hardware loose, so the new pieces can be adjusted to the
structure once the unit is installed.
Installation
1.
Apply sealer to rear support where body contact is made.
2.
Lower structure assembly onto vehicle.
3.
Install hardware and strikers in B-pillar and front and rear
supports.
4.
Install H rail, B- and C-pillar covers. Use body sealer
where removed.
5.
Apply sealer to filler plates and rivet to body using
existing holes.
6.
Tighten hardware on assembly.
7.
Install new inner door seals.
8.
Install padding and vinyl wrap on roll cage assembly.
9.
Install interior grab handles.
10. Install soft top and leak check.
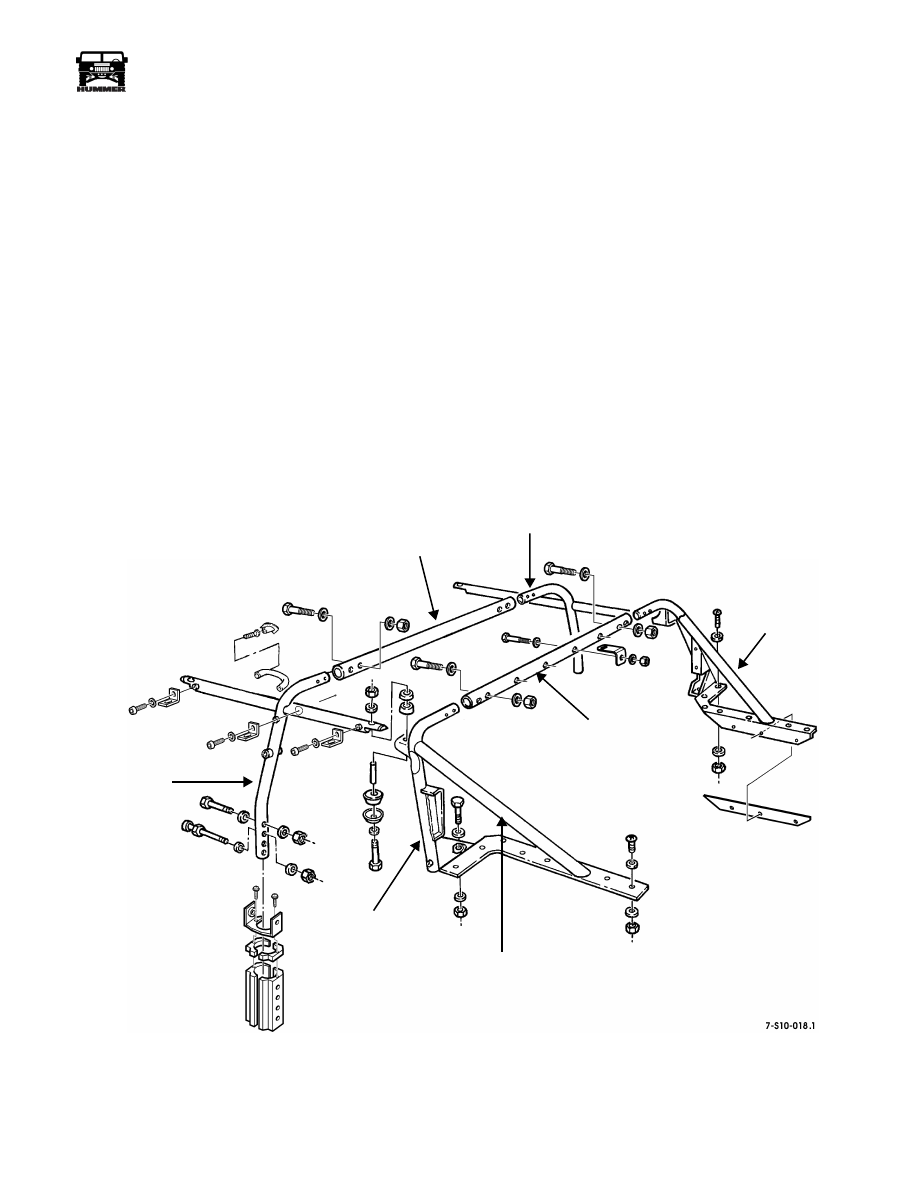
Figure 10-139: Support Structure Assembly
C PILLAR
B PILLAR
B BAR
B PILLAR
C PILLAR
C PILLAR
REAR SUPPORT
C PILLAR
REAR SUPPORT
CENTER
10-72
Body
______________________________________________________________________
®
TAILGATE
Tailgate Chain and Latch Brackets
Replacement
Removal
Remove four locknuts, eight washers, four bolts, chain bracket,
and latch bracket from body (Figure 10-140).
Installation
Secure chain bracket and latch bracket to body with four bolts,
eight washers, and four locknuts. Tighten bolts to 15 lb-ft (20
N•m) (Figure 10-140).
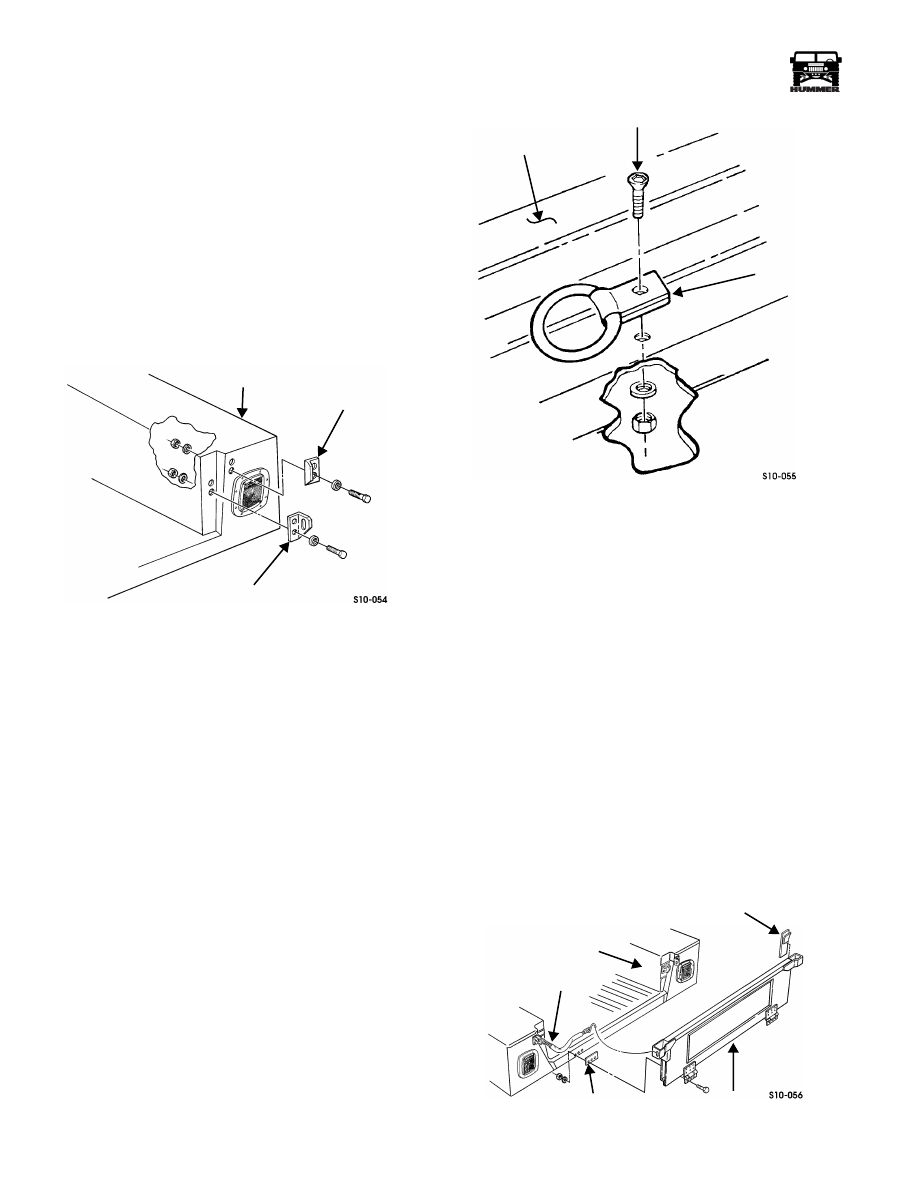
Figure 10-140: Tailgate Bracket Installation
Cargo Tiedown Replacement
NOTE:
Cargo tiedown replacement is basically the same for
all tiedowns.
Removal
Remove locknut, washer, screw, and cargo tiedown from cargo
floor (Figure 10-141).
Installation
Install cargo tiedown on cargo floor with screw, washer, and
locknut. Tighten locknut to 65 lb-ft (88 N•m) (Figure 10-141).
Figure 10-141: Cargo Tiedown Replacement
Tailgate and Seals Replacement
Removal
1.
Remove six locknuts, washers, and bolts securing tailgate
to body (Figure 10-142).
2.
Disconnect two chains from tailgate and remove tailgate
and shims from body.
NOTE:
Perform step 3 for two- and four-door models. Per-
form step 4 and 5 for station wagon and open body models.
3.
Remove two vertical seals from tailgate. Discard seals.
4.
Remove two vertical and horizontal seals from body and
four vertical seals and one horizontal seal from tailgate.
Remove two corner seals (station wagon model only).
Discard seals (Figure 10-143).
5.
Remove two corner seals from tailgate (station wagon
model only).
6.
Remove two grommets from tailgate.
7.
Clean adhesive from tailgate and body.
Figure 10-142: Tailgate and Seals Replacement
BODY
CHAIN BRACKET
LATCH BRACKET
CARGO FLOOR
SCREW
CARGO
TIEDOWN
VERTICAL SEAL
BODY
CHAIN
SHIM
TAILGATE
_____________________________________________________________________
Body 10-73
®
05745159
Installation
1.
Install two grommets on tailgate (Figure 10-143).
NOTE:
Perform steps 2 through 4 for station wagon and open
body models. Perform step 5 for two- and four-door models.
2.
Remove paper backing and install four vertical seals and
one horizontal seal on tailgate. Ensure upper vertical seals
overlap lower seals.
3.
Remove paper backing from two horizontal and vertical
seals and install on body.
4.
Remove paper backing from two corner seals and install
on tailgate (station wagon model only).
5.
Remove paper backing from two vertical seals and install
seals on tailgate (Figure 10-142).
6.
Secure tailgate to body with six bolts, washers, and
locknuts. Shim hinges as needed to align tailgate with
body. When aligned, tighten bolts 26 lb-ft (35 N•m).
7.
Attach the two tailgate chains bracketed to the body to the
tailgate.
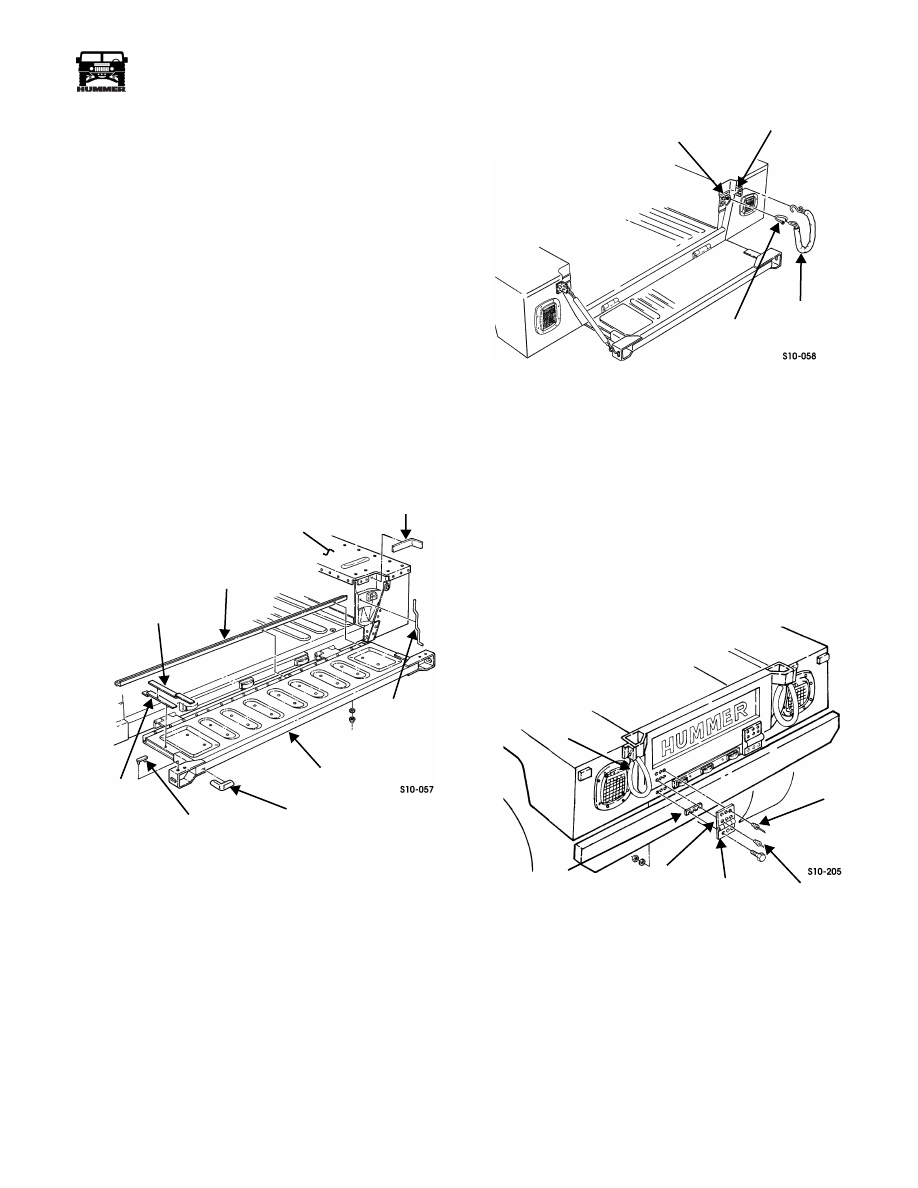
Figure 10-143: Tailgate Mounting Bracketry
and Seal Location
Tailgate Chain Replacement
Removal
1.
Lower tailgate.
2.
Open chain cap link and disconnect chain from bracket
(Figure 10-144).
3.
Unhook chain from chain bracket.
Installation
1.
Hook chain to chain bracket (Figure 10-144).
2.
Connect chain to bracket.
3.
Raise tailgate.
Figure 10-144: Tailgate Chain Replacement
TAILGATE HINGE REPLACEMENT
NOTE:
To facilitate alignment when replacing hinges, place a
small strip of masking tape along each side and bottom of
hinge before removal.
Removal
Remove tailgate by removing six locknuts, washers, and bolts
from the tailgate while still closed. Note number of shims un-
der each hinge and set them aside. Remove tailgate by releas-
ing tailgate chains (Figure 10-145).
Figure 10-145: Tailgate Hinge Replacement
Disassembly
1.
Place tailgate on padded work surface and remove hinge
retainer rivets. Remove hinge and clean any debris from
rivet holes.
2.
Clean tailgate and apply a light coat of seam sealant to
hinge mounting area.
HORIZONTAL
VERTICAL
TAILGATE
CORNER SEAL
GROMMET
VERTICAL
VERTICAL
HORIZONTAL SEAL
BODY
SEAL
(LOWER)
SEAL (UPPER)
SEAL
SEAL
BRACKET
CHAIN BRACKET
CHAIN
CAP LINK
SHIM
LOWER
UPPER
LOWER
HINGE
RETAINER
RIVET
RETAINER
RIVET
UPPER
HINGE
CHAIN
10-74
Body
______________________________________________________________________
®
Assembly
1.
Using three 0.187 in. x 0.626 in. rivets, fasten hinge to
lower set of holes on tailgate.
2.
Fasten hinge to upper set of holes on tailgate with three
0.187 in. x 0.563 in. rivets.
Installation
1.
Position tailgate on bed and secure with tailgate chains.
Loosely install bolts, washers, and locknuts into hinges.
Insert proper amount of shims under each hinge.
2.
Slightly tighten bolts, but not tight enough to restrict
movement into alignment with tape marks.
3.
Align hinges and tailgate into proper position and torque
bolts to 26 lb-ft (35 N•m). Remove any excess sealant
from hinges and body.
4.
Refinish hinges and fasteners as required.
REAR VERTICAL DOOR REPLACEMENT
Removal
1.
Remove seven screws securing hinge to door.
2.
Slowly pull door away from the hinge to expose interior
lock harness connections.
3.
Disconnect interior door lock harness from contacts on
hinge, and tape to door to prevent loss.
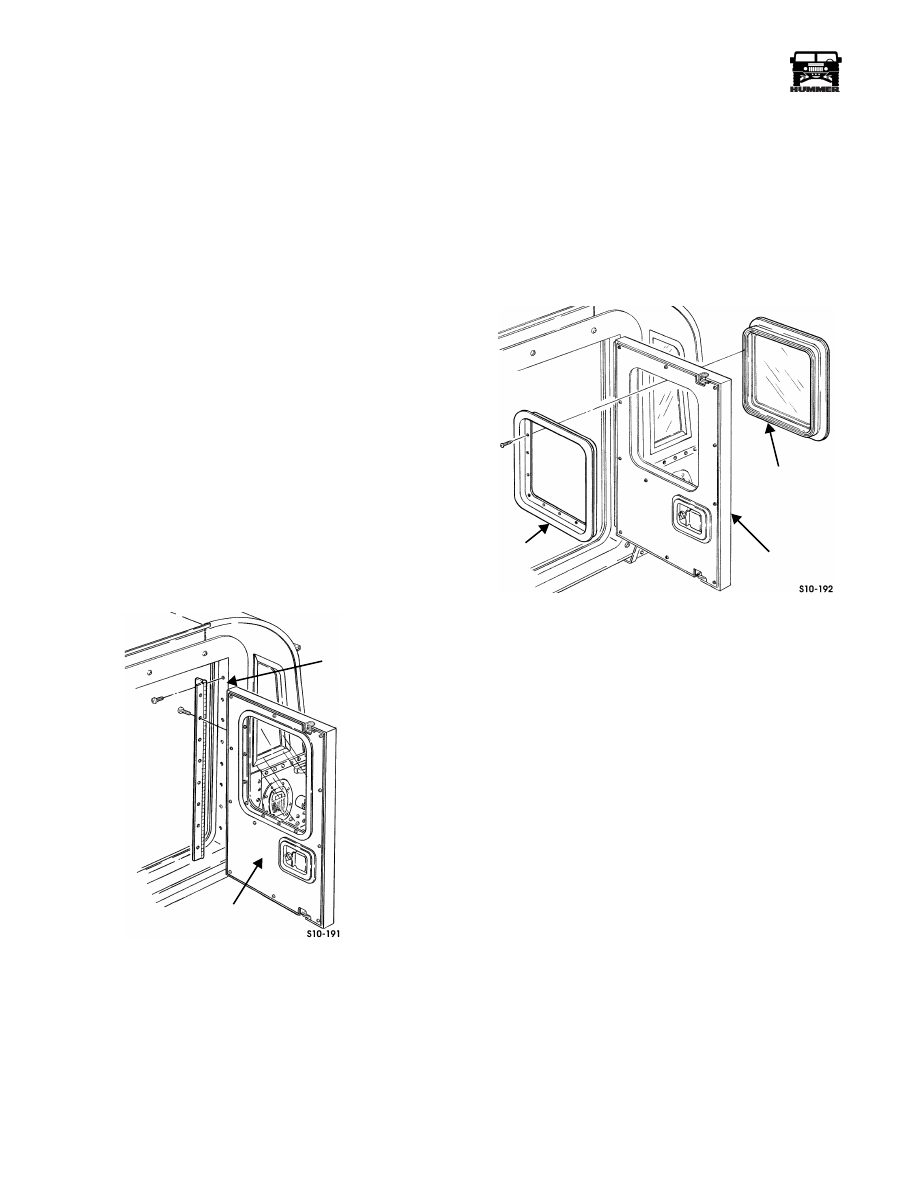
Figure 10-146: Rear Vertical Door Replacement
Installation
1.
Position door close to hinge to allow the interior door lock
harness to be connected to the contacts on the hinge.
2.
Secure hinge to door frame with seven screws (Figure 10-146).
3.
Verify operation of door locks and door latch .
4.
If alignment is necessary, loosen the seven screws on the
interior side of the door hinge. The slots in the hinge will
allow up and down adjustment.
5.
Tighten the seven screws in the hinge.
Window Replacement
Removal
Remove eleven screws, window retainer bracket, and window
from rear vertical door (Figure 10-147).
Figure 10-147: Window Replacement
Installation
Secure window to rear vertical door with window retainer
bracket and eleven screws (Figure 10-147).
REAR
VERTICAL
DOOR
DOOR
FRAME
WINDOW
WINDOW
REAR
VERTICAL
DOOR
RETAINER
BRACKET
Нет комментариевНе стесняйтесь поделиться с нами вашим ценным мнением.
Текст