Hummer H1 (2002+). Manual — part 176
_____________________________________________________________________
Body 10-75
®
05745159
Door Handle Replacement
Removal
1.
Remove rear door window.
2.
Remove four screws and interior door handle from door
(Figure 10-148).
3.
Remove twelve screws and close-out panel from door.
4.
Remove two cotter pins, washers, and latch rods from
exterior door handle.
5.
Remove lock motor rod from door handle
(Figure 10-150).
6.
Remove four spacers and exterior door handle from door.
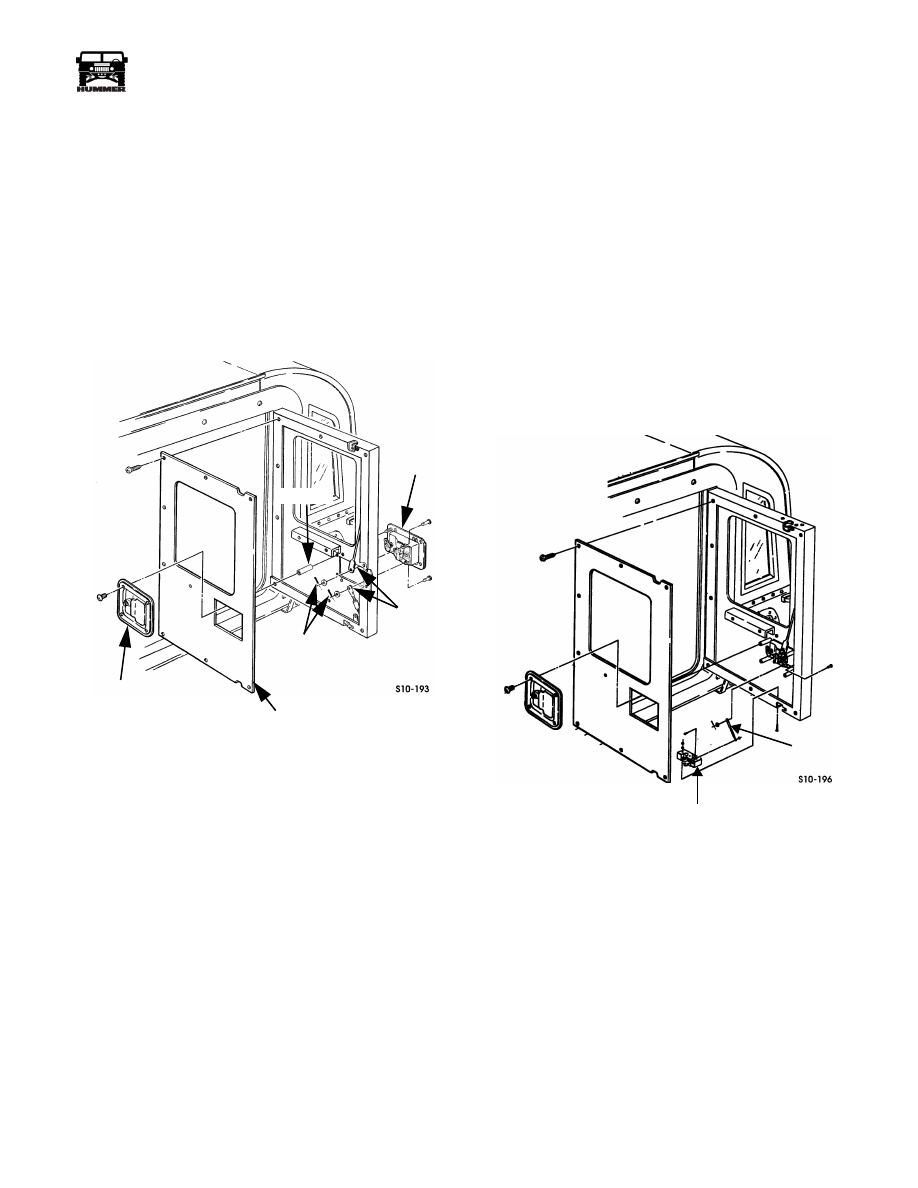
Figure 10-148: Door Handle Replacement
Installation
1.
Secure exterior door handle to door with four spacers
(Figure 10-148).
2.
Install lock motor rod to door handle lock latch with
plastic clip (Figure 10-150).
3.
Secure latch rods to exterior door handle with two washers
and cotter pins.
4.
Secure close-out panel to door with twelve screws.
5.
Secure interior door handle to door with four screws.
6.
Install rear door window.
Door Latch and Latch Rod Replacement
Removal
1.
Remove rear door window.
2.
Remove four screws and interior door handle from door
(Figure 10-149).
3.
Remove twelve screws and close-out panel from door.
4.
Remove cotter pin, washer, and latch rod from exterior
door handle.
5.
Remove lock motor rod from door handle
(Figure 10-150).
6.
Remove three nuts, lockwashers, screws, and lower door
latch from door.
7.
Remove locknut, washer, screw, and latch rod from lower
door latch.
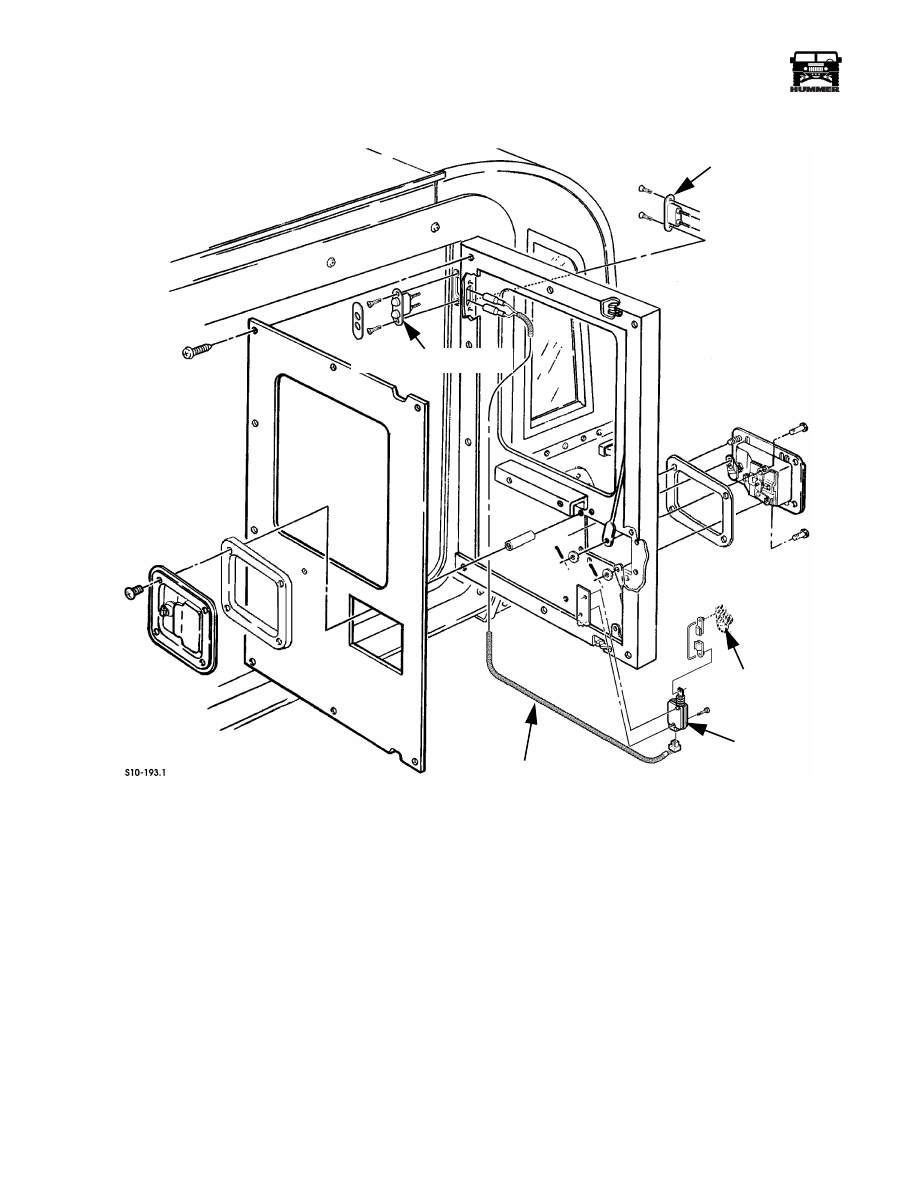
Figure 10-149: Door Latch and Latch Rod
Replacement
Installation
1.
Secure lower door latch to door with three screws, lock-
washers, and nuts (Figure 10-149).
2.
Secure latch rod to lower door latch with screw, washer,
and locknut.
3.
Secure latch rod to exterior door handle with washer and
cotter pin.
4.
Install lock motor rod to door handle lock latch with
plastic clip (Figure 10-150).
5.
Secure close-out panel to door with twelve screws.
6.
Install rear door window. Secure interior door handle to
door with four screws.
INTERIOR
DOOR
HANDLE
COTTER
PINS
EXTERIOR
DOOR
HANDLE
LATCH
RODS
CLOSE-OUT
PANEL
SPACER
LOWER DOOR LATCH
LATCH
ROD
10-76
Body
______________________________________________________________________
®
Figure 10-150: Cargo Door Electric Locks
DOOR LOCK MOTOR HARNESS
MOTOR LINK ROD
AND LOCK CLIPS
DOOR HINGE CONTACTS
DOOR
DOOR HINGE CONTACTS
LOCK
MOTOR
_____________________________________________________________________
Body 10-77
®
05745159
Door Stop Replacement
Removal
1.
Remove rear door window.
2.
Remove four screws and interior door handle from door
(Figure 10-149).
3.
Remove twelve screws and close-out panel from door.
4.
Remove bolt, door stop ball, and retainer from door
(Figure 10-151).
5.
Remove bolt, washer, door stop socket, and retainer from
right rear wheelhouse.
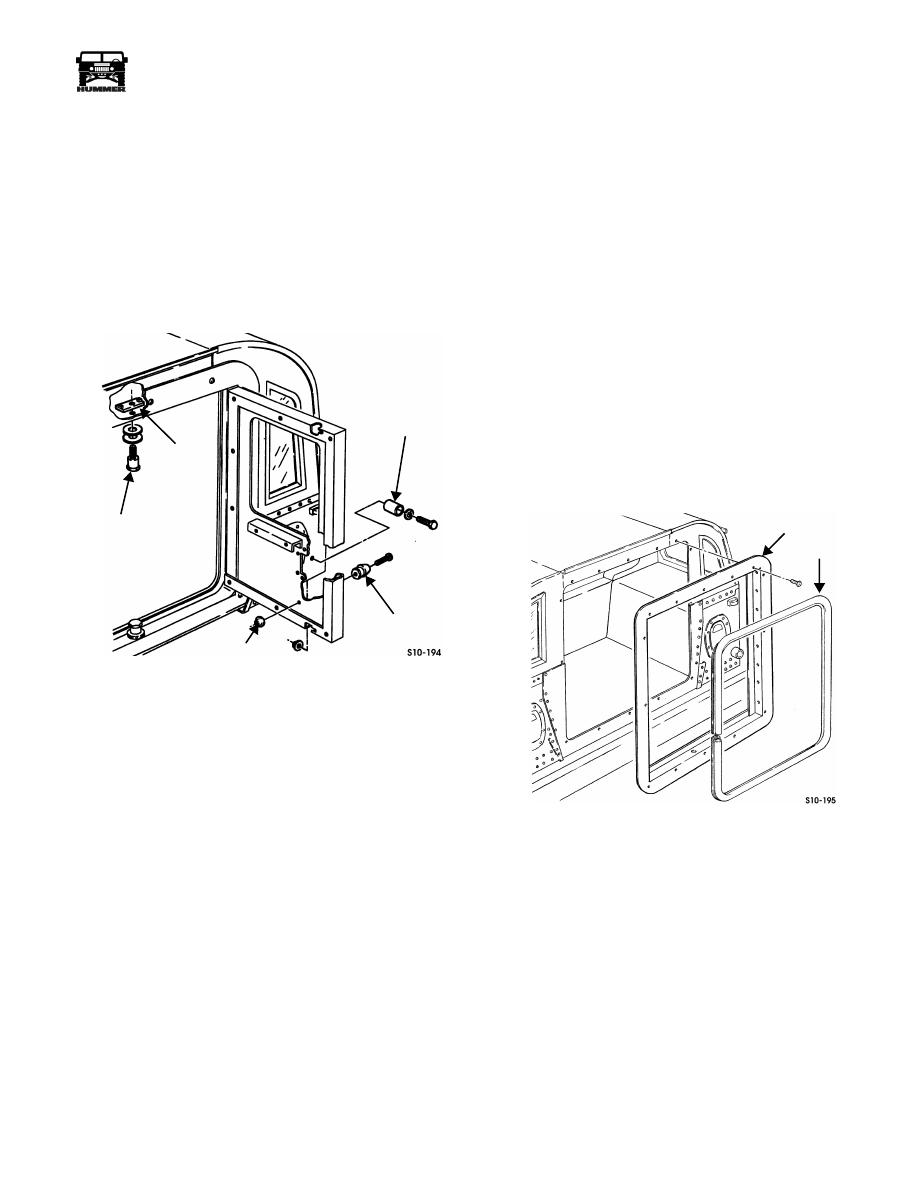
Figure 10-151: Door Stop and Latch Guide
Replacement
Installation
1.
Secure door stop socket to right rear wheelhouse with
washer, bolt, and retainer (Figure 10-151).
2.
Secure door stop ball to door with bolt and retainer.
3.
Secure close-out panel to door with twelve screws
(Figure 10-149).
4.
Secure interior door handle to close-out panel with four
screws.
5.
Install rear door window.
Latch Guide Replacement
Removal
Remove latch guide, two washers, and retaining block from
door frame (Figure 10-151).
Installation
Secure latch guide to door frame with two washers and retain-
ing block (Figure 10-151).
Adjustment
Close door and check alignment, then adjust latch guide as
necessary.
Door Frame and Seal Replacement
Removal
1.
Remove dome lamp fuse.
2.
Remove seven screws securing inner portion of door hinge
to door frame.
3.
When hinge is loose, carefully pull away to access
connectors for door lock contacts in the hinge.
4.
Disconnect the door lock harness connectors, label them
for reassembly.
5.
Remove vertical doors from door frame.
6.
Remove upper and lower latch guides.
7.
Remove inner passenger side closeout panel on inside of
door frame.
8.
Disconnect dome lamp switch harness from door jamb
switch.
9.
Remove fourteen screws from door frame (Figure 10-152).
10. Remove door frame completely
11. Remove seal from door frame.
Figure 10-152: Door Frame and Seal Replacement
Installation
1.
Position seal on door frame (Figure 10-152).
2.
Secure door frame to vehicle with fourteen screws.
3.
Install a new door jamb switch and connect to dome lamp
harness.
4.
Install upper and lower latch guides.
5.
Install vertical doors on door frame.
6.
Connect door lock harness connections to the back of the
door hinge contacts.
7.
Install interior closeout panel.
8.
Close door to adjust new door jamb switch.
9.
Install dome lamp fuse.
10. Verify operation of door lamps and cargo switch.
DOOR
STOP
BALL
DOOR STOP
SOCKET
RETAINER
LATCH
RETAINING
BLOCK
GUIDE
DOOR
FRAME
SEAL
10-78
Body
______________________________________________________________________
®
INTERIOR AND EXTERIOR LIGHTING
REPLACEMENT
Service Headlight Assembly Replacement
Removal
NOTE:
To remove headlight only, perform steps 1 and 2. To
remove the entire assembly, continue with steps 3 through 6.
1.
Loosen three screws and remove retaining ring from head-
light mount (Figure 10-153).
2.
Disconnect headlight jumper harness from headlight, and
remove headlight.
3.
Loosen two screws securing headlight mount to headlight
housing, and remove mount from housing and spring.
4.
Disconnect headlight jumper harness from headlight
housing and remove harness.
5.
Disconnect three leads from back of housing.
6.
Remove three nuts, lockwashers, washers, and housing
from hood.
Installation
NOTE:
To install headlight only, perform steps 5 and 6. To in-
stall entire assembly, perform all steps.
1.
Connect three leads to back of housing (Figure 10-153).
2.
Secure headlight housing to hood with three washers,
lockwashers, and nuts.
3.
Secure headlight mount to housing, with spring and two
screws.
4.
Connect headlight jumper harness to headlight housing.
5.
Connect headlight to jumper harness and secure headlight
to headlight mount with retaining ring with retaining ring.
Tighten three screws.
6.
Connect battery ground cable (Section 12).
7.
Check headlight for proper operation.
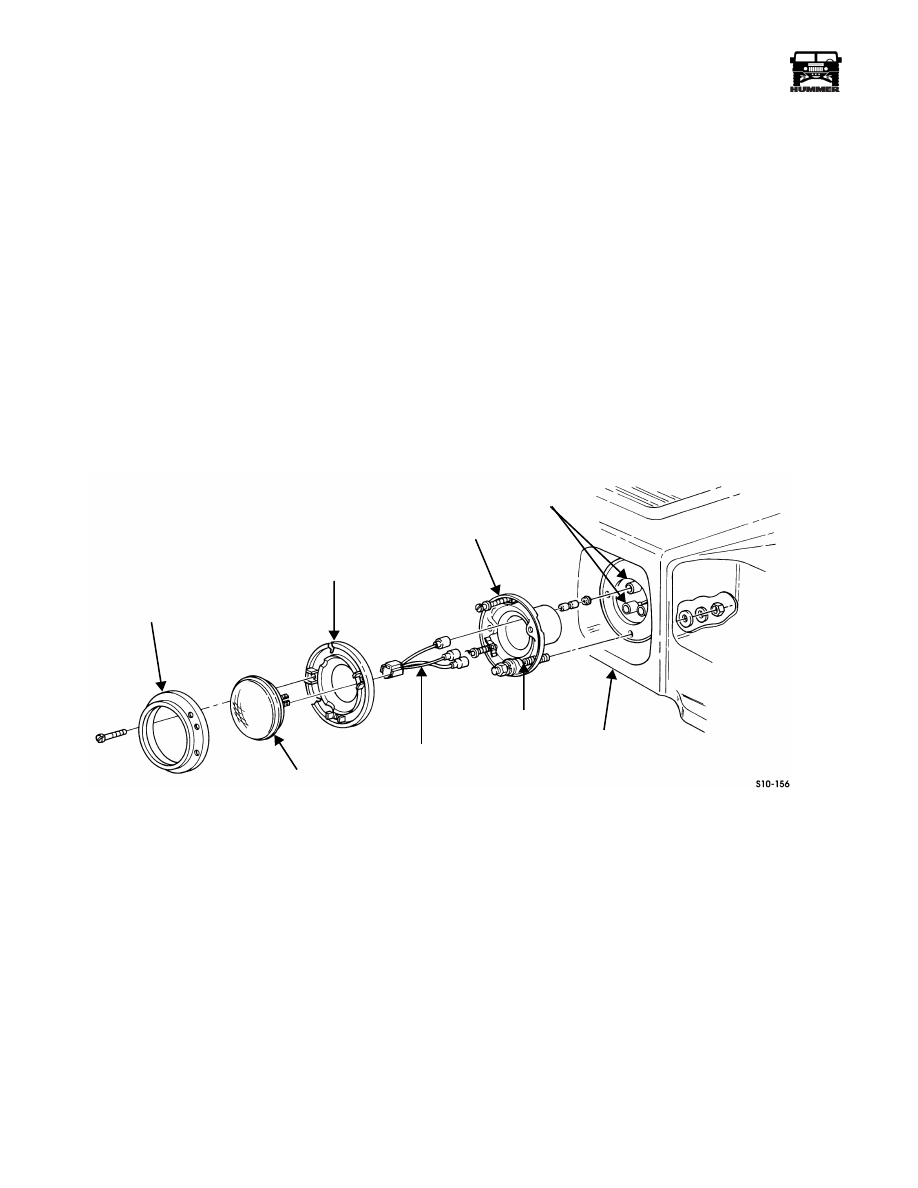
Figure 10-153: Headlight Assembly Replacement
RETAINING RING
HEADLIGHT
HEADLIGHT MOUNT
JUMPER HARNESS
SPRING
HEADLIGHT HOUSING
LEADS
HOOD
Нет комментариевНе стесняйтесь поделиться с нами вашим ценным мнением.
Текст