Dodge Dakota (ND). Manual — part 1213
INSTALLATION
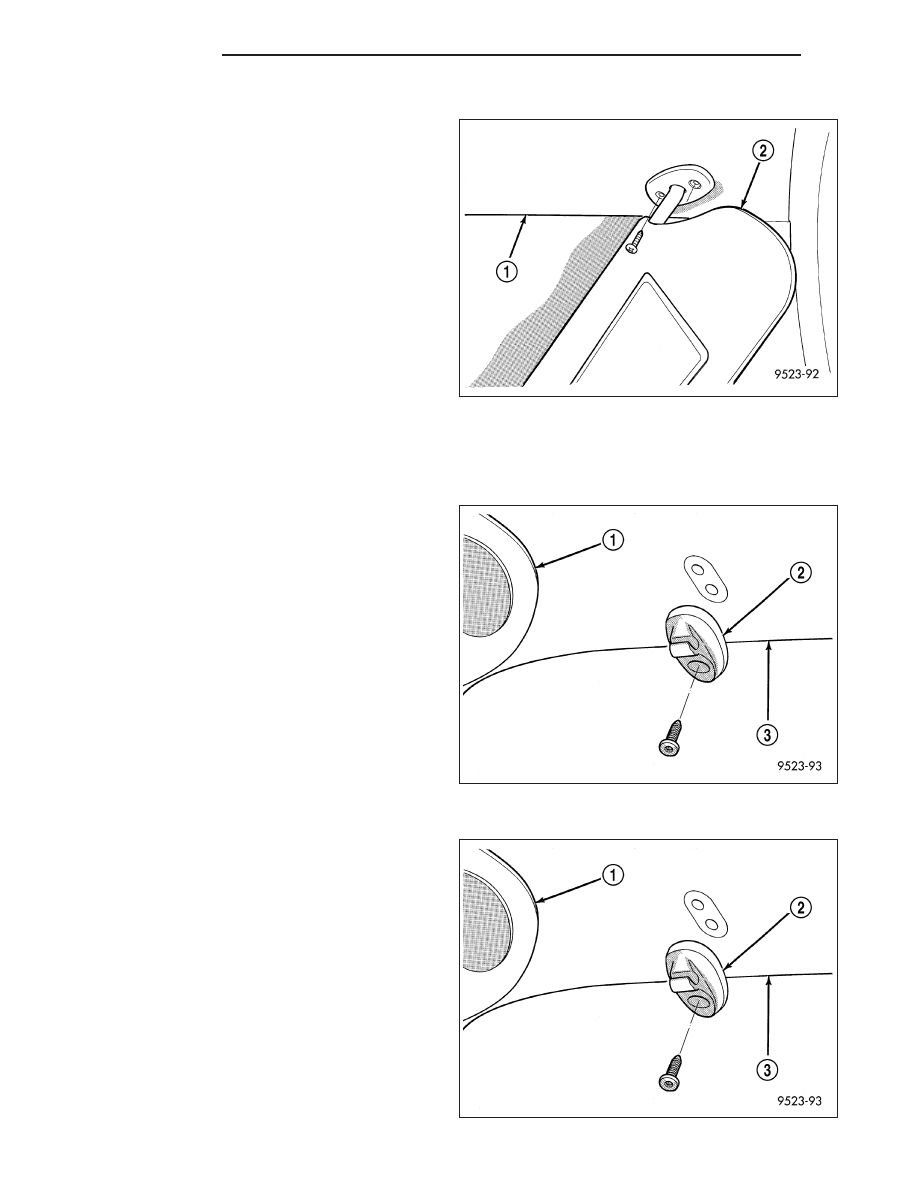
1. If equipped, connect the illuminated vanity mirror
wire harness connector.
2. Position the sun visor (2) on the headliner (1) and
install the two screws that secure the sun visor to
the roof panel. Tighten the screws to 2.2 N·m (20
in. lbs.).
3. Engage the sun visor and sun visor support.
SUN VISOR SUPPORT
REMOVAL
1. Disengage the sun visor (1) from the sun visor sup-
port (2).
2. Remove the screw that secures the support to the
roof panel and remove the support from the head-
liner (3).
INSTALLATION
1. Position the sun visor support (2) on the headliner
(3) and install the screw that secures the support to
the roof panel. Tighten the screw to 2.2 N·m (20 in.
lbs.).
2. Engage the sun visor (1) and sun visor support.
23 - 264
INTERIOR
ND

PAINT
TABLE OF CONTENTS
page
page
PAINT
BASECOAT/CLEARCOAT FINISH
. . . . . . . . . . . . . . . . . . . . . . . . 265
PAINT CODE
. . . . . . . . . . . . . . . . . . . . . . . . 265
PAINT TOUCH-UP
. . . . . . . . . . . . . . . . . . . . . . . . 266
. . . . . . . . . . . . . . . 266
FINESSE SANDING/BUFFING & POLISHING
. . . . . . . . . . . . . . . . . . . . . . . . 266
PAINT
SPECIFICATIONS - PAINT CODES
EXTERIOR COLORS
EXTERIOR COLOR
DAIMLERCHRYSLER CODE
Deep Molten Red Pearlcoat
BR8
Flame Red Clearcoat
PR4
Mineral Gray Metallic Clearcoat
CDM
Light Almond Pearl Metallic Clearcoat
ZKJ
Patriot Blue Pearlcoat
WBT
Atlantic Blue Pearlcoat
ZBJ
Bright Silver Metallic Clearcoat
WSB
Black Clearcoat
DX8
Bright White Clearcoat
GW7
BASECOAT/CLEARCOAT FINISH
DESCRIPTION
The original equipment paint finish is a multi step process that involves cleaning, applying electro de-position
(E-coat), anti-chip primer, basecoat, and clearcoat steps.
CAUTION: Do not use abrasive chemicals, abrasive compounds or harsh alkaline based cleaning solvents
on the painted surfaces of a vehicle. Failure to follow this caution can result in damage to vehicle finish.
On most vehicles a two-part paint application (basecoat/clearcoat) is used. Color paint that is applied to primer is
called basecoat. A clear coat paint is then applied to protect the basecoat from ultraviolet light and to provide a
durable high-gloss finish.
PAINT CODE
DESCRIPTION
Exterior vehicle body colors are identified on the Vehicle Certification Label (Refer to VEHICLE DATA/VEHICLE
INFORMATION/VEHICLE CERTIFICATION LABEL - DESCRIPTION). The first digit of the paint code listed on the
vehicle indicates the sequence of application, i.e.: P = primary coat, Q = secondary coat. The color names provided
in the Paint and Trim Code Description chart are the color names used on most repair product containers. (Refer to
23 - BODY/PAINT - SPECIFICATIONS)
ND
PAINT
23 - 265
PAINT TOUCH-UP
DESCRIPTION
When a painted metal surface has been scratched or chipped, it should be touched-up as soon as possible to avoid
corrosion. For best results, use MOPAR
T
Scratch Filler/Primer, Touch-Up Paints and Clear Top Coat.
WARNING: USE AN OSHA APPROVED RESPIRATOR AND SAFETY GLASSES WHEN SPRAYING PAINT OR
SOLVENTS IN A CONFINED AREA. PERSONAL INJURY CAN RESULT.
STANDARD PROCEDURE
1. Scrape loose paint and corrosion from inside scratch or chip.
2. Clean affected area with MOPAR
T
Tar/Road Oil Remover or equivalent, and allow to dry.
3. Fill the inside of the scratch or chip with a coat of filler/primer. Do not overlap primer onto good surface finish.
The applicator brush should be wet enough to puddle-fill the scratch or chip without running. Do not stroke brush
applicator on body surface. Allow the filler/primer to dry hard.
4. Cover the filler/primer with color touch-up paint. Do not overlap touch-up color onto the original color coat around
the scratch or chip. Butt the new color to the original color, if possible. Do not stroke applicator brush on body
surface. Allow touch-up paint to dry hard.
5. On vehicles without clearcoat, the touch-up color can be lightly finesse sanded (1500 grit) and polished with
rubbing compound.
6. On vehicles with clearcoat, apply clear top coat to touch-up paint with the same technique as described in Step
4. Allow clear top coat to dry hard. If desired, Step 5 can be performed on clear top coat.
WARNING: AVOID PROLONGED SKIN CONTACT WITH PETROLEUM OR ALCOHOL – BASED CLEANING
SOLVENTS. PERSONAL INJURY CAN RESULT.AVOID PROLONGED SKIN CONTACT WITH PETROLEUM OR
ALCOHOL – BASED CLEANING SOLVENTS. PERSONAL INJURY CAN RESULT.
FINESSE SANDING/BUFFING & POLISHING
DESCRIPTION
CAUTION: Do not remove more than 0.5 mils of clearcoat finish when sanding, hand buffing or polishing.
Basecoat paint must retain clearcoat for durability.
CAUTION: If the finish has been finesse sanded in the past, it cannot be repeated. Failure to follow this
caution can result in damage to vehicle finish.
NOTE: Finesse sanding should only be performed by a trained automotive paint technician.
Minor acid etching, orange peel, or smudging in a clearcoat or single-stage finish can be reduced with light finesse
sanding, hand buffing and polishing. Use a Paint Thickness Gauge #PR-ETG-2X or equivalent to determine
clearcoat or single-stage paint thickness before and after the repair.
23 - 266
PAINT
ND
SEATS
TABLE OF CONTENTS
page
page
SEATS
. . . . . . . . . . . . . . . . . 267
HEADREST-CLUB CAB
. . . . . . . . . . . . . . . . . . . . . . . . . . . . 268
. . . . . . . . . . . . . . . . . . . . . . . . 268
SEAT-FRONT
. . . . . . . . . . . . . . . . . . . . . . . . . . . . 269
. . . . . . . . . . . . . . . . . . . . . . . . 270
SEAT-CLUB CAB
. . . . . . . . . . . . . . . . . . . . . . . . . . . . 271
. . . . . . . . . . . . . . . . . . . . . . . . 272
SEAT-QUAD CAB
. . . . . . . . . . . . . . . . . . . . . . . . . . . . 273
. . . . . . . . . . . . . . . . . . . . . . . . 274
SEATS
WARNING
RESTRAINT SYSTEM
WARNING: During and following any seat belt or child restraint anchor service, carefully inspect all seat
belts, buckles, mounting hardware, retractors, tether straps, and anchors for proper installation, operation,
or damage. Replace any belt that is cut, frayed, or torn. Straighten any belt that is twisted. Tighten any
loose fasteners. Replace any belt that has a damaged or inoperative buckle or retractor. Replace any belt
that has a bent or damaged latch plate or anchor plate. Replace any child restraint anchor or the unit to
which the anchor is integral that has been bent or damaged. Never attempt to repair a seat belt or child
restraint component. Always replace damaged or faulty seat belt and child restraint components with the
correct, new and unused replacement parts listed in the DaimlerChrysler Mopar parts catalog. Failure to
follow these instructions may result in personal injury or death.
WARNING: On vehicles equipped with airbags, disable the supplemental restraint system before attempting
any steering wheel, steering column, airbag, occupant classification system, seat belt tensioner, impact sen-
sor, or instrument panel component diagnosis or service. Disconnect and isolate the battery negative
(ground) cable, then wait two minutes for the system capacitor to discharge before performing further diag-
nosis or service. This is the only sure way to disable the supplemental restraint system. Failure to take the
proper precautions could result in accidental airbag deployment. Failure to follow these instructions may
result in personal injury or death.
WARNING: On vehicles equipped with airbags, before performing any welding operations disconnect and
isolate the battery negative (ground) cable and disconnect all wire harness connectors from the airbag con-
trol module (acm). Failure to take the proper precautions could result in accidental airbag deployment and
other possible damage to the supplemental restraint system circuits and components. Failure to follow
these instructions may result in personal injury or death.
WARNING: Replace all restraint system components only with parts specified in the DaimlerChrysler Mopar
parts catalog. Substitute parts may appear interchangeable, but internal differences may result in inferior
occupant protection. Failure to follow these instructions may result in personal injury or death.
WARNING: The fasteners, screws, and bolts originally used for the restraint system components must never
be replaced with any substitutes. These fasteners have special coatings and are specifically designed for
the restraint system. Any time a new fastener is needed, replace it with the correct fasteners provided in the
service package or specified in the DaimlerChrysler Mopar parts catalog. Failure to follow these instructions
may result in personal injury or death.
ND
SEATS
23 - 267
Нет комментариевНе стесняйтесь поделиться с нами вашим ценным мнением.
Текст