Infiniti FX35 / FX45. Manual — part 979
WW-38
< SERVICE INFORMATION >
REAR WIPER AND WASHER SYSTEM
OK or NG
OK
>> GO TO 2.
NG
>> Check combination switch (wiper switch). Refer to
LT-104, "Combination Switch Inspection"
.
2.
ACTIVE TEST
With CONSULT-III
1.
Select “REAR WIPER” of BCM active test item.
2.
With operating the test item, check the rear wiper operation.
Without CONSULT-III
GO TO 3.
Does rear wiper operate normally?
YES
>> Replace BCM. Refer to
BCS-13, "Removal and Installation of BCM"
.
NO
>> GO TO 3.
3.
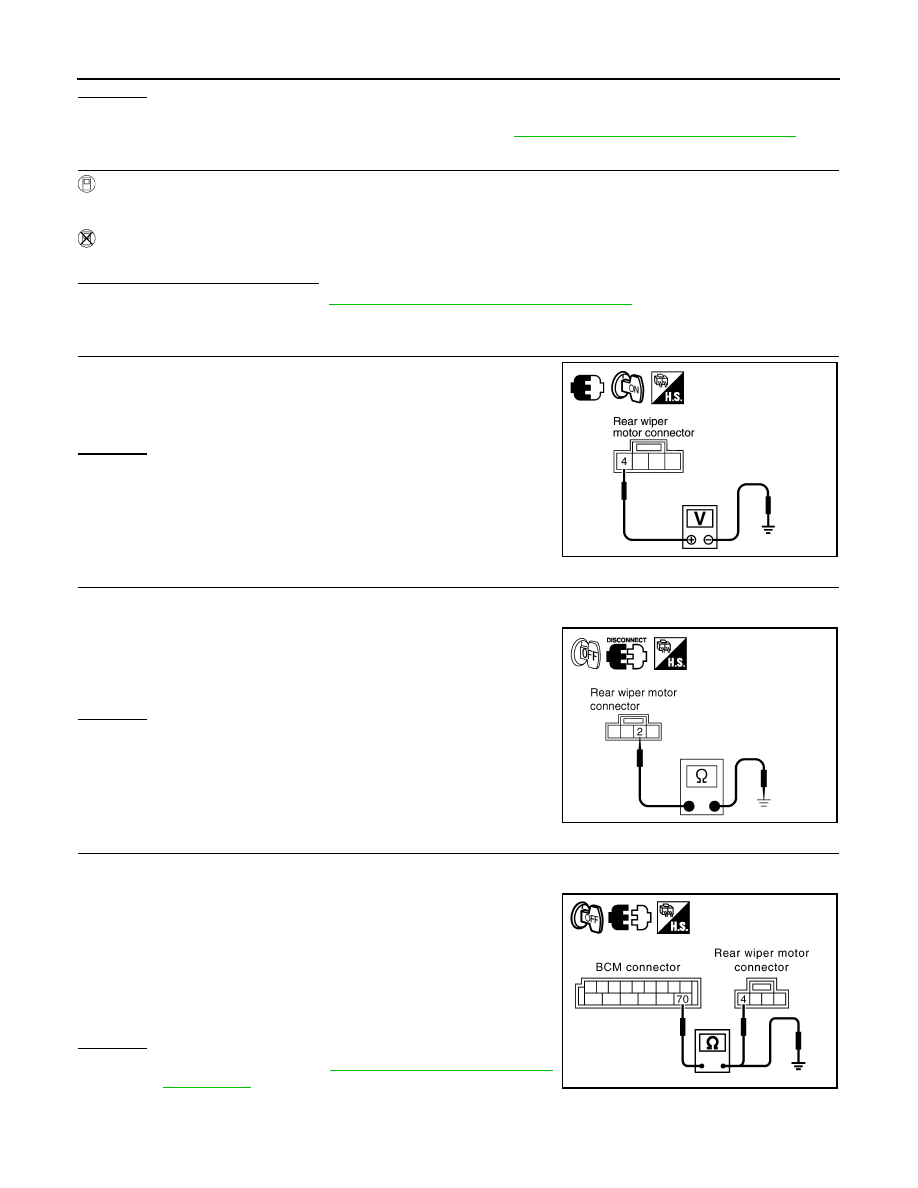
CHECK BCM
With rear wiper switch ON, check voltage between rear wiper motor
harness connector and ground.
OK or NG
OK
>> GO TO 4.
NG
>> GO TO 5.
4.
CHECK GROUND CIRCUIT
1.
Turn ignition switch OFF.
2.
Disconnect rear wiper motor connector.
3.
Check continuity between rear wiper motor harness connector
and ground.
OK or NG
OK
>> Replace rear wiper motor.
NG
>> Repair harness or connector.
5.
CHECK REAR WIPER CIRCUIT
1.
Turn ignition switch OFF.
2.
Disconnect BCM connector and rear wiper motor connector.
3.
Check continuity between BCM harness connector and rear
wiper motor harness connector.
4.
Check continuity between BCM harness connector and ground.
OK or NG
OK
BCS-13, "Removal and Installa-
NG
>> Repair harness or connector.
4 – Ground
: Battery voltage.
PKIB1784E
2 – Ground
: Continuity should exist.
PKIA5200E
70 – 4
: Continuity should exist.
70 – Ground
: Continuity should not exist.
PKID0795E
REAR WIPER AND WASHER SYSTEM
WW-39
< SERVICE INFORMATION >
C
D
E
F
G
H
I
J
L
M
A
B
WW
N
O
P
Rear Wiper Does Not Return to Stop Position
INFOID:0000000001328584
1.
CHECK REAR WIPER MOTOR CIRCUIT
With CONSULT-III
1.
Select “RR WIPER STOP” of BCM data monitor item.
2.
Check that “RR WIPER STOP”, turn ON-OFF linked with rear wiper switch operation.
Without CONSULT-III
GO TO 2.
OK or NG
OK
>> Replace BCM. Refer to
BCS-13, "Removal and Installation of BCM"
.
NG
>> GO TO 2.
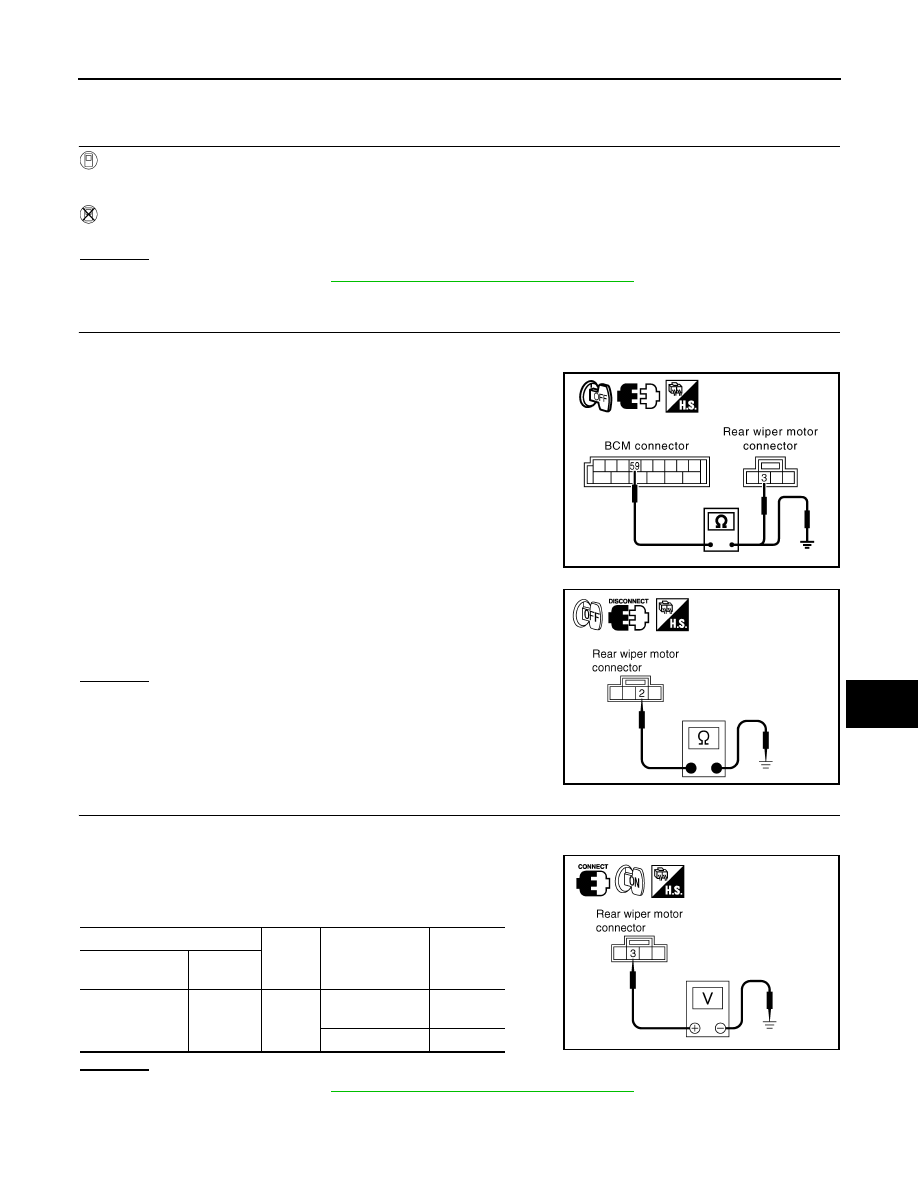
2.
CHECK REAR WIPER AUTO STOP CIRCUIT
1.
Turn ignition switch OFF.
2.
Disconnect BCM connector and rear wiper motor connector.
3.
Check continuity between BCM harness connector and rear
wiper motor harness connector.
4.
Check continuity between BCM harness connector and ground.
5.
Check continuity between rear wiper motor harness connector
and ground.
OK or NG
OK
>> GO TO 3.
NG
>> Repair harness or connector.
3.
CHECK REAR WIPER MOTOR SIGNAL
1.
Connect BCM connector and rear wiper motor connector.
2.
Turn ignition switch ON.
3.
Check voltage between rear wiper motor harness connector and
ground while rear wiper motor is stopped and while it is operat-
ing.
OK or NG
OK
>> Replace BCM. Refer to
BCS-13, "Removal and Installation of BCM"
.
NG
>> Replace rear wiper motor.
59 – 3
: Continuity should exist.
59 – Ground
: Continuity should not exist.
PKID0796E
2 – Ground
: Continuity should exist.
PKIA5200E
(+)
(-)
Condition
Voltage
(Approx.)
Rear wiper motor
Connector
Terminal
D107
3
Ground
Wiper stopped
Battery
voltage
Wiper operating
0 V
PKIA5203E
WW-40
< SERVICE INFORMATION >
REAR WIPER AND WASHER SYSTEM
Only Rear Wiper ON Does Not Operate
INFOID:0000000001328585
LT-104, "Combination Switch Inspection"
Only Rear Wiper INT Does Not Operate
INFOID:0000000001328586
LT-104, "Combination Switch Inspection"
Wiper Does Not Wipe When Rear Washer Operates
INFOID:0000000001328587
LT-104, "Combination Switch Inspection"
Rear Wipers Do Not Stop
INFOID:0000000001328588
1.
CHECK CIRCUIT BETWEEN COMBINATION SWITCH AND BCM
With CONSULT-III
1.
Select “RR WIPER INT”, “RR WIPER ON”, and “RR WASHER SW” of BCM data monitor item.
2.
With operating the wiper switch, check the monitor status.
Without CONSULT-III
LT-104, "Combination Switch Inspection"
OK or NG
OK
>> Replace BCM. Refer to
BCS-13, "Removal and Installation of BCM"
.
NG
>> Check combination switch (wiper switch). Refer to
LT-104, "Combination Switch Inspection"
.
Removal and Installation of Rear Wiper Arm, Adjustment of Wiper Arms Stop Location
INFOID:0000000001328589
REMOVAL
1.
Turn rear wiper switch ON to operate wiper motor, then turn rear wiper switch OFF (auto stop).
2.
Remove rear wiper arm cap, and remove rear wiper arm nut.
3.
Remove rear wiper arm from the vehicle.
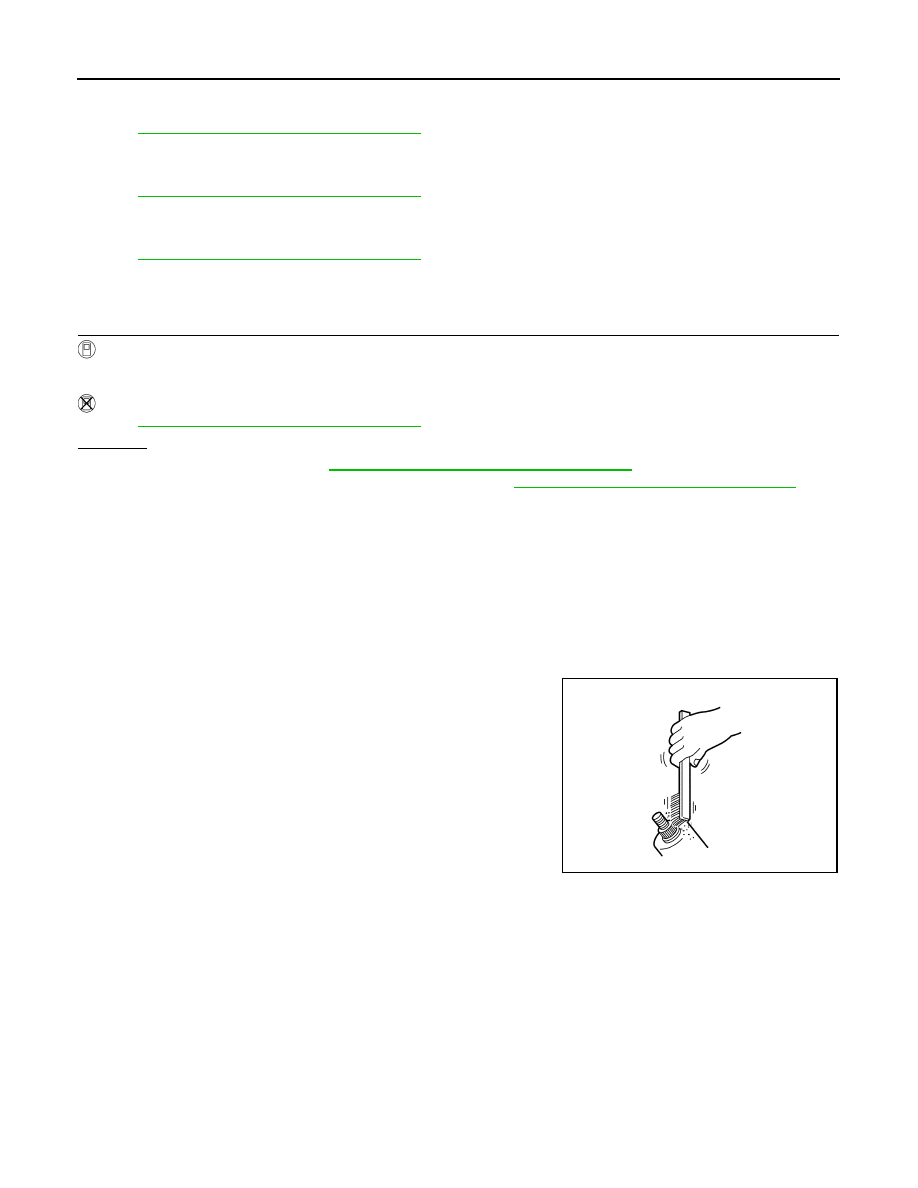
INSTALLATION
1.
Clean up the pivot area as shown in the figure. This will reduce
possibility of rear wiper arm nuts looseness.
2.
Prior to rear wiper arms installation, turn rear wiper switch ON to
operate wiper motor, and then turn rear wiper switch OFF (auto
stop).
SKIA0082J
REAR WIPER AND WASHER SYSTEM
WW-41
< SERVICE INFORMATION >
C
D
E
F
G
H
I
J
L
M
A
B
WW
N
O
P
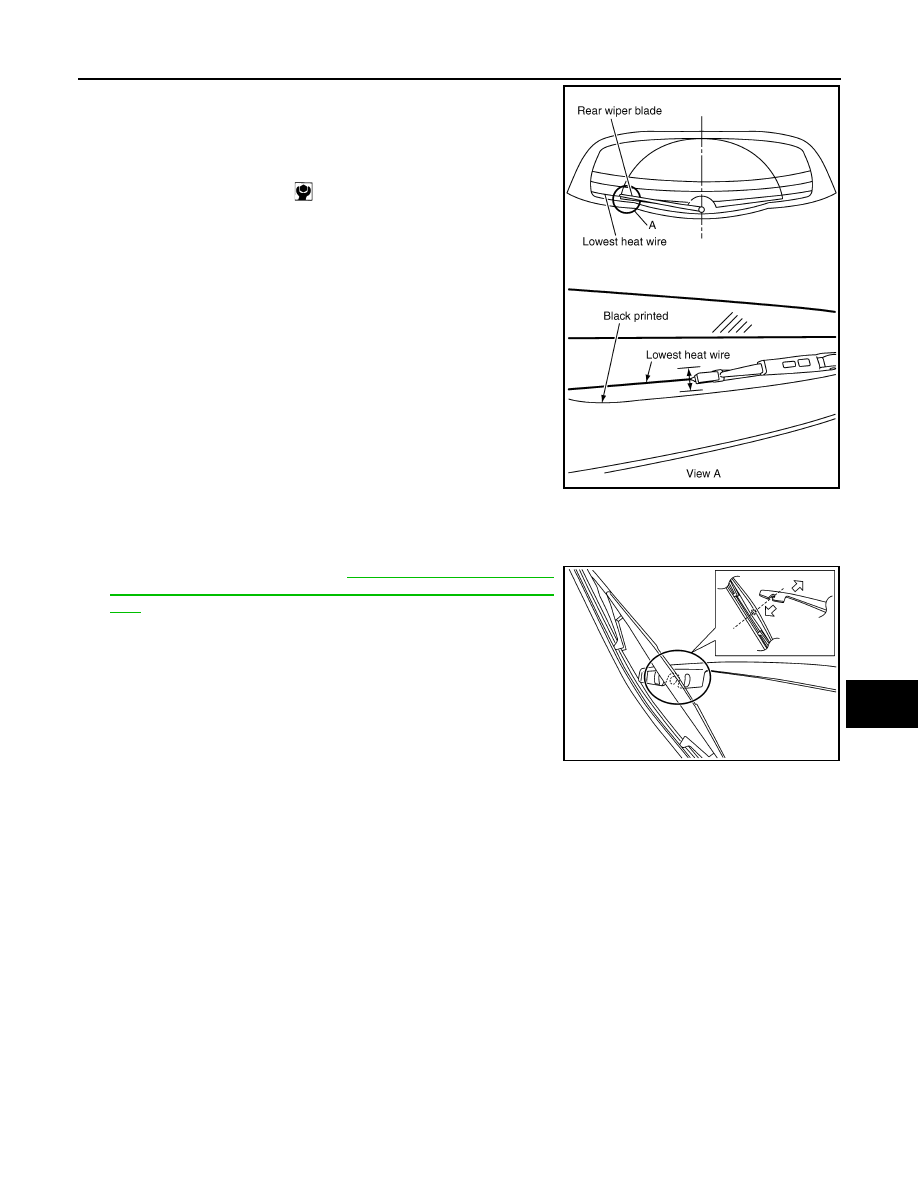
3.
Lift the blade up and then set it down onto back door window
glass surface to set the blade center to lowest heat wire immedi-
ately.
4.
Tighten rear wiper arm nuts to specified torque.
5.
Spray washer fluid. Turn on rear wiper switch ON to operate
wiper motor, and then turn rear wiper switch OFF (auto stop).
6.
Ensure that wiper blade stop within the following range.
7.
Install rear wiper arm cap.
Removal and Installation of Rear Wiper Blade
INFOID:0000000001328590
REMOVAL
1.
Remove rear wiper arm. Refer to
lation of Rear Wiper Arm, Adjustment of Wiper Arms Stop Loca-
tion"
2.
Turn rear wiper blade 90 degrees against rear wiper arm, and
pull it out downward for removal.
CAUTION:
Replace rear wiper blade as rear wiper blade assembly.
INSTALLATION
Installation is the reverse order of removal.
Rear wiper arm nut
: 8.8 N·m (0.90 kg-m, 78 in-lb)
Lowest heat wire
:
±
3.75 mm (
±
0.148 in)
PKID0496E
SKIA6169E
Нет комментариевНе стесняйтесь поделиться с нами вашим ценным мнением.
Текст