Infiniti FX35, FX50 (S51). Manual — part 1366
MA-28
< PERIODIC MAINTENANCE >
ENGINE MAINTENANCE (VK50VE)
2.
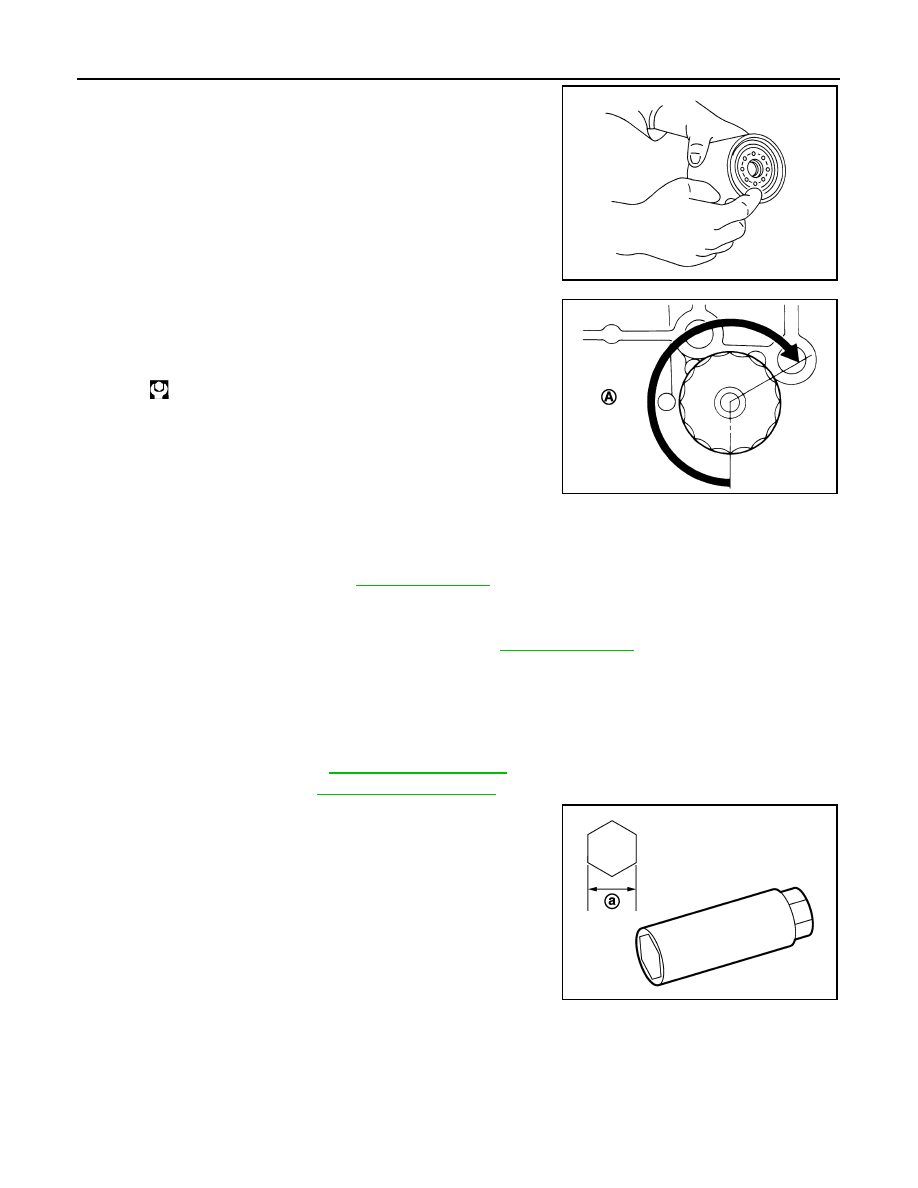
Apply engine oil to the oil seal contact surface of new oil filter.
3.
Screw oil filter manually until it touches the installation surface,
then tighten it by 2/3 turn (A). Or tighten to the specification.
OIL FILTER : Inspection
INFOID:0000000005248739
INSPECTION AFTER INSTALLATION
1.
Check the engine oil level. Refer to
.
2.
Start the engine, and check there is no leakage of engine oil.
3.
Stop the engine and wait for 15 minutes.
4.
Check the engine oil level, and adjust the level. Refer to
.
SPARK PLUG
SPARK PLUG : Removal and Installation
INFOID:0000000005248740
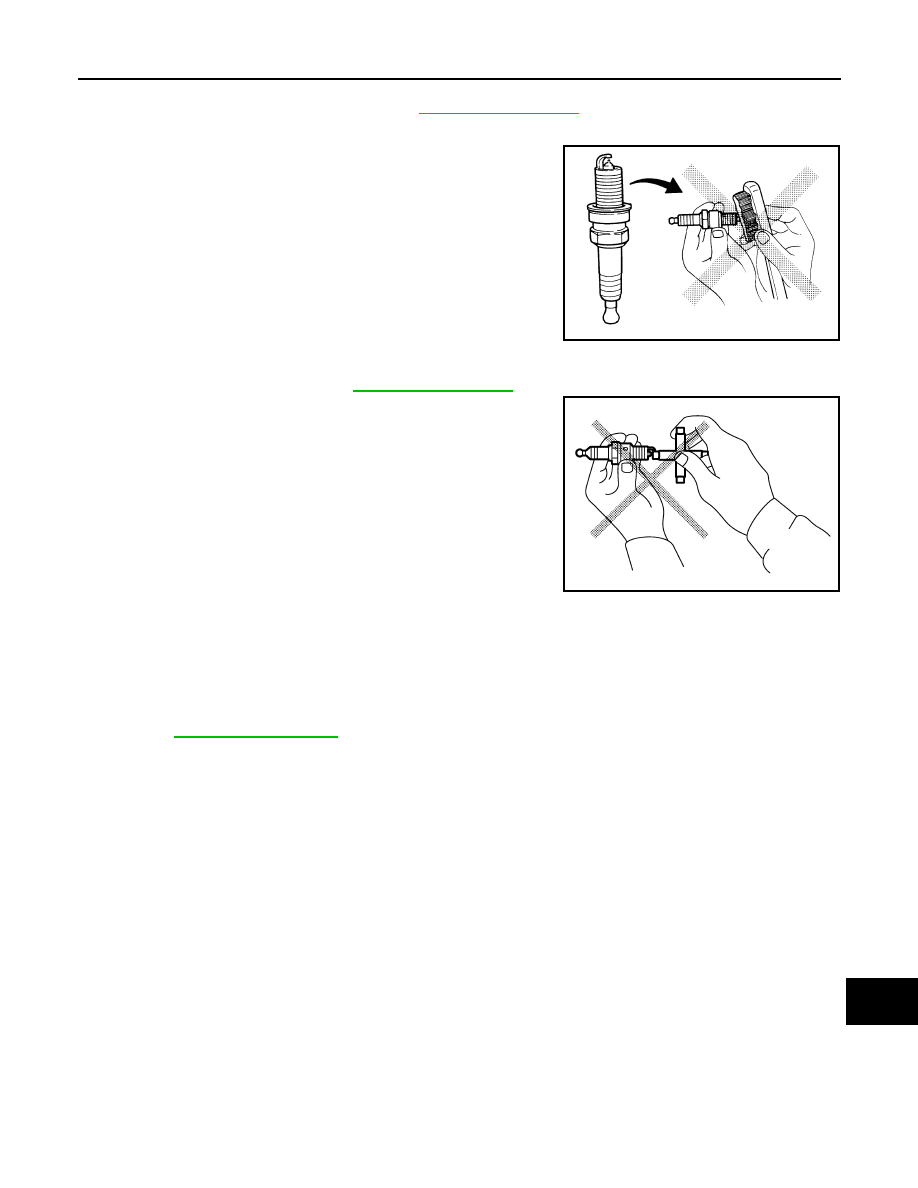
REMOVAL
1.
Remove engine cover. Refer to
.
2.
Remove ignition coil. Refer to
3.
Remove spark plug with a spark plug wrench (commercial ser-
vice tool).
INSTALLATION
Installation is the reverse order of removal.
SPARK PLUG : Inspection
INFOID:0000000005248741
INSPECTION AFTER REMOVAL
Use the standard type spark plug for normal condition.
SMA010
Oil filter:
: 17.7 N·m (1.8 kg-m, 13 ft-lb)
JPBIA0077ZZ
a
: 14 mm (0.55 in)
JPBIA0030ZZ
ENGINE MAINTENANCE (VK50VE)
MA-29
< PERIODIC MAINTENANCE >
C
D
E
F
G
H
I
J
K
L
M
B
MA
N
O
A
CAUTION:
• Never drop or impact spark plug.
• Never use a wire brush for cleaning.
• If plug tip is covered with carbon, use spark plug cleaner to
clean.
• Measure spark plug gap. When it exceeds the limit, replace spark plug even if it is within the speci-
fied replacement mileage. Refer to
• Spark plug gap adjustment is not required between replace-
ment intervals.
EVAP VAPOR LINES
EVAP VAPOR LINES : Inspection
INFOID:0000000005248742
1.
Visually inspect EVAP vapor lines for improper attachment and for cracks, damage, loose connections,
chafing and deterioration.
2.
Inspect fuel tank filler cap vacuum relief valve for clogging, sticking, etc.
Refer to
Spark plug (Standard type)
: Refer to
Cleaner air pressure
: Less than 588 kPa (6 kg/cm
2
, 85 psi)
Cleaning time
: Less than 20 seconds
SMA773C
JPBIA0031ZZ
MA-30
< PERIODIC MAINTENANCE >
CHASSIS MAINTENANCE
CHASSIS MAINTENANCE
EXHAUST SYSTEM
EXHAUST SYSTEM : Inspection
INFOID:0000000005248743
Check exhaust pipes, muffler and mounting for improper attachment,
leakage, cracks, damage or deterioration.
• If damage is found, repair or replace damaged parts.
TRANSFER FLUID
TRANSFER FLUID : Inspection
INFOID:0000000005248744
FLUID LEAKAGE
Check transfer surrounding area (oil seal, drain plug, and filler plug etc.) for fluid leakage.
FLUID LEVEL
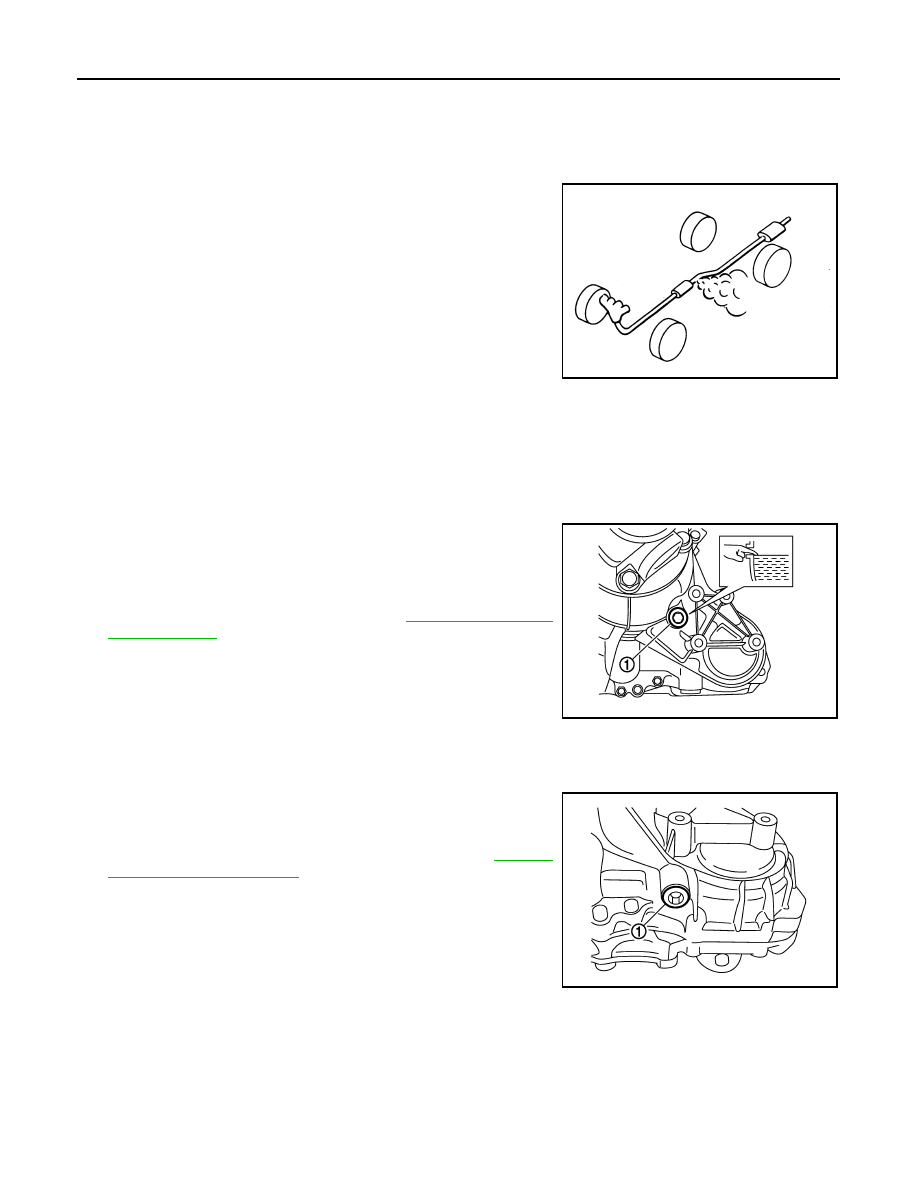
1.
Remove filler plug (1) and gasket. Then check that fluid is filled
up from mounting hole for the filler plug.
CAUTION:
Never start engine while checking fluid level.
2.
Set a new gasket onto filler plug, and install it on transfer and
tighten to the specified torque. Refer to
.
CAUTION:
Never reuse gasket.
TRANSFER FLUID : Draining
INFOID:0000000005248745
1.
Run the vehicle to warm up the transfer unit sufficiently.
2.
Stop the engine, and remove the drain plug (1) to drain the
transfer fluid.
3.
Set a new gasket onto the drain plug, and install it on the trans-
fer and tighten to the specified torque. Refer to
CAUTION:
Never reuse gasket.
SMA211A
JPDIE0129ZZ
JPDIE0130ZZ

CHASSIS MAINTENANCE
MA-31
< PERIODIC MAINTENANCE >
C
D
E
F
G
H
I
J
K
L
M
B
MA
N
O
A
TRANSFER FLUID : Refilling
INFOID:0000000005248746
1.
Remove filler plug (1) and gasket. Then fill fluid up to mounting
hole for the filler plug.
CAUTION:
Carefully fill the fluid. (Fill up for approximately 3 minutes.)
2.
Leave the vehicle for 3 minutes, and check the fluid level again.
3.
Set a new gasket onto filler plug, and install it on transfer and
tighten to the specified torque. Refer to
DLN-69, "VQ35HR : Exploded View"
.
CAUTION:
Never reuse gasket.
FRONT PROPELLER SHAFT: 2S56A
FRONT PROPELLER SHAFT: 2S56A : Inspection
INFOID:0000000005248747
NOISE
Check the propeller shaft tube surface for dents or cracks. If damaged, replace propeller shaft assembly.
VIBRATION
If vibration is present at high speed, inspect propeller shaft runout
first.
1.
With a dial indicator, measure propeller shaft runout at runout
measuring points by rotating final drive companion flange with
hands.
2.
If runout still exceeds specifications, separate propeller shaft at
final drive companion flange; then rotate companion flange 90,
180, 270 degrees and install propeller shaft.
3.
Check runout again. If runout still exceeds specifications, replace propeller shaft assembly.
4.
Check the vibration by driving vehicle.
RUNOUT MEASURING POINT
Propeller shaft runout measuring point (Point “ ”).
REAR PROPELLER SHAFT: 3S80A-R
REAR PROPELLER SHAFT: 3S80A-R : Inspection
INFOID:0000000005248748
NOISE
Fluid and viscosity
: Refer to
.
Fluid capacity
: Refer to
.
JPDIE0129ZZ
Limit
Propeller shaft runout
: Refer to
.
JPDID0185ZZ
Standard
A
: 381.5 mm (15.02 in)
(VQ35HR)
: 386.5 mm (15.22 in)
(VK50VE)
PDIA0768J
Нет комментариевНе стесняйтесь поделиться с нами вашим ценным мнением.
Текст