Infiniti FX35, FX50 (S51). Manual — part 1354
OIL COOLER
LU-13
< REMOVAL AND INSTALLATION >
[VQ35HR]
C
D
E
F
G
H
I
J
K
L
M
A
LU
N
P
O
OIL COOLER
Exploded View
INFOID:0000000005245069
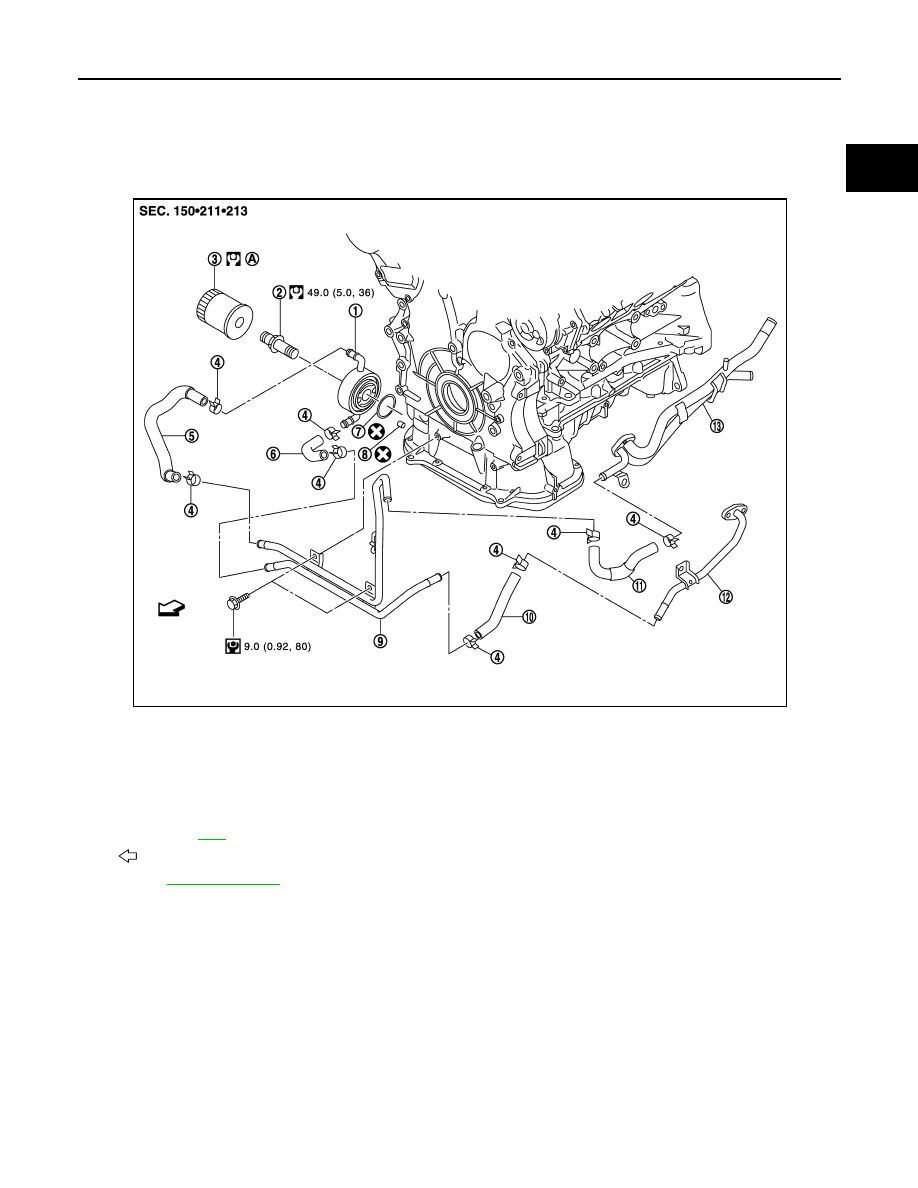
2WD models
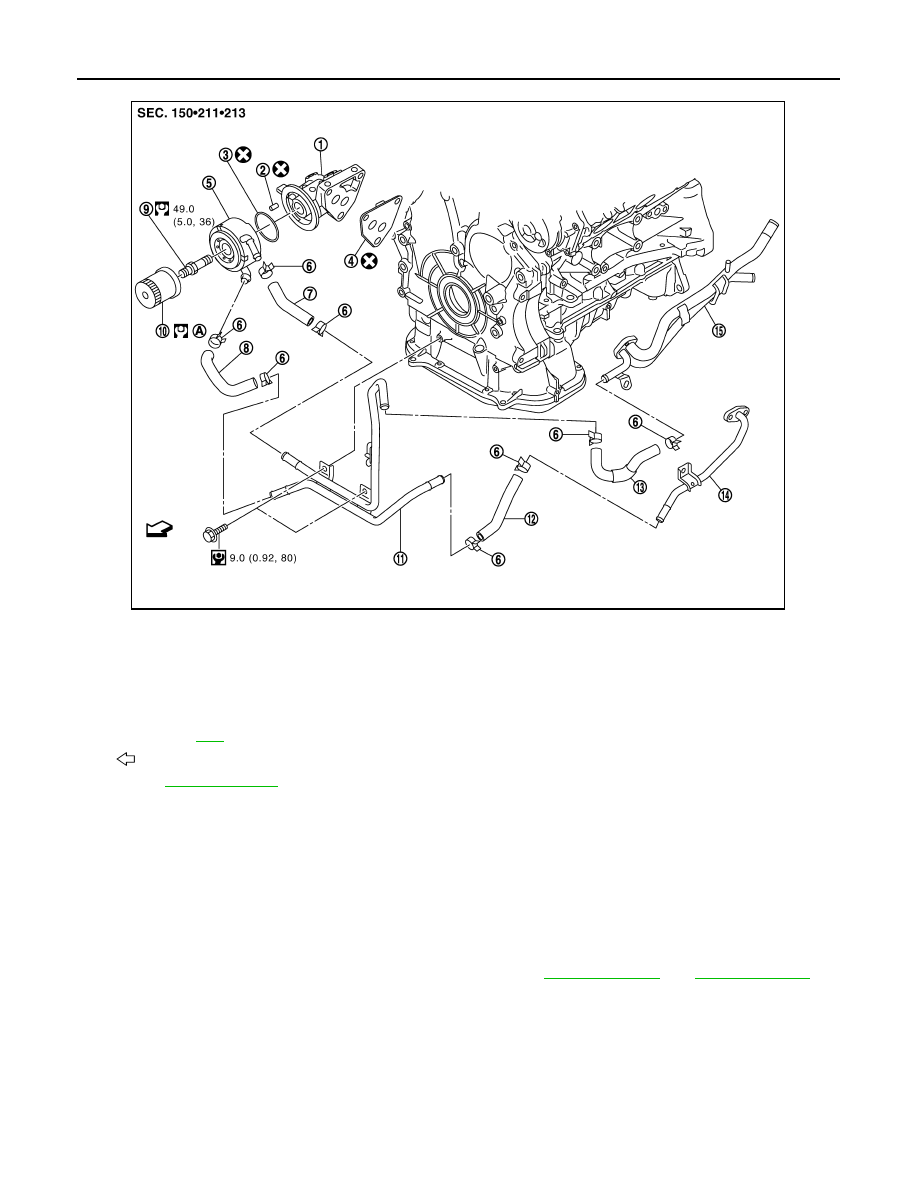
AWD models
1.
Oil cooler
2.
Connector bolt
3.
Oil filter
4.
Clamp
5.
Water hose
6.
Water hose
7.
O-ring
8.
Relief valve
9.
Water pipe
10.
Water hose
11.
Water hose
12.
Water pipe
13.
Heater pipe
A.
: Engine front
for symbols in the figure.
PBIC5238E
LU-14
< REMOVAL AND INSTALLATION >
[VQ35HR]
OIL COOLER
Removal and Installation
INFOID:0000000005245070
REMOVAL
WARNING:
Be careful not to get burned, as engine oil and engine coolant may be hot.
NOTE:
When removing oil cooler only, step 2 is unnecessary.
1.
Remove engine undercover with power tool.
2.
Drain engine coolant from radiator and cylinder block. Refer to
.
NOTE:
Perform this step when removing water pipes.
3.
Disconnect water hoses from oil cooler.
• When removing oil cooler only, pinch water hoses near oil cooler to prevent engine coolant from spilling
out.
• Remaining engine coolant in piping will come out. Use a tray to collect it.
CAUTION:
• Perform this step when the engine is cold.
• Never spill engine coolant on drive belts.
1.
Oil filter bracket
2.
Relief valve
3.
O-ring
4.
Gasket
5.
Oil cooler
6.
Clamp
7.
Water hose
8.
Water hose
9.
Connector bolt
10.
Oil filter
11.
Water pipe
12.
Water hose
13.
Water hose
14.
Water pipe
15.
Heater pipe
A.
: Engine front
for symbols in the figure.
JPBIA0244GB
OIL COOLER
LU-15
< REMOVAL AND INSTALLATION >
[VQ35HR]
C
D
E
F
G
H
I
J
K
L
M
A
LU
N
P
O
4.
Remove oil filter. Refer to
LU-9, "Removal and Installation"
.
CAUTION:
Never spill engine oil on drive belts.
5.
Remove connector bolt, and oil cooler.
CAUTION:
Never spill engine oil on rubber parts such as drive belts and engine mounting insulator.
6.
Remove water pipes, if necessary.
INSTALLATION
Note the following items, and install in the reverse order of removal.
• Check that no foreign objects are adhering to the mating surfaces.
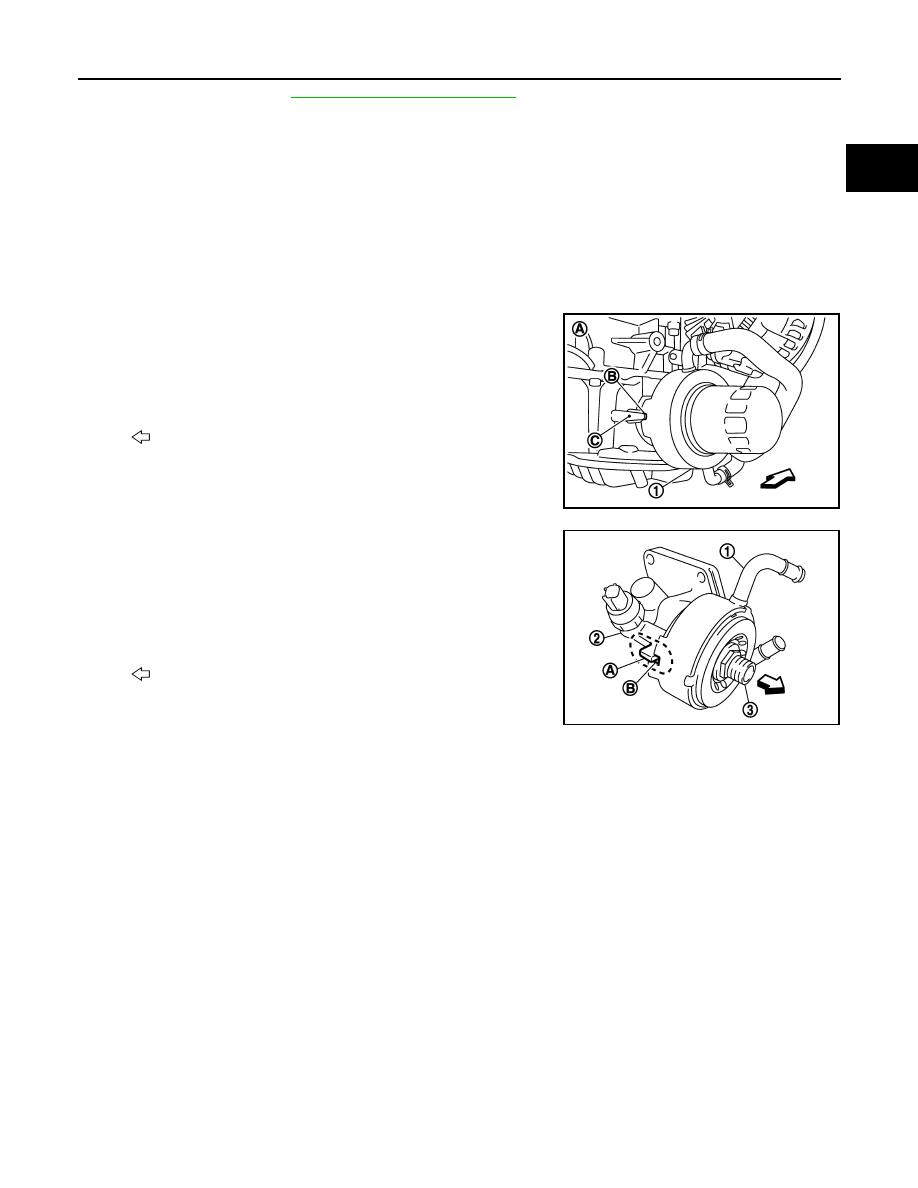
• Align cutout on oil cooler with protrusion on oil pan side (2WD) or oil filter bracket (AWD), and tighten con-
nector bolt.
- 2WD models
- AWD models
Inspection
INFOID:0000000005245071
INSPECTION AFTER REMOVAL
Oil Cooler
Check oil cooler for cracks. Check oil cooler for clogging by blowing through engine coolant inlet. If necessary,
replace oil cooler.
Relief Valve
Check relief valve with the following procedure.
• Press steel ball of relief valve using a clean plastic stick. Check that valve moves smoothly and proper
spring repulsion is felt.
• Replace relief valve, if necessary, with the following procedure.
- Remove the relief valve by prying using a screwdriver.
CAUTION:
Be careful not to damage the mounting hole.
- Press in the relief valve until it reaches a depth of 7 mm (0.28 in) from end surface of oil pan (upper) (2WD)
or oil filter bracket (AWD), using approximately 10 mm (0.39 in) diameter drift.
CAUTION:
Carefully press in the relief valve by aligning its mounting hole side with the axle center so as not to
cause deformation.
INSPECTION AFTER INSTALLATION
1
: Oil cooler
A
: Engine right side
B
: Cutout
C
: Protrusion
: Engine front
PBIC5239E
1
: Oil cooler
2
: Oil filter bracket
3
: Connector bolt
A
: Protrusion
B
: Cutout
: Engine front
JPBIA0083ZZ

LU-16
< REMOVAL AND INSTALLATION >
[VQ35HR]
OIL COOLER
1.
Check the engine oil level and the engine coolant level and add engine oil and engine coolant. Refer to
.
2.
Start the engine, and check there is no leaks of engine oil or engine coolant.
3.
Stop the engine and wait for 10 minutes.
4.
Check the engine oil level and the engine coolant level again. Refer to
and
Нет комментариевНе стесняйтесь поделиться с нами вашим ценным мнением.
Текст