Infiniti EX35. Manual — part 974
BODY SIDE TRIM
INT-21
< ON-VEHICLE REPAIR >
C
D
E
F
G
H
I
K
L
M
A
B
INT
N
O
P
2.
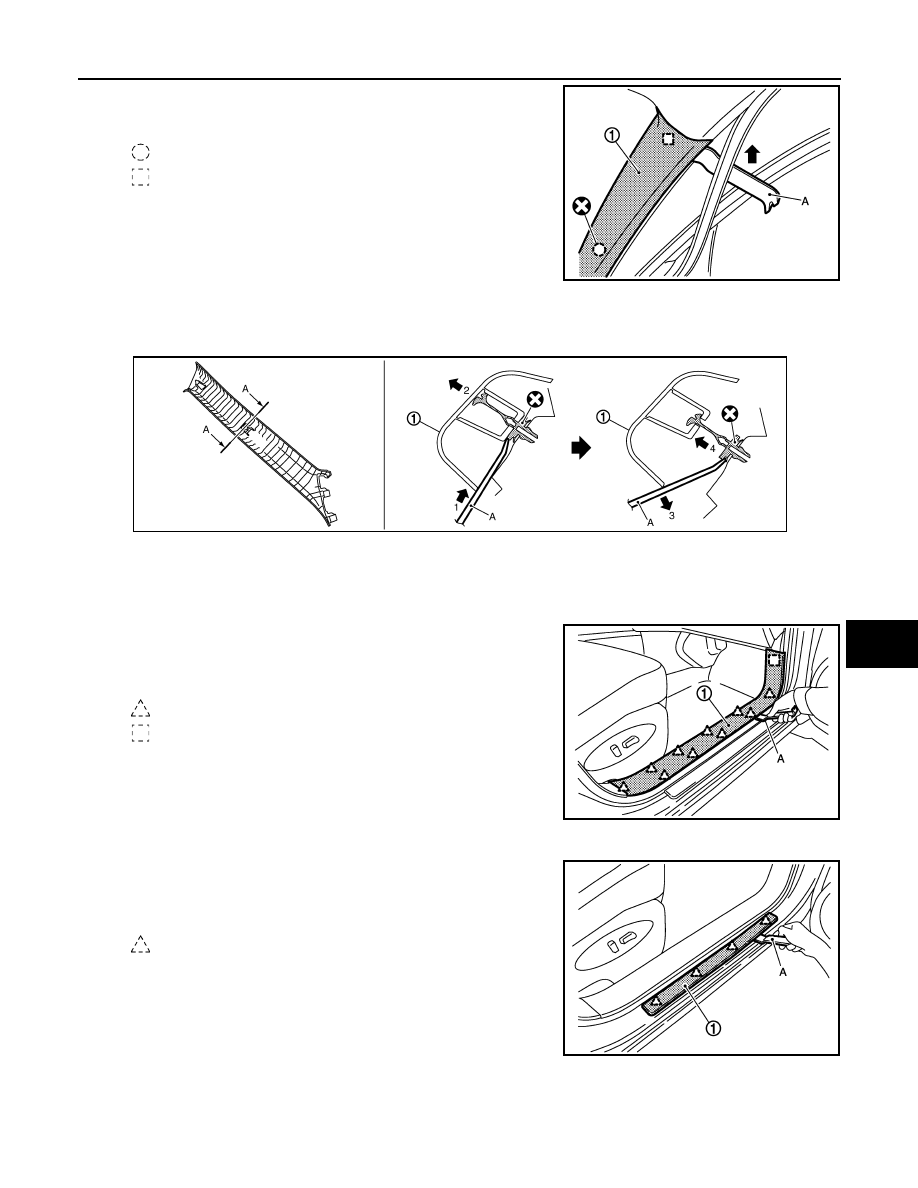
Disengage front pillar garnish (1) mounting clip and metal clip
with remover tool (A).
3.
Pull the front pillar garnish (1) partially toward the vehicle.
4.
Insert the remover tool (A) between mounting clip bottom side and body side to disengage front pillar gar-
nish (1) mounting clip.
5.
Once free, pull front pillar garnish (1) upwards to disengage the lower locating tab from instrument panel.
6.
Remove front pillar garnish.
FRONT KICKING PLATE INNER
1.
Disengage the pawls and metal clip with remover tool (A) from
the body side panel.
2.
Remove front kicking plate inner (1).
FRONT KICKING PLATE OUTER
1.
Disengage the pawls from the body side panel with remover tool
(A).
2.
Remove front kicking plate outer (1)
DASH SIDE FINISHER
1.
Remove front kicking plate inner.
2.
Remove clip (A).
: Clip
: Metal clip
JMJIA1553ZZ
JMJIA0990ZZ
: Pawl
: Metal clip
JMJIA1554ZZ
: Pawl
JMJIA1555ZZ

INT-22
< ON-VEHICLE REPAIR >
BODY SIDE TRIM
3.
Disengage dash side finisher (1) mounting clips with a remover
tool (B).
4.
Remove dash side finisher.
REAR KICKING PLATE INNER
1.
Disengage the pawls from the body with remover tool (A).
2.
Remove rear kicking plate inner (1).
REAR KICKING PLATE OUTER
1.
Disengage the pawls from the body side panel with remover tool
(A).
2.
Remove rear kicking plate outer (1).
CENTER PILLAR LOWER GARNISH
1.
Remove front kicking plate inner and rear kicking plate inner.
2.
Insert a remover tool (A) between center pillar lower garnish (1)
and body side panel to disengage the clips.
3.
Remove the seat belt anchor cap (2), then remove the bolt
behind this cap.
4.
Remove center pillar lower garnish (1).
CENTER PILLAR UPPER GARNISH
1.
Remove front kicking plate inner and rear kicking plate inner.
2.
Remove center pillar lower garnish.
3.
Remove center pillar upper garnish lower clip.
: Clip
JMJIA0961ZZ
: Pawl
JMJIA1556ZZ
: Pawl
JMJIA1557ZZ
: Clip
JMJIA1558ZZ

BODY SIDE TRIM
INT-23
< ON-VEHICLE REPAIR >
C
D
E
F
G
H
I
K
L
M
A
B
INT
N
O
P
4.
Pull center pillar upper garnish from inside passenger room, disengage clips as shown in the figure, and
remove garnish from vehicle.
INSTALLATION
Install in the reverse order of removal.
CAUTION:
When installing body side trim, check that clips are securely fitted in panel holes on body, and then
press them in.
1.
Center pillar upper garnish
2.
Center pillar panel
JMJIA1176ZZ
INT-24
< ON-VEHICLE REPAIR >
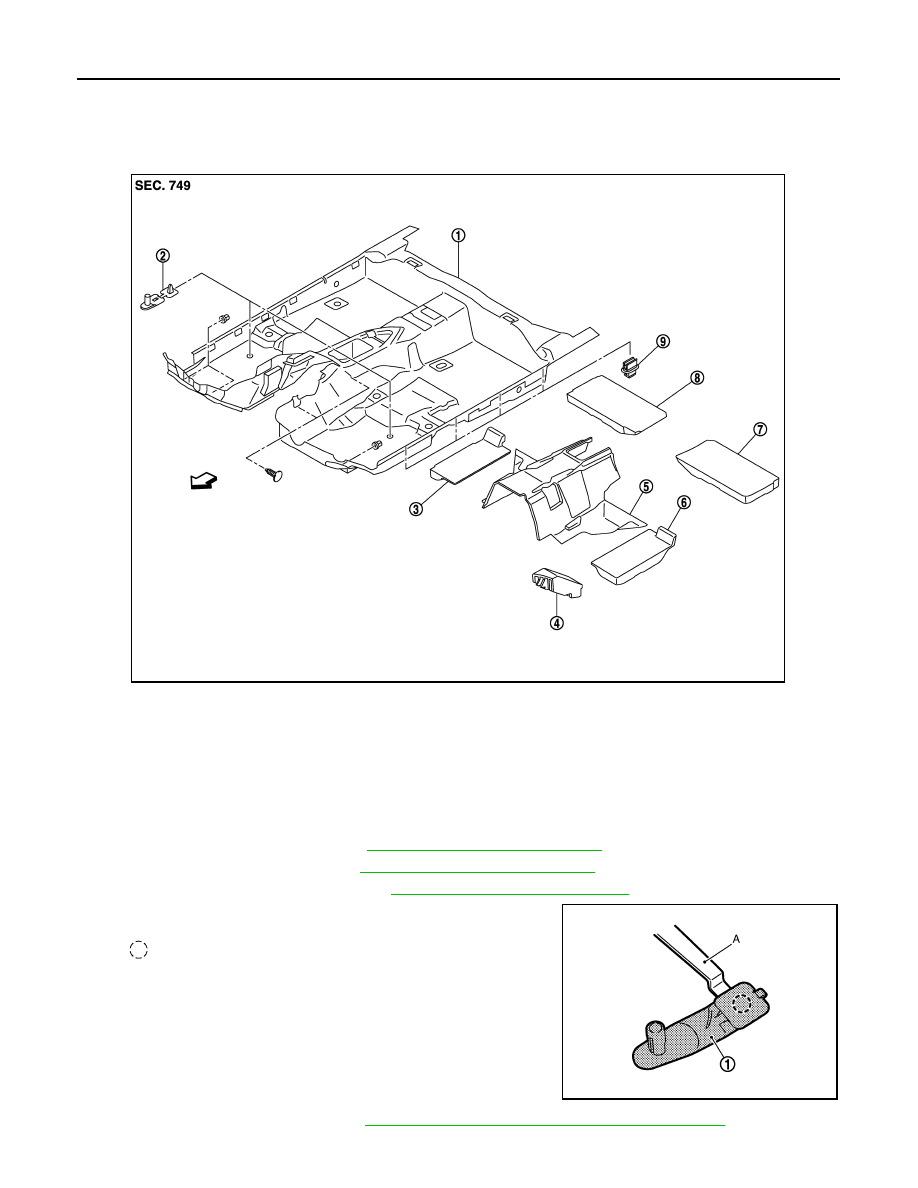
FLOOR TRIM
FLOOR TRIM
Exploded View
INFOID:0000000003591421
Removal and Installation
INFOID:0000000003591422
REMOVAL
1.
Remove front seat (LH/RH). Refer to
SE-90, "Removal and Installation"
.
2.
Remove rear seat cushion. Refer to
SE-99, "Removal and Installation"
.
3.
Remove accelerator pedal pad. Refer to
ACC-3, "Removal and Installation"
.
4.
Disengage clip of floor hook (1) with remover tool (A).
5.
Remove foot grille (LH/RH). Refer to
VTL-59, "FOOT GRILLE : Removal and Installation"
.
1.
Floor trim
2.
Floor hook
3.
Front floor spacer (RH)
4.
Footrest
5.
Front floor spacer center
6.
Front floor spacer (LH)
7.
Rear floor spacer (LH)
8.
Rear floor spacer (RH)
9.
Fixing clip
JMJIA1559ZZ
: Clip
JMJIA0092GB
Нет комментариевНе стесняйтесь поделиться с нами вашим ценным мнением.
Текст