Infiniti EX35. Manual — part 712
IGNITION COIL, SPARK PLUG AND ROCKER COVER
EM-47
< ON-VEHICLE REPAIR >
C
D
E
F
G
H
I
J
K
L
M
A
EM
N
P
O
IGNITION COIL, SPARK PLUG AND ROCKER COVER
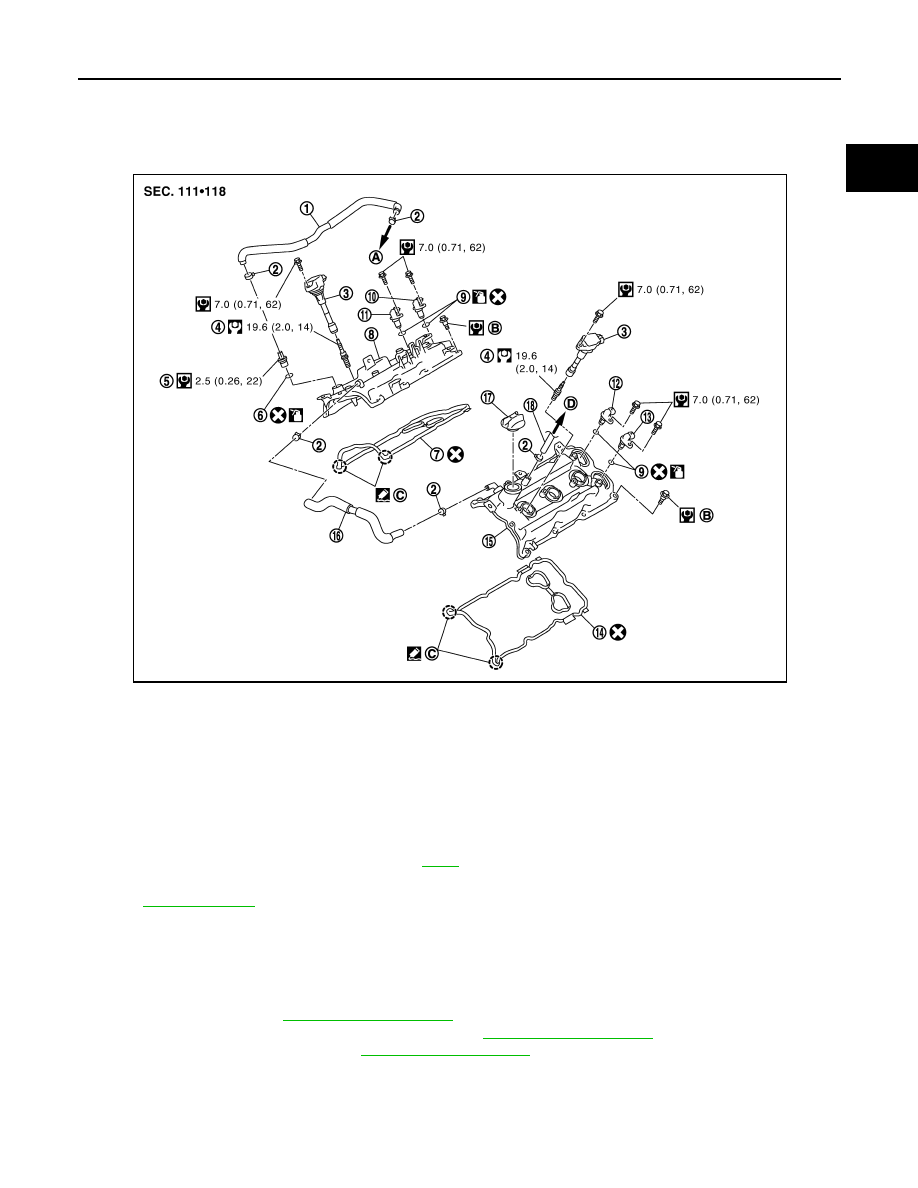
Exploded View
INFOID:0000000003470880
Removal and Installation
INFOID:0000000003139115
REMOVAL
1.
Remove the following parts:
• Engine cover: Refer to
• Air cleaner case and air duct (RH and LH): Refer to
• Intake manifold collector: Refer to
.
2.
Disconnect PCV hose from rocker cover.
1.
PCV hose
2.
Clamp
3.
Ignition coil
4.
Spark plug
5.
PCV valve
6.
O-ring
7.
Rocker cover gasket (bank 1)
8.
Rocker cover (bank 1)
9.
O-ring
10.
Camshaft position sensor (PHASE)
(bank 1)
11.
Exhaust valve timing control position
sensor (bank 1)
12.
Camshaft position sensor (PHASE)
(bank 2)
13.
Exhaust valve timing control position
sensor (bank 2)
14.
Rocker cover gasket (bank 2)
15. Rocker cover (bank 2)
16.
PCV hose
17.
Oil filler cap
18. PCV hose
A.
To intake manifold collector
B.
Refer to
C.
Camshaft bracket side
D.
To air duct
Refer to
for symbols in the figure.
JPBIA1622GB
EM-48
< ON-VEHICLE REPAIR >
IGNITION COIL, SPARK PLUG AND ROCKER COVER
3.
Remove camshaft position sensor (PHASE) and exhaust valve
timing control position sensor. (bank 1 and bank 2)
CAUTION:
• Handle carefully to avoid dropping and shocks.
• Never disassemble.
• Never allow metal powder to adhere to magnetic part at
sensor tip.
• Never place sensors in a location where they are exposed
to magnetism.
4.
Remove PCV valve and O-ring from rocker cover, if necessary.
5.
Remove oil filler cap from rocker cover, if necessary.
6.
Remove ignition coil.
CAUTION:
Never shock ignition coil.
7.
Remove harness clips on the rocker cover.
8.
Loosen mounting bolts with power tool in reverse order shown in
the figure.
9.
Remove rocker cover gasket from rocker cover.
10. Use scraper to remove all traces of liquid gasket from cylinder head and camshaft bracket (No. 1).
CAUTION:
Never scratch or damage the mating surface when cleaning off old liquid gasket.
INSTALLATION
A
: Keep off any magnetic materials
: Engine front
JPBIA0454ZZ
JPBIA0040ZZ
IGNITION COIL, SPARK PLUG AND ROCKER COVER
EM-49
< ON-VEHICLE REPAIR >
C
D
E
F
G
H
I
J
K
L
M
A
EM
N
P
O
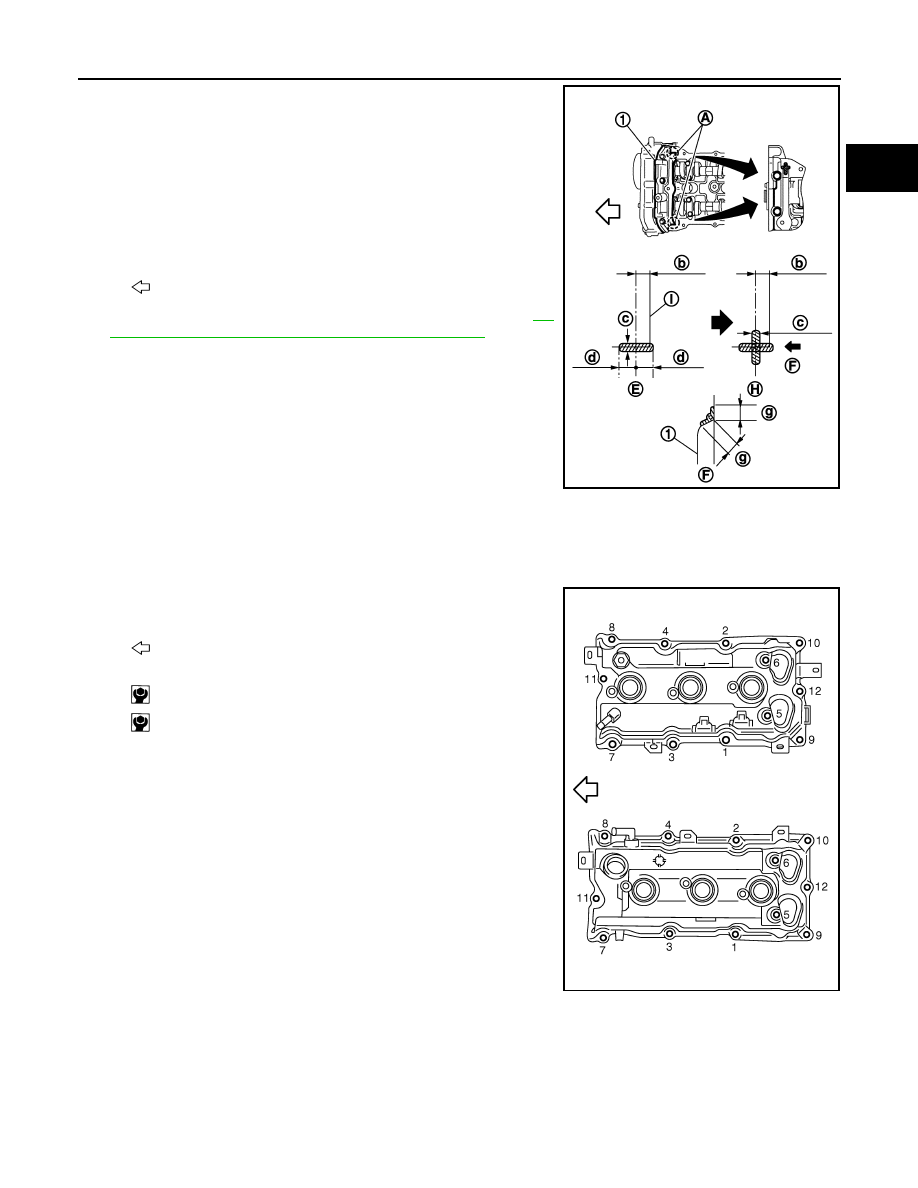
1.
Apply liquid gasket to the position shown in the figure with the
following procedure:
Use Genuine RTV silicone sealant or equivalent. Refer to
15, "Recommended Chemical Products and Sealants"
.
a.
Refer to figure (E) to apply liquid gasket to joint part of camshaft
bracket (No. 1) (1) and cylinder head.
b.
Refer to figure (H) to apply liquid gasket in 90 degrees to figure.
2.
Install rocker cover gasket to rocker cover.
3.
Install rocker cover.
• Check if rocker cover gasket is not dropped from the installation groove of rocker cover.
4.
Tighten bolts in two steps separately in numerical order as
shown in the figure.
5.
Install in the reverse order of removal after this step.
A
: Liquid gasket application point
F
: View F
I
: End surface of camshaft bracket (No. 1)
b
: 4 mm (0.16 in)
c
:
φ
2.5 - 3.5 mm (0.098 - 0.138 in)
d
: 5 mm (0.20 in)
g
: 10 mm (0.39 in)
: Engine front
JPBIA0274ZZ
: Engine front
1st step
: 2.0 N·m (0.2 kg-m, 18 in-lb)
2nd step
: 8.3 N·m (0.85 kg-m, 73 in-lb)
JPBIA0040ZZ
EM-50
< ON-VEHICLE REPAIR >
TIMING CHAIN
TIMING CHAIN
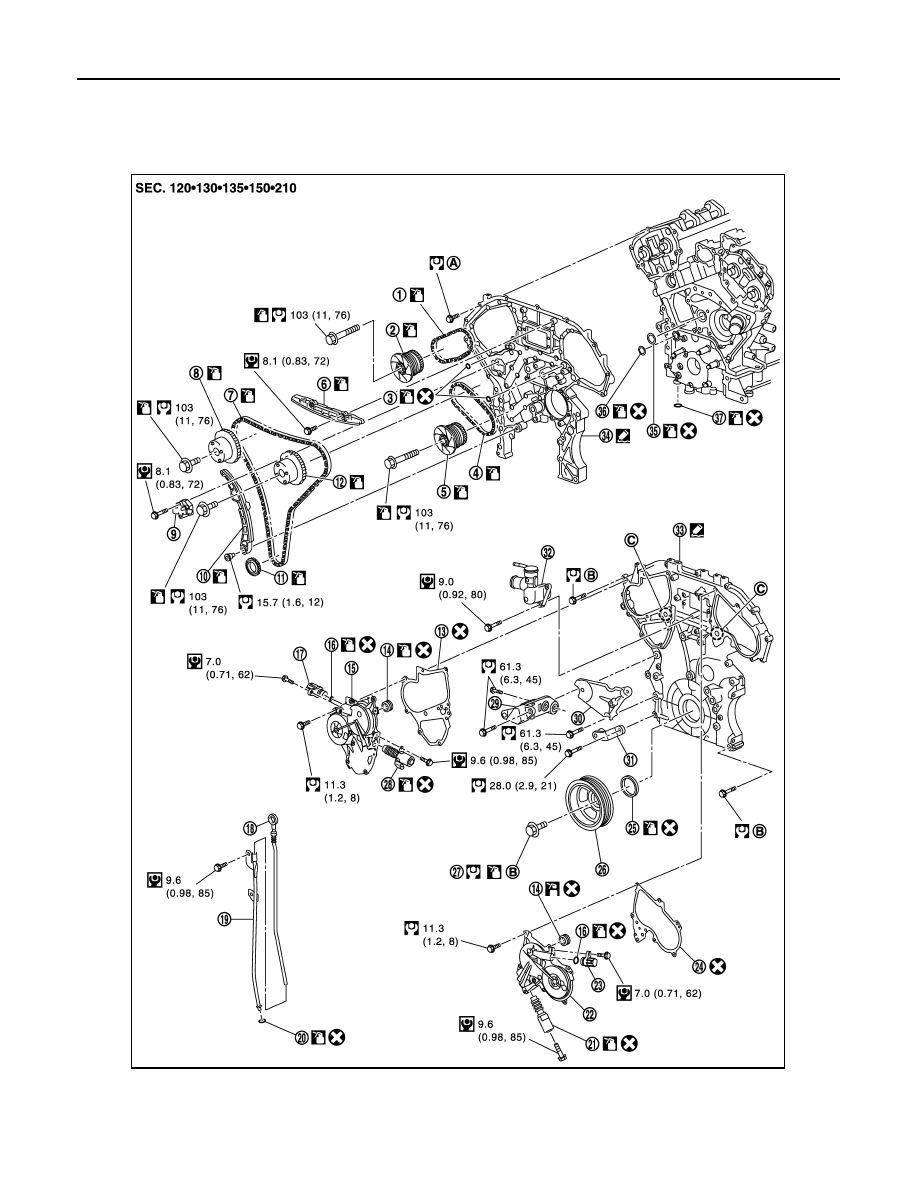
Exploded View
INFOID:0000000003139116
1.
Timing chain (secondary)
2.
Camshaft sprocket (EXH)
3.
O-ring
4.
Timing chain (secondary)
5.
Camshaft sprocket (EXH)
6.
Internal chain guide
7.
Timing chain (primary)
8.
Camshaft sprocket (INT)
9.
Timing chain tensioner (primary)
JPBIA1926GB
Нет комментариевНе стесняйтесь поделиться с нами вашим ценным мнением.
Текст