Infiniti EX35. Manual — part 984

INSTRUMENT PANEL ASSEMBLY
IP-21
< ON-VEHICLE REPAIR >
C
D
E
F
G
H
I
K
L
M
A
B
IP
N
O
P
• Side defroster nozzle LH/RH. Refer to
VTL-54, "SIDE DEFROSTER NOZZLE : Removal and Installa-
• Antenna feeder. Refer to
.
• GPS antenna. Refer to
AV-920, "Removal and Installation"
• Trip A/B reset switch. Refer to
MWI-165, "Removal and Installation"
.
INSTALLATION
Install in the reverse order of removal.
IP-22
< ON-VEHICLE REPAIR >
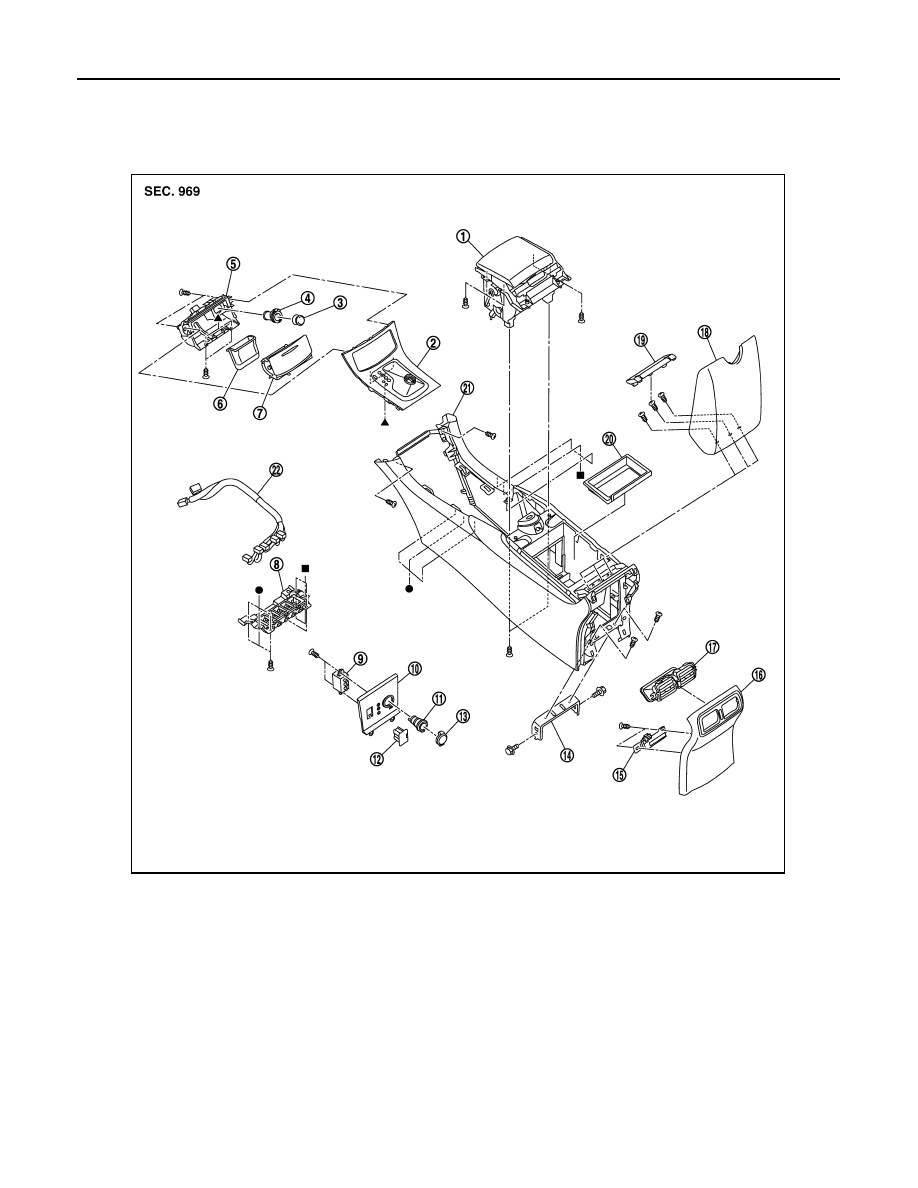
CENTER CONSOLE ASSEMBLY
CENTER CONSOLE ASSEMBLY
Exploded View
INFOID:0000000003624914
Removal and Installation
INFOID:0000000003625190
REMOVAL
1.
Put selector lever in drive position.
1.
Cup holder assembly
2.
Console finisher assembly
3.
Socket knob
4.
Socket inner case
5.
6.
Inner ashtray
7.
Ashtray lid
8.
Switch panel
9.
Auxiliary input jacks
10. Console finisher
11.
Socket inner case
12. ipod connector
13. Socket knob
14. Console bracket
15. Inside key antenna
16. Console rear finisher
17. Rear ventilator grille
18. Console lid assembly
19. Console mask
20. Console pocket
21. Center console assembly
22. Console sub harness
JMJIA1640ZZ

CENTER CONSOLE ASSEMBLY
IP-23
< ON-VEHICLE REPAIR >
C
D
E
F
G
H
I
K
L
M
A
B
IP
N
O
P
2.
Remove selector lever knob.
• Refer to
TM-156, "2WD : Removal and Installation"
• Refer to
TM-159, "AWD : Removal and Installation"
.(AWD models)
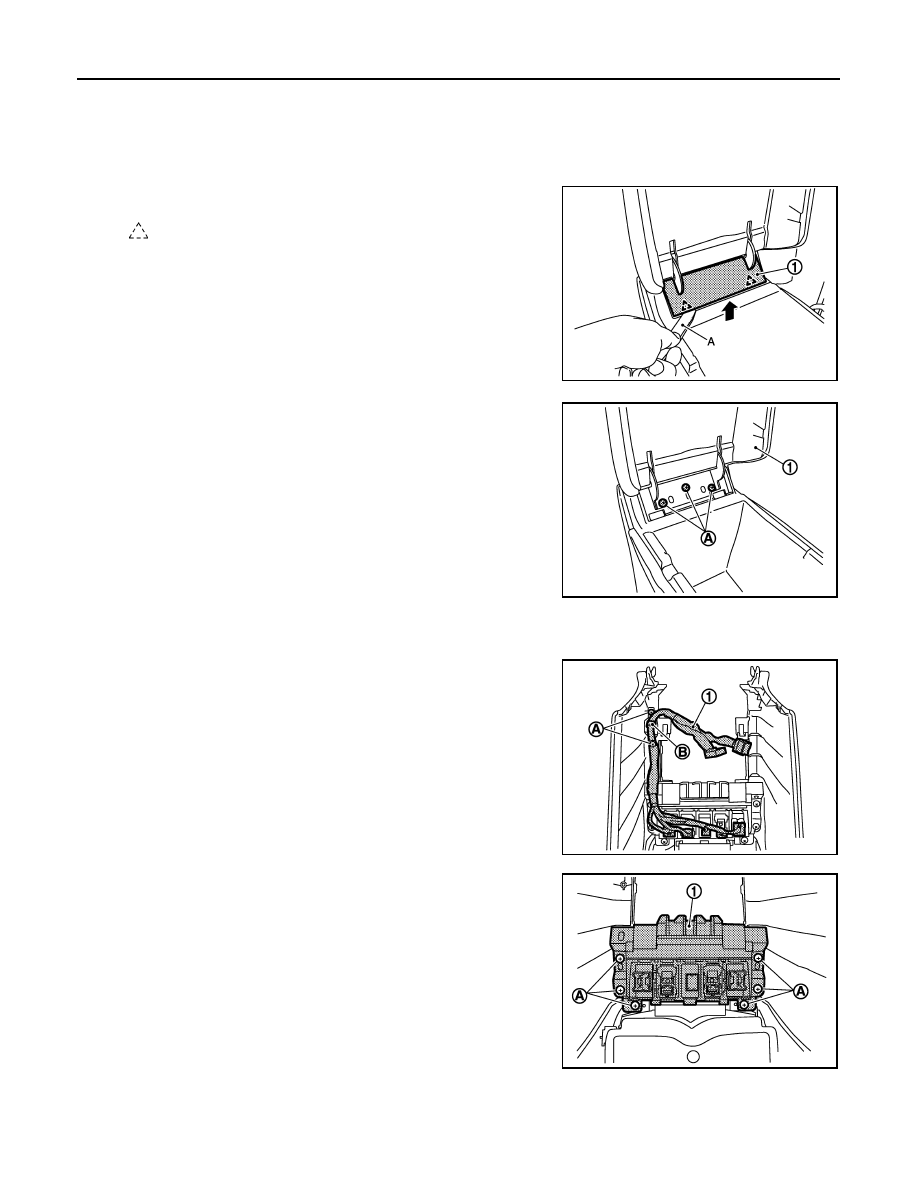
3.
Remove console finisher assembly.
• Pull console finisher (1), upward to disengage from center
console.
• Disconnect harness connectors.
4.
Disconnect console sub harness connectors (A).
5.
Remove center console fixing screws (B).
6.
Put front seat to front must position.
7.
Remove console rear finisher.
• Pull back the console rear finisher (1) with remover tool (A).
• Disconnect inside key antenna connector.
8.
Remove rear ventilator duct (1).
Refer to
VTL-58, "REAR VENTILATOR DUCT 2 : Removal and
.
9.
Remove center console fixing screws (A).
10. Remove center console assembly.
• Lift up center console assembly back side.
• Disconnect harness connectors.
INSTALLATION
Install in the reverse order of removal.
: Pawl
: Metal clip
JMJIA1612ZZ
JMJIA1613ZZ
: Metal clip
JMJIA1614ZZ
JMJIA1615ZZ
IP-24
< ON-VEHICLE REPAIR >
CENTER CONSOLE ASSEMBLY
Disassembly and Assembly
INFOID:0000000003625192
DISASSEMBLY
1.
Remove console lid assembly.
• Open the console lid.
• Remove console mask (1) fixing pawls with remover tool (A).
• Remove console lid assembly (1) fixing screws (A), and then
remove console lid assembly.
2.
Remove console pocket.
3.
Reverse a center console assembly.
4.
Remove console sub harness.
• Remove console sub harness (1) fixing screws (A).
• Remove console sub harness fixing clip (B).
• Disconnect switch connectors.
5.
Remove switch panel.
• Remove switch panel (1) fixing screws (A).
• Pull back switch panel.
: Pawl
JMJIA1641ZZ
JMJIA1642ZZ
JMJIA1643ZZ
JMJIA1645ZZ
Нет комментариевНе стесняйтесь поделиться с нами вашим ценным мнением.
Текст