SsangYong Korando II (1996-2006 year). Manual — part 37
1D1 -- 10 M162 ENGINE COOLING
DAEWOO MY_2000
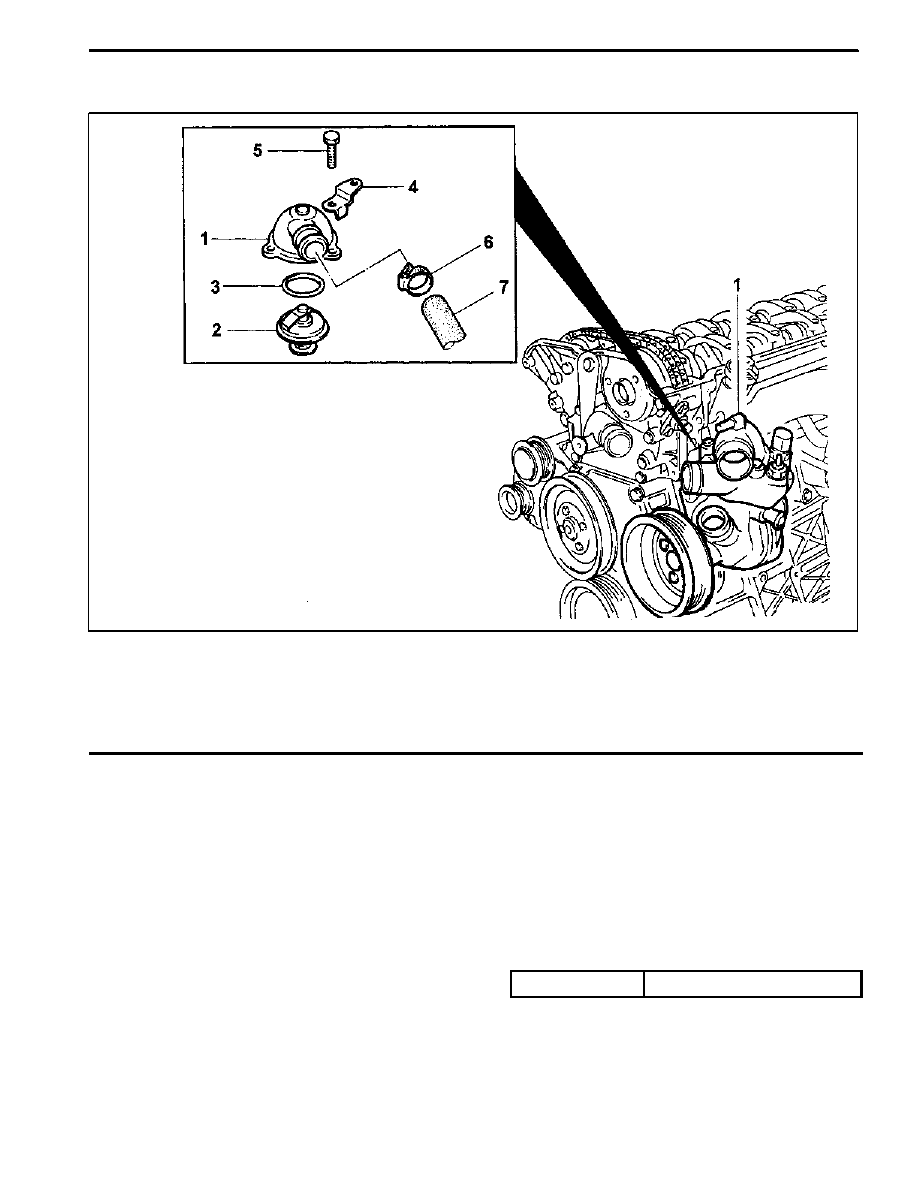
THERMOSTAT
1 Thermostat Cover
2 Thermostat
3 O--ring
4 Thermostat Cover Bracket
5 Bolt (M6 X 25, 3 pieces)
9--11 NSm (80--97 lb-in)
. . . . . . . . . . . . . . . . . . . . .
6 Hose Mounting Clamp
7 Heater Hose
Removal & Installation Procedure
1. Drain the coolant from the radiator.
2. Loosen the hose mounting clamp (6) and remove the
heater hose (7).
3. Unscrew the three bolts (5) and remove the thermo-
stat cover bracket, thermostat cover and the thermo-
stat in order.
Installation Notice
Tightening Torque
9 -- 11 NSm (80 -- 97 lb-in)
Do not separate the thermostat cover and thermo-
stat.
4. Replace the O--ring if necessary.
5. Check the leakage in the cooling system.

M162 ENGINE COOLING 1D1 -- 11
DAEWOO MY_2000
OIL COOLER PIPE LINE
Preceding Work: Removal of intake air duct
1 Bolt (M6 X 35, 1 piece)
9--11 NSm (80--97 lb-in)
. . . . . . . . . . . . . . . . . . . . .
2 Bolt (M6 X 16, 2 pieces)
9--11 NSm (80--97 lb-in)
. . . . . . . . . . . . . . . . . . . . .
3 Oil Cooler Pipe Line
4 O--ring
Replace
. . . . . . . . . . . . . . . . . . . . . . . . . . . .
Removal & Installation Procedure
1. Drain the coolant.
2. Unscrew the bolts (1, 2) and remove the oil cooler
pipe line (3).
Replace the O--ring with new one.
Installation Notice
Tightening Torque
9 -- 11 NSm (80 -- 97 lb-in)
3. Installation should follow the removal procedure in
the reverse order.
4. Fill up the coolant as specified.
5. Check the leaks in the cooling system.

1D1 -- 12 M162 ENGINE COOLING
DAEWOO MY_2000
COOLING FAN AND VISCOUS CLUTCH
Preceding Work: Removal of cooling fan shroud
1 Cooling Fan Pulley
2 Viscous Clutch
3 Cooling Fan
4 Bolt (M6 X 12, 4 pieces)
9--11 NSm (80--97 lb-in)
. . . . . . . . . . . . . . . . . . . . .
5 Bolt (M10 X 45, 1 piece)
40.5--49.5 NSm (29.8--36.5 lb-ft)
. . . . . . . . . . . . .

M162 ENGINE COOLING 1D1 -- 13
DAEWOO MY_2000
Tools Required
603 589 00 40 00 Fan Clutch Holder
1. Remove the engine hanger bracket bolts.
Installation Notice
Tightening Torque
22.5 -- 27.5 NSm
(16.6 -- 20.3 lb-ft)
2. Remove the engine hanger bracket.
3. Remove the cooling fan bolts.
Installation Notice
Tightening Torque
9 -- 11 NSm (80 -- 97 lb-in)
4. Hold the cooling fan pulley using the fan clutch holder
603 589 00 40 00.
5. Remove the viscous clutch mounting bolts and vis-
cous clutch.
Installation Notice
Tightening Torque
40.5 -- 49.5 NSm
(29.8 -- 36.5 lb-ft)
Important: There are two chambers in the viscous
clutch. Be sure to make the viscous clutch stand on the
ground not to flow silicone oil into another chamber in
the viscous clutch. Do not lay down the clutch.
6. Installation should follow the removal procedure in
the reverse order.
Нет комментариевНе стесняйтесь поделиться с нами вашим ценным мнением.
Текст