Hummer H1 (2002+). Manual — part 164

_____________________________________________________________________
Body 10-27
®
05745159
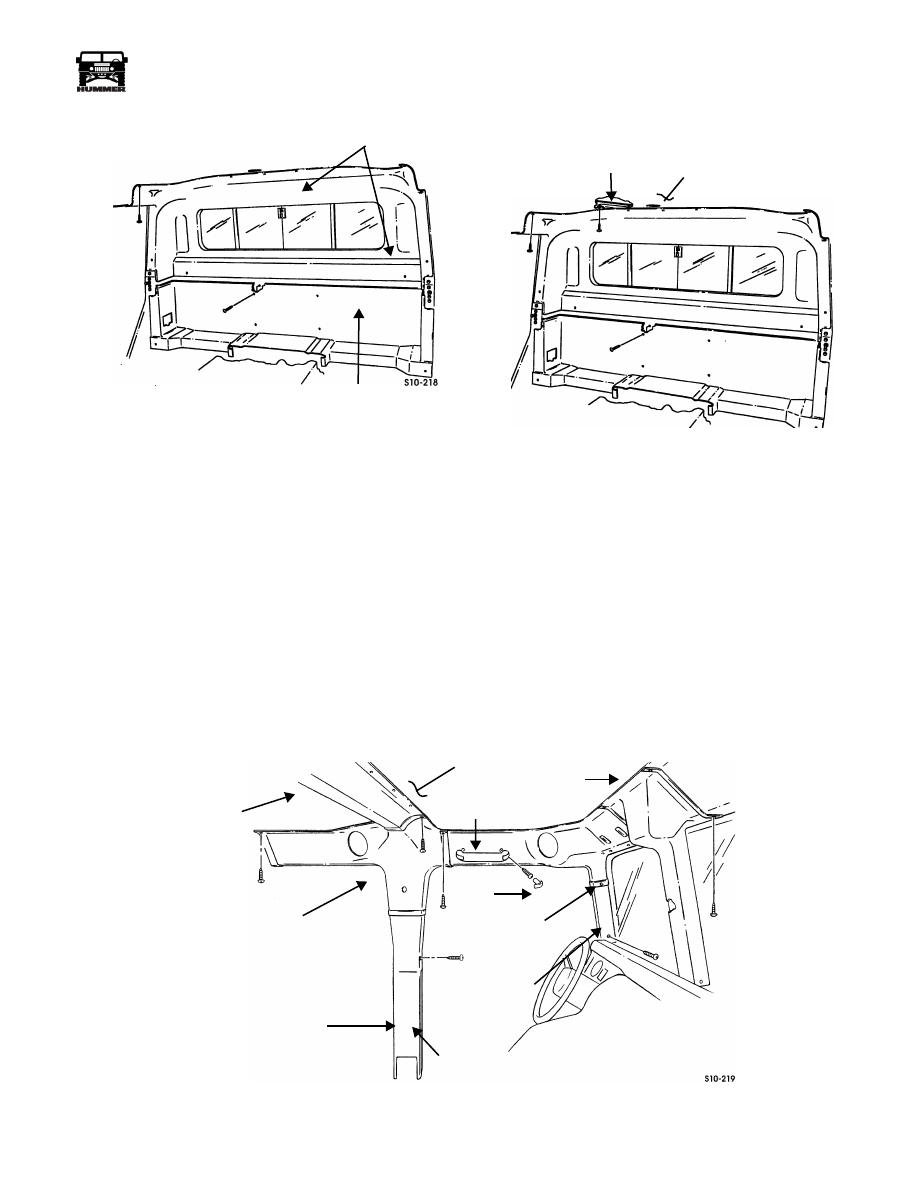
Figure 10-39: Four-Passenger Vehicle Interior Trim
Component Identification
12. Remove screw/washer assemblies and window trim from
rear compartment wall and roof.
13. Remove panel fasteners and upper wheelhouse trim from
wheelhouse.
14. Remove screw/washer assemblies and lower wheelhouse
trim from wheelhouse.
15. Remove screw/washer assemblies and lower center trim
panel from lower rear compartment wall.
16. Remove domelight.
17. Remove panel fasteners and headliner from roof.
Installation
1.
Secure headliner to roof with panel fasteners (Figure 10-39).
2.
Secure domelight.
3.
Secure lower center trim panel to lower rear compartment
wall with screw/washer assemblies.
4.
Secure upper and lower wheelhouse trim panels to
wheelhouse with screw/washer assemblies and panel
fasteners.
5.
Secure window trim to rear compartment wall and roof
with screw/washer assemblies.
6.
Secure trim panel to rear compartment wall with screw/
washer assemblies.
NOTE:
Perform steps 7 through 9 for station wagon models
only.
7.
Secure lower C-pillar trim to lower C-pillar with four
screw and washer assemblies (Figure 10-38).
8.
Secure upper C-pillar trim to roof with nine screw and
washer assemblies.
9.
Secure C-pillar center trim to roof with eight screw and
washer assemblies.
10. Secure B-pillar trim to B-pillar with washers and screws
(Figure 10-40).
11. Secure upper B-bar trim to roof with screw/washer
assemblies.
12. Secure B-bar center trim to roof with screw/washer
assemblies.
Figure 10-40: B-Pillar and Interior Trim
Component Identification
13. Secure grab handle to trim with screws and covers.
14. Install seat belt assemblies.
15. Install overhead speakers (Section 12).
16. Install rear seats.
HEADLINER
PANEL
LOWER REAR
COMPARTMENT
WALL
FASTENER
REAR
COMPARTMENT
WALL
ROOF
WINDOW
TRIM
WINDOW TRIM
UPPER
WHEELHOUSE
TRIM
TRIM
PANEL
LOWER
WHEELHOUSE
TRIM
LOWER CENTER
TRIM PANEL
GRAB HANDLE
COVER
ROOF
UPPER
B-BAR
TRIM
CENTER
B-BAR
TRIM
TRIM
B-PILLAR

10-28
Body
______________________________________________________________________
®
Driver’s Compartment Trim Replacement
Removal
1.
Remove overhead speakers from driver’s compartment and
passenger’s compartment (if applicable) (Section 12).
2.
Remove visors.
3.
Remove seat belt assemblies.
4.
Remove covers, screws, and grab handle from trim.
(Figure 10-41).
5.
Remove screw/washer assemblies and B-bar center trim
from roof.
6.
Remove screw/washer assemblies and center trim from
windshield frame and roof (Figure 10-42).
7.
Remove screw/washer assemblies and upper A-pillar trim
from roof.
8.
Remove screw/washer assembly and lower A-pillar trim
from A-pillar.
9.
Remove screw/washer assemblies and upper B-bar trim
from roof.
10. Remove screws, washers, and B-pillar trim from B-pillar.
NOTE:
Replacement of the rear driver’s compartment trim for
2-door vehicles with and without an enlarged cab is basically
the same. Steps 11 through 13 cover 2-door vehicles without
an enlarged cab.
11. Remove seats.
Figure 10-41: Driver’s Compartment Trim Replacement
Figure 10-42: A-Pillar and B-Bar Interior Trim Identification
GRAB
COVER
ROOF
B-BAR
CENTER TRIM
HANDLE
UPPER
TRIM
A-PILLAR
LOWER
UPPER
CENTER TRIM
B-BAR
A-PILLAR
TRIM
A-PILLAR
TRIM
B-PILLAR
TRIM
_____________________________________________________________________
Body 10-29
®
05745159
Figure 10-43: Rear Compartment Wall Location
13. Remove screw/washer assemblies, B-beam trim, and rear
edge trim from B-beam and lower rear compartment wall.
14. Remove domelight.
15. Remove panel fasteners and headliner from roof (Figure 10-44).
Installation
1.
Position headliner on roof and install with panel fasteners
(Figure 10-44).
2.
Install domelight.
NOTE:
Perform steps 3 through 5 for 2-door vehicles without
an enlarged cab.
3.
Secure rear edge trim and B-beam trim to B-beam and rear
compartment wall with screw/washer assemblies
(Figure 10-43).
4.
Secure trim to upper rear compartment wall with screw/
washer assemblies.
Figure 10-44: Headliner Positioning
5.
Install seats.
6.
Secure B-pillar trim to B-pillar with washers and screws
(Figure 10-45).
7.
Secure upper B-bar trim to roof with screw/washer
assemblies.
8.
Secure lower A-pillar trim to A-pillar with screw/washer
assembly.
9.
Secure upper A-pillar trim to roof with screw/washer
assemblies (Figure 10-42).
10. Secure center trim to windshield frame and roof with
screw/washer assemblies (Figure 10-45).
11. Secure B-bar center trim to roof with screw/washer
assemblies.
12. Secure grab handle to trim with screws and covers.
Figure 10-45: A-Pillar and B-Bar Interior Trim Components
LOWER REAR
COMPARTMENT WALL
UPPER REAR
COMPARTMENT WALL
ROOF
HEADLINER
ROOF
GRAB HANDLE
COVER
A-PILLAR
LOWER
A-PILLAR
CENTER TRIM
B-PILLAR
UPPER
B-BAR
TRIM
B-BAR
CENTER
TRIM
TRIM
B-PILLAR TRIM
10-30
Body
______________________________________________________________________
®
Station Wagon Rear Compartment Trim
Replacement
Removal
1.
Remove rear seats.
2.
Remove bolts, washers, upper seat belt bracket, and seat
belt assembly from C-pillar (Figure 10-46).
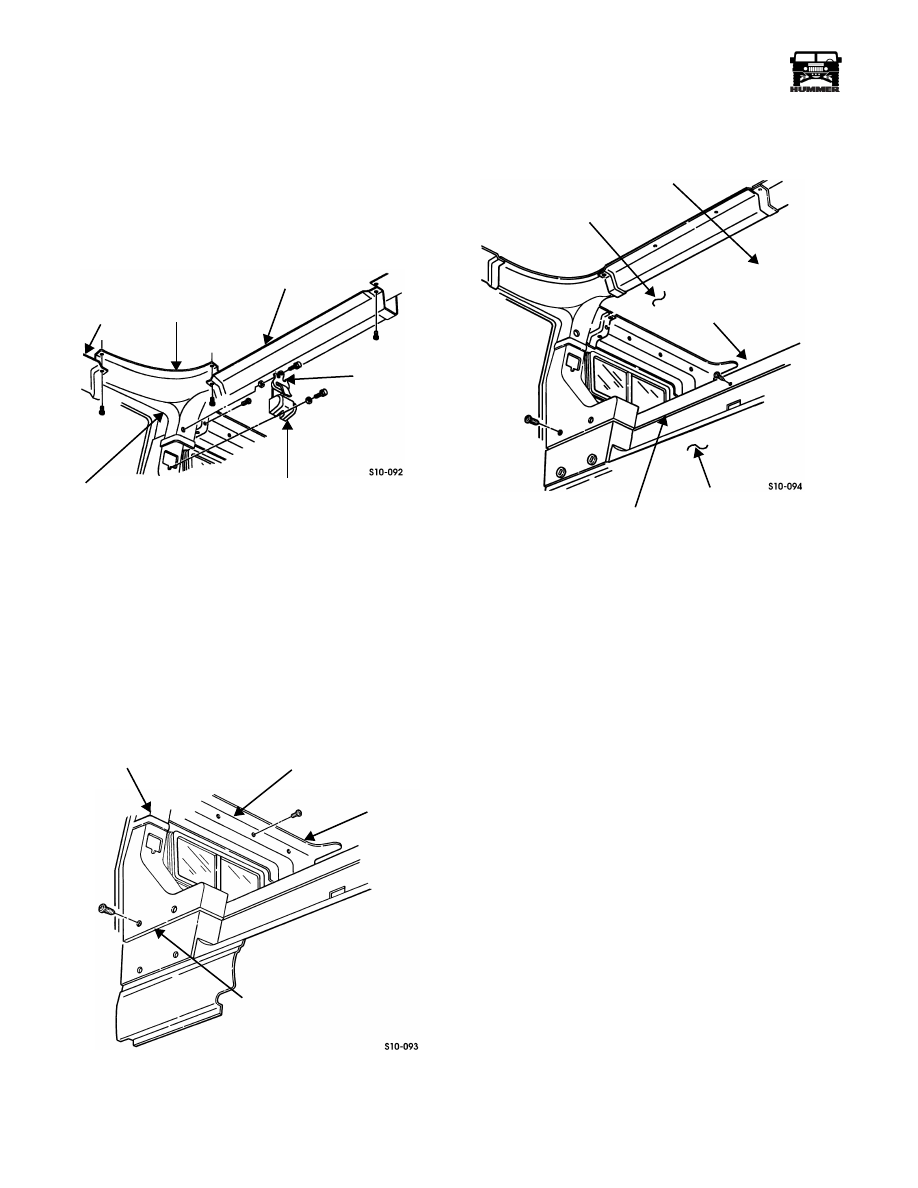
Figure 10-46: C- and B-Pillar Trim Component Iden-
tification
3.
Remove screw/washer assemblies and center trim from C-
pillar.
4.
Remove screw/washer assemblies from edge of trim on
upper B-pillar trim.
5.
Remove screw/washer assemblies and upper C-pillar trim
from C-pillar.
6.
Remove screw/washer assemblies and trim from station
wagon compartment side wall (Figure 10-47).
Figure 10-47: C-Pillar Trim Location
7.
Remove screw/washer assemblies and lower C-pillar trim
from C-pillar.
8.
Remove screw/washer assemblies and two trim panels
from lower rear compartment wall (Figure 10-48).
Figure 10-48: Headliner and Trim Removal
9.
Remove panel fasteners and trim panel from rear
compartment wall.
10. Remove domelight.
11. Remove panel fasteners and rear headliner from roof.
Installation
1.
Secure trim to bottom of rear window.
2.
Secure rear headliner to roof with panel fasteners
(Figure 10-48).
3.
Install domelight.
4.
Secure trim panel to compartment wall with two panel
fasteners.
5.
Secure trim panels to lower rear compartment wall with
screw/washer assemblies.
6.
Secure lower C-pillar trim to lower side of C-pillar with
screw/washer assemblies (Figure 10-49).Secure trim to
upper station wagon compartment side wall with screw/
washer assemblies.
7.
Secure upper C-pillar trim to C-pillar with screw/washer
assemblies.
8.
Secure edge of upper trim on B-pillar with screw/washer
assemblies.
9.
Secure center trim to C-pillar with screw/washer
assemblies.
10. Secure seat belt assembly and bracket to C-pillar with
washers and bolts. Tighten bolts to 35-40 lb-ft (47-55
N•m).
11. Install rear seat.
CENTER TRIM
SEAT BELT
SEAT BELT ASSEMBLY
C-PILLAR
B-PILLAR
BRACKET
UPPER
TRIM
C-PILLAR
UPPER
TRIM
C-PILLAR
STATION WAGON
COMPARTMENT
LOWER C-PILLAR TRIM
SIDE WALL
TRIM
HEADLINER
TRIM
LOWER
CENTER TRIM
PANEL FASTENERS
REAR
COMPARTMENT
WALL
Нет комментариевНе стесняйтесь поделиться с нами вашим ценным мнением.
Текст