DAF LF45, LF55 Series. Manual — part 347

5
LF45/55 series
Removal and installation
WIRING REPAIR
2-19
6. Compress the contact crimping tool: Do not
interrupt the contact crimping before the tool
is completely compressed to the end
position. Only then is full contact crimping
achieved and the tool is opened.
7. Repeat this for the other ends of the buffer
connector.
8. Check the contact crimping for damage and
pull the wires to ensure they are properly
fixed.
Note:
Improper contact crimping means a bad
connection, which may cause failures.
Avoid breathing in the vapours
produced when heating the
crimping insulation.
9. Heat the crimping insulation to fix it properly
to the wire insulation. Ensure that the
insulation does not get burnt. If the
insulation gets burnt it will become brittle
and easily break or crack.
E501493
2.6 REMOVAL AND INSTALLATION, EARTH WIRE
When a failure occurs in an electrical system,
one of the first things to be checked is the earth
connection, with particular attention being paid
to earth connection on the chassis.
Points for special attention when checking
earth connection on chassis
If an earth connection has been removed and is
being re-installed, pay attention to the following:
-
the bolt, nut, earth strip and washers must
be cleaned (e.g. using a steel brush or sand
paper). If a component is corroded, it must
be replaced by a new one.
-
clean all dirt and paint from the area around
the engine/chassis earth connection on both
sides of the chassis member so that the
bare metal is visible.
E501495
3
200440
5
WIRING REPAIR
Removal and installation
LF45/55 series
2-20
-
clean all dirt and paint from the area around
the battery/chassis earth connection on the
inside of the chassis member so that the
bare metal is visible.
-
on the earth strip side, the cleaned area
must be larger than the contact area of the
earth strip.
-
on the nut side, the cleaned area must be
larger than the contact surface of the nut.
-
after fitting the earth connection, a
protective zinc primer should be applied to
both sides of it and it should be painted.
2.7 REPAIRING CAN NETWORK WIRING
When repairing or replacing CAN wiring, the
original twisted lengths and diameters of the
wiring must be taken into consideration. A 10%
tolerance in the twisted length of the wiring is
permitted. Winding density 40-50 turns/m.
When repairing the wiring, the winding density
must be maintained, with the provision that it is
permissible for the wiring at the point of repair to
have no windings over a maximum length of
60 mm. When the wiring is being repaired, it
must be secured in a wire tie at the end and in
the middle.
Replacing CAN wire
1. Measure the length of the original wire
when untwisted.
2. Measure the diameter of the original wire.
Always take a wire of the same diameter or,
if this is not available, of the next size up.
3. Preferably choose a wire of the same colour
as the original wire.
4. Follow the routing of the original wire and
secure the wire in the original way.
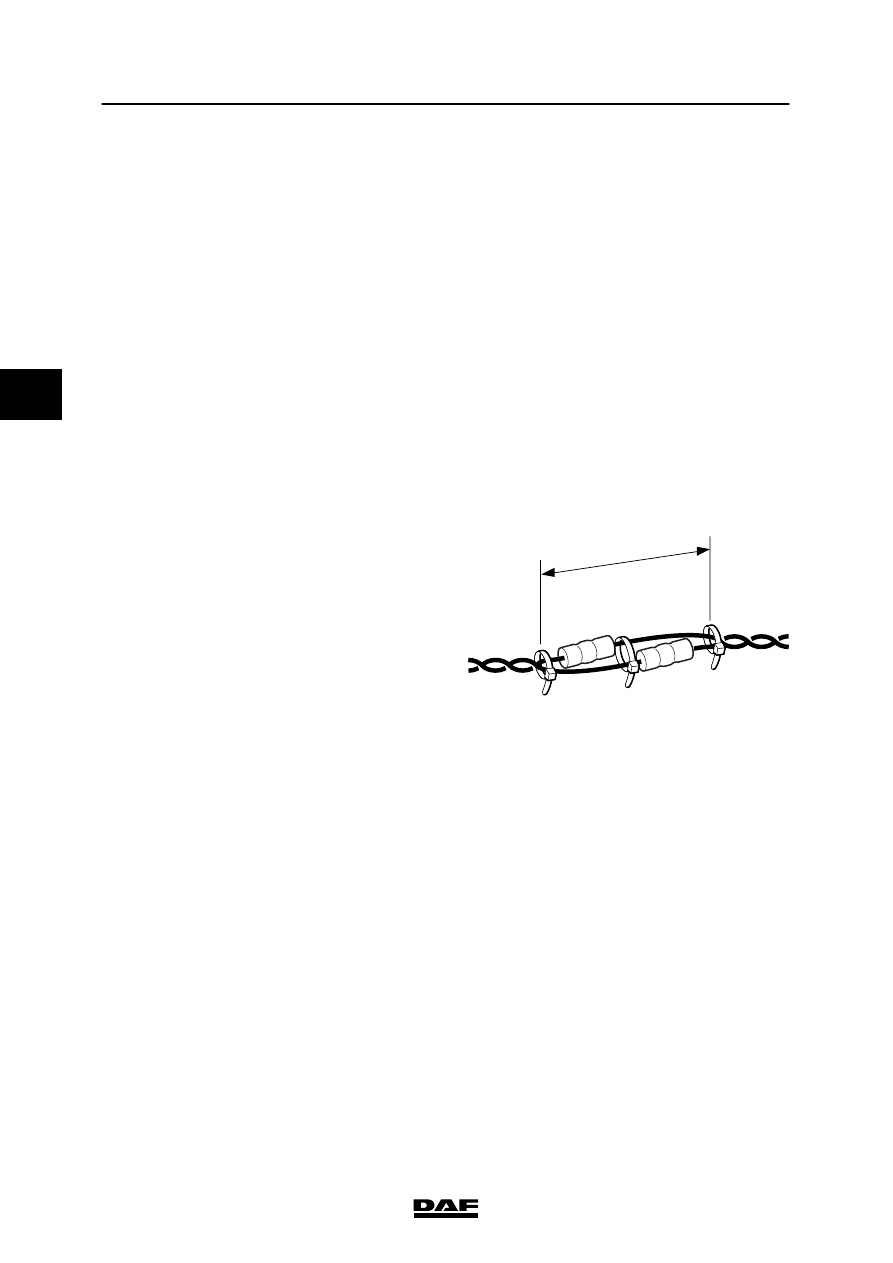
Max. 60mm
E500977
3
200440
5
LF45/55 series
Contents
BATTERIES
1
CONTENTS
Page
Date
1. SAFETY INSTRUCTIONS
1-1
200440
. . . . . . . . . . . . . . . . . . . . . . . . . . . . . . . . . . . . . . . . . . . . . . .
. . . .
1.1
Batteries
1-1
200440
. . . . . . . . . . . . . . . . . . . . . . . . . . . . . . . . . . . . . . . . . . . . . . . . . . . . . . . . .
. . . .
1.2
Battery charging
1-1
200440
. . . . . . . . . . . . . . . . . . . . . . . . . . . . . . . . . . . . . . . . . . . . . . . . . .
. . . .
2. CHARGING BATTERIES
2-1
200440
. . . . . . . . . . . . . . . . . . . . . . . . . . . . . . . . . . . . . . . . . . . . . . . .
. . . .
2.1
General
2-1
200440
. . . . . . . . . . . . . . . . . . . . . . . . . . . . . . . . . . . . . . . . . . . . . . . . . . . . . . . . .
. . . .
2.2
Methods of charging
2-2
200440
. . . . . . . . . . . . . . . . . . . . . . . . . . . . . . . . . . . . . . . . . . . . . .
. . . .
3. STORAGE OF BATTERIES
3-1
200440
. . . . . . . . . . . . . . . . . . . . . . . . . . . . . . . . . . . . . . . . . . . . .
. . . .
3.1
General
3-1
200440
. . . . . . . . . . . . . . . . . . . . . . . . . . . . . . . . . . . . . . . . . . . . . . . . . . . . . . . . .
. . . .
3.2
Storage up to four weeks.
3-1
200440
. . . . . . . . . . . . . . . . . . . . . . . . . . . . . . . . . . . . . . . . . .
. . . .
3.3
Storage for more than four weeks
3-2
200440
. . . . . . . . . . . . . . . . . . . . . . . . . . . . . . . . . . .
. . . .
4. INSPECTION OF BATTERIES
4-1
200440
. . . . . . . . . . . . . . . . . . . . . . . . . . . . . . . . . . . . . . . . . . .
. . . .
4.1
Visual inspection
4-1
200440
. . . . . . . . . . . . . . . . . . . . . . . . . . . . . . . . . . . . . . . . . . . . . . . . . .
. . . .
4.2
Inspection of the charging condition
4-2
200440
. . . . . . . . . . . . . . . . . . . . . . . . . . . . . . . . .
. . . .
4.3
Inspection using a battery tester
4-4
200440
. . . . . . . . . . . . . . . . . . . . . . . . . . . . . . . . . . . .
. . . .
200440
4
5
BATTERIES
Contents
LF45/55 series
2
4
200440
Нет комментариевНе стесняйтесь поделиться с нами вашим ценным мнением.
Текст