Infiniti FX35, FX50 (S51). Manual — part 1975
FRONT WIPER DRIVE ASSEMBLY
WW-123
< REMOVAL AND INSTALLATION >
C
D
E
F
G
H
I
J
K
M
A
B
WW
N
O
P
4.
Disconnect the front wiper motor connector.
5.
Remove the front wiper drive assembly from the vehicle.
INSTALLATION
1.
Install the front wiper drive assembly to the vehicle.
2.
Connect the front wiper motor connector.
3.
Operate the front wiper to move it to the auto stop position.
4.
Install the cowl top cover. Refer to
5.
Install the front wiper arms. Refer to
.
Disassembly and Assembly
INFOID:0000000005234802
DISASSEMBLY
1.
Remove the front wiper linkage 1 and 2 from the front wiper drive assembly.
CAUTION:
Never bend the linkage or damage the plastic part of the ball joint when removing the wiper link-
age.
2.
Remove the front wiper motor mounting screws, and then remove the front wiper motor from the front
wiper frame.
ASSEMBLY
1.
Connect the front wiper motor connector.
2.
Operate the front wiper to move it to the auto stop position.
3.
Disconnect the front wiper motor connector.
4.
Install the front wiper motor to the front wiper frame.
5.
Install the front wiper linkage 2 to the front wiper motor and the front wiper frame.
6.
Install the front wiper linkage 1 to the front wiper frame.
CAUTION:
• Never drop front wiper motor or cause it to come into contact with other parts.
• Be careful for the grease condition at the front wiper motor and front wiper linkage joint
(retainer). Apply Multi
−
purpose grease or an equivalent if necessary.
WW-124
< REMOVAL AND INSTALLATION >
RAIN SENSOR
RAIN SENSOR
Exploded View
INFOID:0000000005234803
CAUTION:
When the rain sensor is removed from windshield, the rain sensor cannot be re-used.
REMOVAL
Removal and Installation
INFOID:0000000005234804
REMOVAL
1.
Remove the inside mirror cover (LH and RH).
2.
Disengage the both sides of metal spring clips, and remove the rain sensor from the windshield.
3.
Disconnect rain sensor connector.
INSTALLATION
Install in the reverse order of removal.
CAUTION:
• Surface of windshield should be cleaned.
• Never touch gel/adhesive of new part.
• Lock the metal spring clips and install the rain sensor securely.
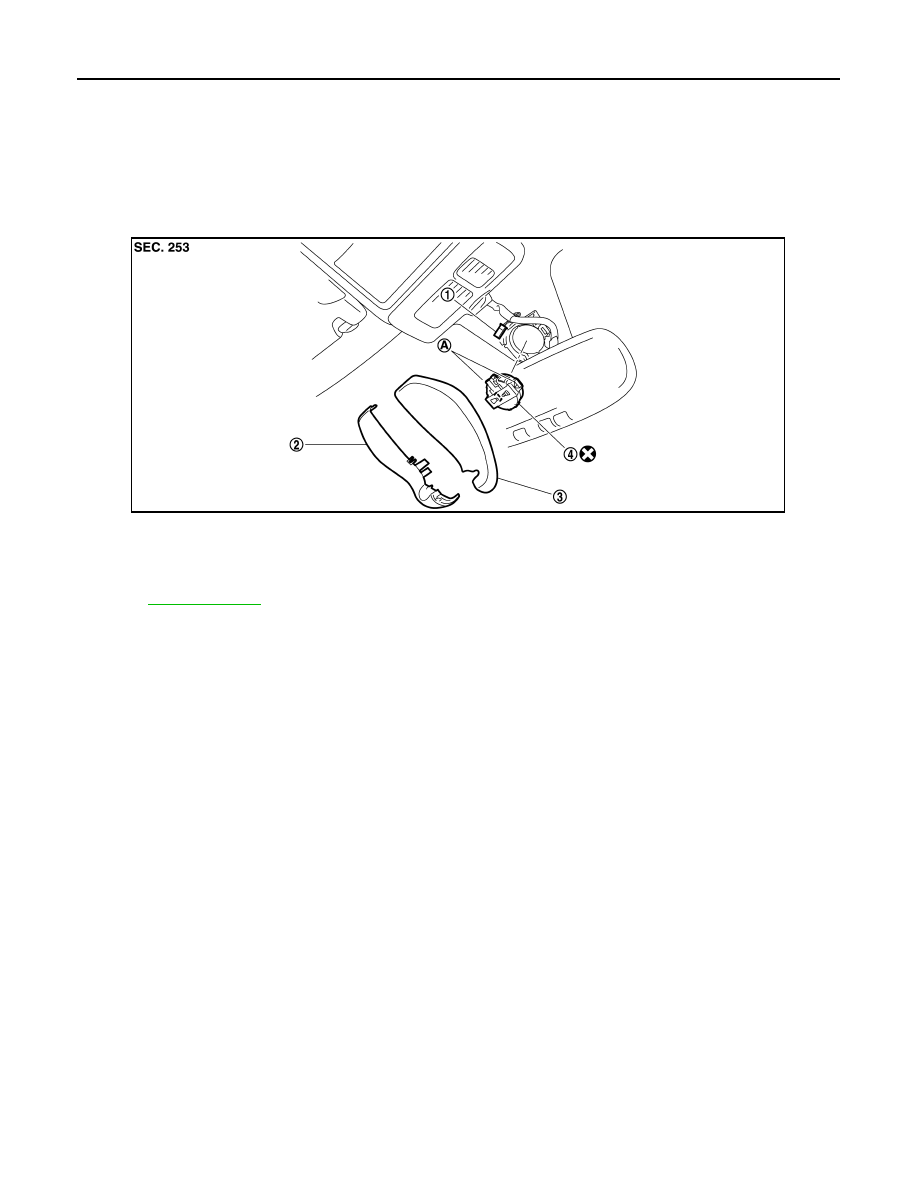
1.
Rain sensor connector
2.
Inside mirror cover (LH)
3.
Inside mirror cover (RH)
4.
Rain sensor
A.
Metal spring clip
Refer to
for symbols in the figure.
JPLIA1234ZZ
WIPER AND WASHER SWITCH
WW-125
< REMOVAL AND INSTALLATION >
C
D
E
F
G
H
I
J
K
M
A
B
WW
N
O
P
WIPER AND WASHER SWITCH
Exploded View
INFOID:0000000005234805
WW-126
< REMOVAL AND INSTALLATION >
REAR WIPER ARM
REAR WIPER ARM
Exploded View
INFOID:0000000005234806
Removal and Installation
INFOID:0000000005234807
REMOVAL
1.
Operate the rear wiper to the auto stop position.
2.
Remove the rear wiper arm cover.
3.
Remove the rear wiper arm mounting nut.
4.
Remove wiper arm from the vehicle.
INSTALLATION
1.
Clean wiper arm mount as shown in the figure to prevent nut
from being loosened.
2.
Operate the rear wiper motor to the auto stop position.
3.
Adjust the rear wiper blade position. Refer to
4.
Install the rear wiper arm by tightening the mounting nut.
5.
Inject the washer fluid.
6.
Operate the rear wiper to the auto stop position.
7.
Check that the rear wiper blades stop at the specified position.
8.
Install the rear wiper arm cover.
Adjustment
INFOID:0000000005234808
REAR WIPER BLADE POSITION ADJUSTMENT
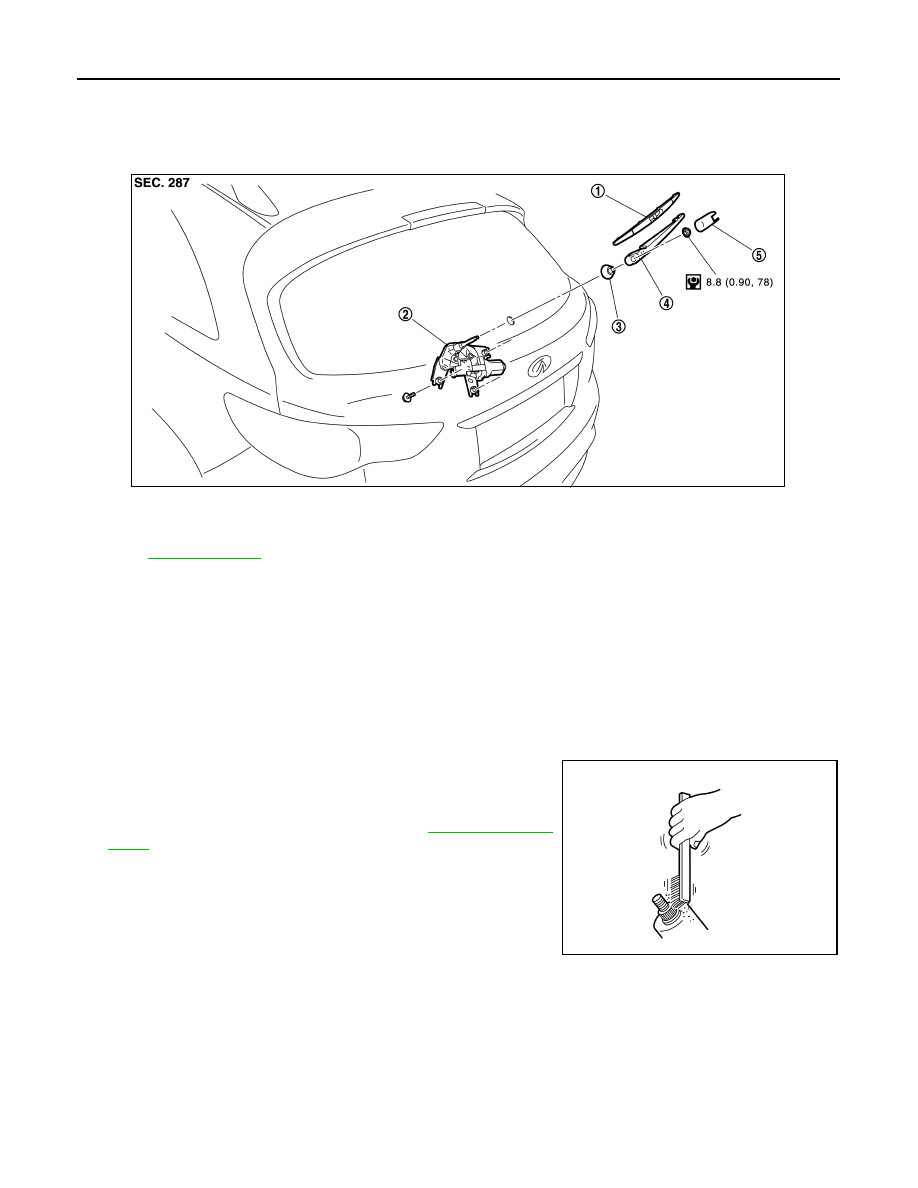
Clearance between the end of back door glass and the top of wiper blade center.
1.
Rear wiper blade
2.
Rear wiper motor
3.
Pivot seal
4.
Rear wiper arm
5.
Rear wiper arm cover
Refer to
for symbols in the figure.
JPLIA1235GB
SKIA0082J
Нет комментариевНе стесняйтесь поделиться с нами вашим ценным мнением.
Текст